Planning to buy a road bicycle? Before any recommendations, I’ll explain what’s important to know. There’s a table of contents right below, so you can jump straight to what interests you. If you have the time and are curious to understand why I’m recommending what I’m recommending – just read on. 🙂
This is not a list of “10 best road bikes to buy in year 20XX,” filled with affiliate links for shops that pay the highest commission to the author (none of the bikes in this article have my affiliate links).
This article is more along the lines of what I’d recommend to my friends if they asked what road bike to buy.
And: What I’d like to explain to the 15-year old me. 🙂
A separate article answers the question: “Which MTB (mountain bicycle) should I buy?“
For buying help and tips, see the article: Buying a bicycle – how to ask for advice?
For my default product & service review stance and philosophy, see:
Products and reviews – CAUTION!
1. What is a road bicycle?
A road bicycle is among the most efficient (“fastest”) bicycle designs for riding on paved roads. It’s got handlebars that are curved downwards (“drop-bars“) that allow for the rider to get into a low, aerodynamic riding position. Gearing is usually made to be “faster” (larger gear ratios) for riding fast.
Climbing on paved roads allows the rider to ride out of the saddle. Climbing steep hills in mud can result in rear-wheel skidding if the rider stands out of the saddle, unweighing the rear wheel. So MTB (Mountain Bike) gear ratios are often designed to be a lot shorter (“slower”).
Road bikes are usually fitted with narrow tyres, for reduced weight and air drag.
In essence: road bikes are light, fast, and with a good fit and model choice, can be among the most comfortable bikes to ride. But they don’t excel in luggage hauling or off-road riding conditions.
1.1. Introduction: the market(ing) and the cycling industry
I think it’s important to explain how things work – for my own peace of mind.
Profit is important, even when it’s against the customers’ interests.
We’re living in capitalism. Companies will advertise and sell you anything for a profit. Even when that is harmful to you. Case in point – we all know what beverage is in the picture below:

Picture 1
I wrote an article explaining the unsafe bicycle industry patents. It’s nothing spectacular, but I’ve seen each of those problems affect people (often myself). Some of those are still widely used.
I also explained the carbon-fiber frame and parts failure mode. I wouldn’t bet my life that every part is scanned after the production – because that costs a lot, and those parts are already very expensive.
Sales and high turnover are important
Large companies don’t make money if you buy a bicycle that’s durable, easy and cheap to maintain.
Modern, and “newer tech,” isn’t always better for you
I wrote articles objectively explaining the pros and cons of suspension, and the pros and cons of disc brakes on bicycles… almost forgot – the ever more popular 1x drivetrains!
The bottom line is that all those “improvements” have their cost. Both in terms of money and other problems they introduce. That’s why it’s important to weigh all the pros and cons, so you don’t end up buying something that creates more problems than it solves (for you), just because it’s “modern and advanced.”
In other words: the interests of manufacturers, sellers, and buyers are often opposed. Not always, but often. That is why it’s important to understand what’s just marketing hype, and what really gives you benefits. Based on your needs and priorities – everybody is different.
Update:
Recently, I wrote an article called “Nonsense in the cycling industry,” which is more of a general type and expresses my personal opinion(s).
Here’s a list of some current road-bike industry trends and patents that provide some advantages, along with some serious drawbacks. Read and decide for yourself what’s the optimal choice for you:
2. Modern patents (that aren’t always beneficial)
Newer and more modern is not always better – not for everyone. As I’ll discuss in this chapter, some of the cycling-industry advancements come at a cost. Both in terms of money and by making maintenance more complicated, requiring special tools. This makes you more reliant on service shops, and it also makes shops’ job more complicated, so you can’t just “hop in” for a quick fix – you will more likely have to leave your bicycle.
Digression:
Bicycle service shops must have at least week-long queues, especially during the cycling season – for reasons explained in my article on bicycle service overload. If you want to avoid waiting for a few weeks to have your bike serviced during the cycling season, seriously consider buying something “less modern.” And, of course, read this website, and watch my YouTube channel to learn how to fix your bike by yourself. 🙂
2.1. Internally routed cables and housing
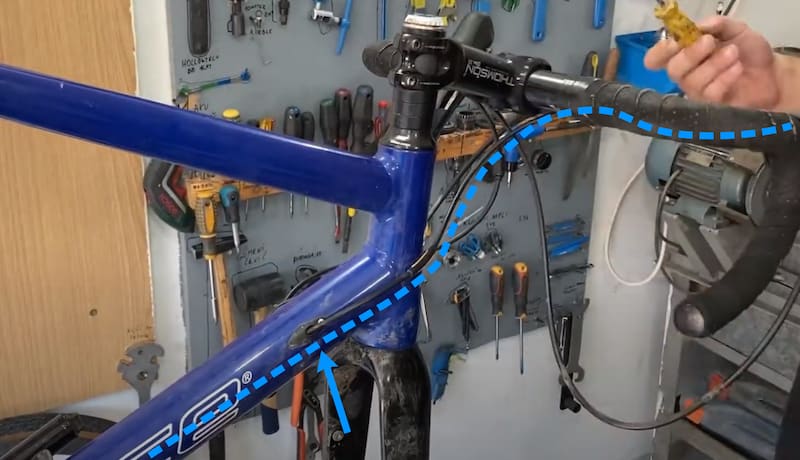
Some people think bikes look more elegant when the cables and housing are hidden. An objective advantage is lower air drag when cables and housing are run beneath the bar tape and through the frame.
What are the the downsides?
Picture 2
In the article about cable and housing routing, I’ve explained why it’s important to have as few direction changes as possible. Housing packed under the bar tape does leave a “cleaner cock-pit,” but it also makes precise shifting more difficult.
It also makes it more difficult to inspect, clean, and replace cables and housing. Yes, there are tools and techniques that make this job possible, but I like joking that there should be a special place in hell for people who design and sell frames with internally routed cables to anyone but top-class TT racers (for whom any extra wind drag really can be a measurable detriment).
Let’s look at the advantages of external cable and housing routing:
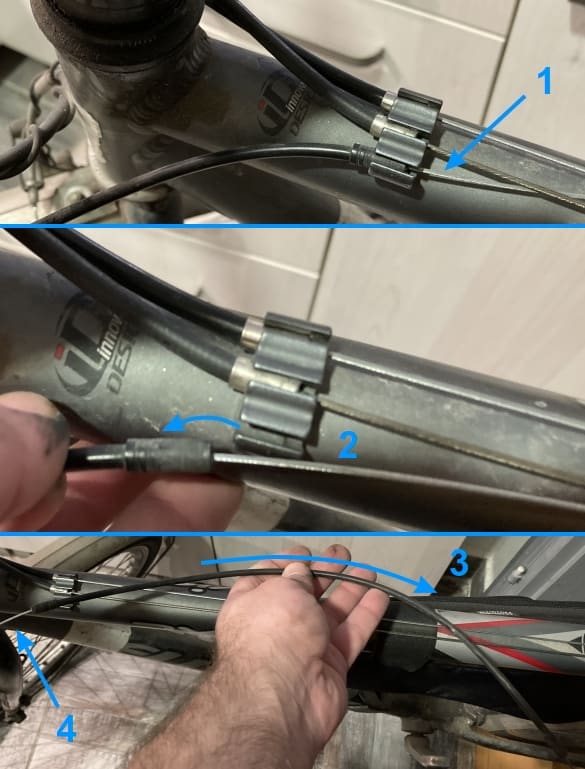
Housing can easily be freed to slide over the cables, without loosening any cable pinch bolts. This allows you to inspect, clean and lubricate cables even on a very dirty bike as shown in picture 3 below. How is this done?
- For brakes, start by loosening the brake quick-release.
- For shifters, first shift onto the largest chainring (either in the back, the front, or both – depending on which housing you wish to release). Or to the smallest rear sprocket if you have a Shimano Rapid-Rise rear derailleur.
- Then click the shifter as many times as it will go, without turning the pedals, so the shifter cable gets slack (if you don’t turn the pedals while clicking the shifter, the derailleurs won’t move, and the cable will become slack) – item 1 in picture 3 below.
- Pull out the housing from the frame cable stop, the slack cable will allow that – item 2 in picture 3.
- Slide the housing to uncover the cable section that was covered by it – item 3 in picture 3.
Picture 3
Simple, faste, easy. Impressive, isn’t it?! 🙂
Of course, with internally routed cables, this can’t be done.
My video on what a good bicycle frame looks like, and why most modern bicycle frames suck:
2.2. Press-fit bottom brackets
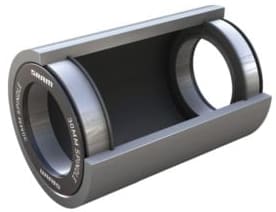
Modern higher-end frames usually have threadless, press-fit bottom brackets. Bearings are practically directly pressed into the frame:
Picture 4
This is a technically superior solution, but only if done properly. Unfortunately, that is seldom the case, so people often have problems with creaking, play, or premature bearing wear because the bearings aren’t aligned. Frame manufacturing tolerances are just not good enough in practice, with a vast majority of frames.
There is a solution, one that allows you to later on just replace the relatively cheap cartridge bearings. You just need to pay about 200 $ once, for a Hambini bottom bracket (link to their website, I still haven’t found the time for an article on why I think that’s the only acceptably good solution on the market).
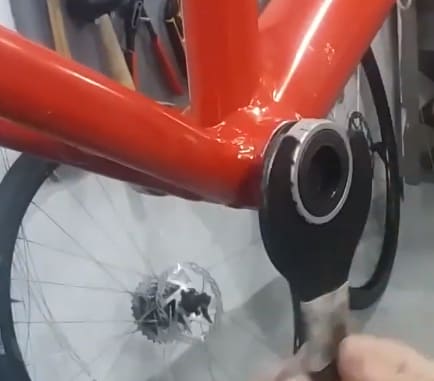
It could be argued that another disadvantage of press-fit bottom brackets is the need for special bearing removal and fitting tools (so you don’t risk any damage). Well, I have five different tools for different threaded bottom bracket standards. And that’s not nearly all – just the most common ones (threaded bottom bracket standards).
Picture 5
So this second “objection” is just partially true. But the problem of fitting and tolerances is a real one. I think that with press-fit bottom bracket bicycles, you should plan the 200-ish dollar investment in a proper bottom bracket.
When I find the time I’ll write in more detail about the Hambini bottom brackets, including the challenges of precise-enough manufacturing which increases the costs.
If a Hambini BB can’t fit or has too much play (and you have purchased the correct model), ask for a frame replacement if it is under warranty!

2.3. Threadless (A-head) stems
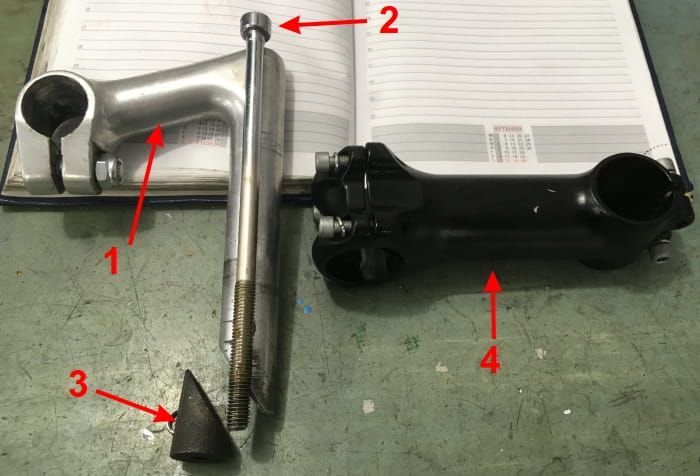
This is one of the few undoubtedly positive advancements in the cycling industry. A safer patent compared to the old quill stems, held in place using only one bolt:
Picture 6
In addition to being safer, threadless stems make setting headset bearings preload a lot easier.
If you are buying a new bicycle, make sure it has a threadless (a-head) stem. For more details, see the article about unsafe bicycle stem patents.
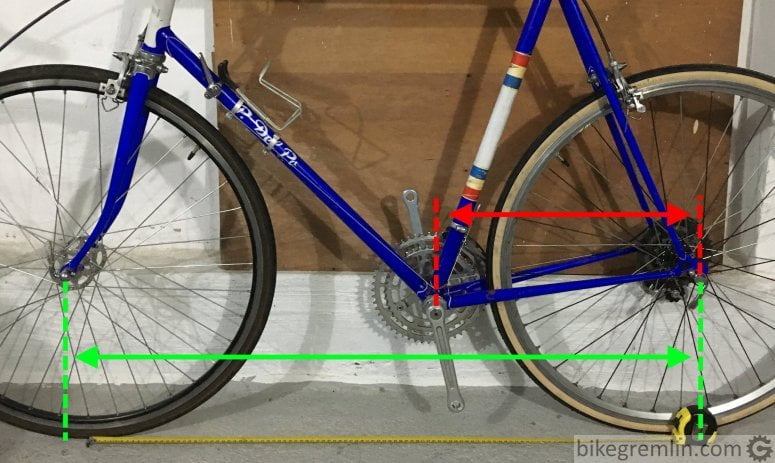
2.4. Short chainstays
Marked with red in picture 7:
Picture 7
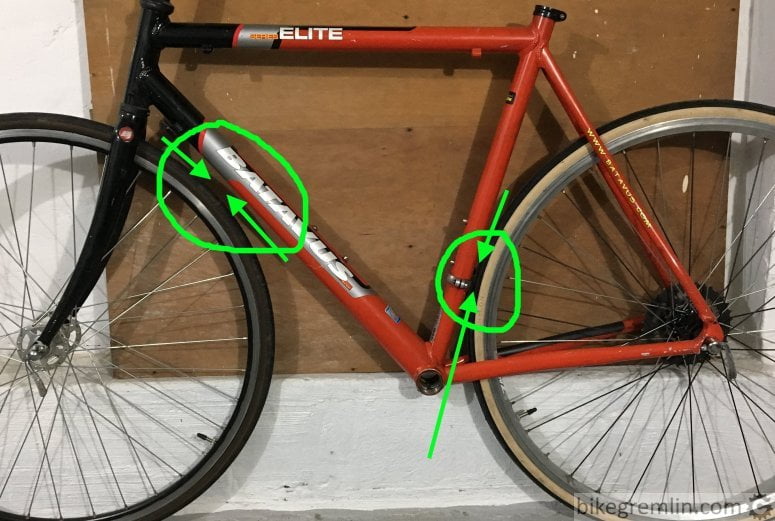
The bicycle in the picture has 45 cm long chainstays. This leaves room for fitting wider, hence also taller tyres. Most modern frames, especially for road bicycles, have short chainstays, of about 41 cm:
Picture 8
Such design has a few more problems:
- The rider is sitting practically directly on top of the rear wheel, making every bump hit go straight to their back.
- The front wheel can more easily become unloaded (or lift) when pedalling hard up hill, while seated.
- Steering is less stable on fast descends.
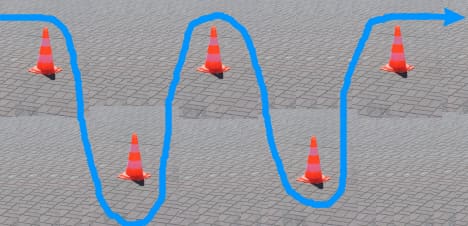
Advantages? The frame is a bit lighter since it has less material. Also, thanks to the shorter wheelbase, you can more quickly finish an obstacle course, if that’s your thing.
Picture 9
I wrote in more details on this in the articles about bicycle frame comfort, and bicycle frame geometry.
2.5. Disc brakes
In a separate article, I explained all the disc brake pros and cons, compared to rim brakes. Briefly: disc brakes have better modulation and braking in the pouring rain, but greater weight, and more complicated and expensive maintenance. With the ever-present risk of the annoying rubbing. They also require stronger, hence heavier fork (see disc brake forks explained).
Based on my experience, high-quality rim brakes are good enough, even for riding in the rain. I’d even argue that disc brakes, especially on road bicycles, are solving a problem that doesn’t exist. Yes, they are “better,” but do read the above-linked article, weigh all the pros and cons, then decide for yourself what’s the optimal choice for you.
Old-style road calipers, modern “mini-V-brakes” and cantilever brakes are good, while I consider the modern road bicycle rim calipers to be problematic:
2.6. Thru-axles vs quick release
Now already old, the quick-release system is an ingeniously simple, quick and secure way to mount wheels onto the frame (invented by the legendary Tullio Campagnolo).
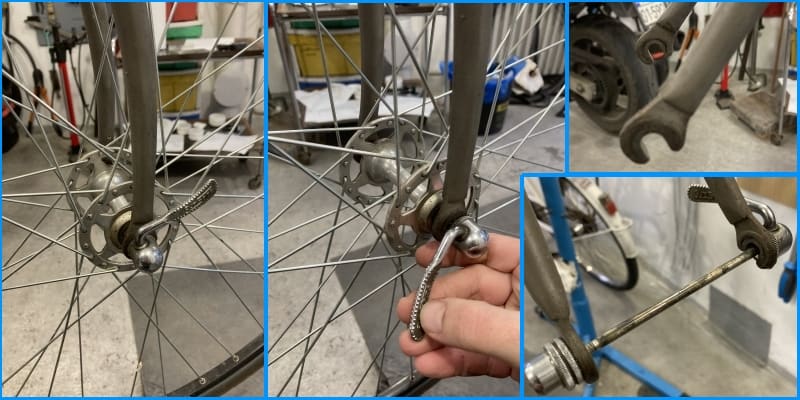
Picture 10
However, front-wheel disc brakes pull the wheel downwards when braking. Moving the brake calliper to the front side of the fork would solve this problem, but no one’s done that! An alternate solution to this problem is for the frame dropouts to be enclosed.
Another problem disc brakes have introduced is how close the brake pads are to the disc – just a fraction of a millimetre away. When you remove a wheel (for say a tyre change), you must return it to the exact same position – within a fraction of a millimetre, or risk some disc brake rub.
Thru-axles solve both of these problems by being screwed directly into the frame, or fork.
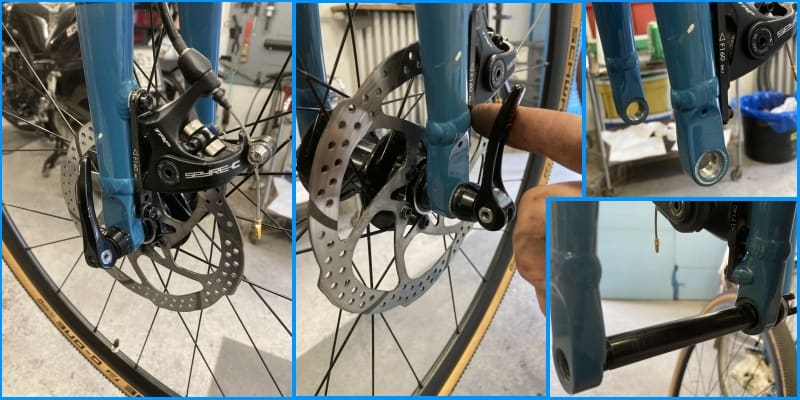
Thanks Garijeva Garaža for the “posing” 🙂
Picture 11
The downsides? Thru-axles are a lot less practical to use (slower wheel replacement) and have many different thread pitch “standards” (hard to source spare ones in my country) but if you are using disc brakes, they are the necessary evil.
2.7. Huge “number of gears”
There’s a trend of adding more and more sprockets on the back wheel – we’re at 13 now (Rotor 1×13 road groupset review). Along with a decrease in the number of front chainrings – we went from triple to double cranks, then to single chainring cranks, the popular “1x drivetrains.” This is not a good idea, especially for road bicycles. More is not always better. I’ll explain by listing the pros and cons.
The rear sprockets (cassette)
The advantages of more sprockets on the rear wheel:
- Smaller differences in the number of teeth between adjacent sprockets – which allows for finer tuning of the desired gear ratio.
- Slightly faster gear shifts – not sure this matters enough even for the racers, but it’s worth not(h)ing.
The downsides:
- More sprockets that are thinner and more tightly packed leaves very little margin for error. This requires perfect condition and tuning of the rear derailleur, as well as the shifter cable and housing. The slightest imperfection can create shifting problems (my YouTube video link).
- Chains and cassettes are more expensive, the more “speeds” they have.
- The rear wheel gets weaker, the wider a cassette is, i.e. the more speeds it has. I’ve made a video explaining how the number of speeds affects the wheel’s strength. The wheels were first weakened by going to 8 speeds, and then furthermore when we went to 11+ speeds.
Front chainrings
For the front chainrings, the modern trend is reducing their number. I’ve explained this in the article about the pros and cons of 1x systems (groups). Briefly:
Systems with three front chainrings provide very “easy gears” for the steep climbs, and very “fast gears” for fast descends (see bicycle gear ratios). In addition to that, they provide quite small differences in adjacent gear ratios, without needing a huge number of rear sprockets to achieve that. The cherry on the top of the cake is they provide all that without the need for much cross-chaining, which prolongs the life of chain and chainrings, and creates lower mechanical (friction) losses.
With 1x systems, the opposite is true for everything stated in the paragraph above. 🙂
Systems with two chainrings are somewhere in between. They are probably the sweet spot for road bicycles when all the pros and cons are considered. Except for the people who like riding up long, steep climbs and aren’t in excellent shape – in that case, a triple is a better idea.
The downside of triple chainring systems is they are a bit heavier (three chainrings are heavier than two), and they require a front derailleur (unlike the 1x systems). Another downside is that you need to think about the front shifting as well – some people find this complicated.
I think it’s nice having three front chainrings, or at least two, while I prefer up to 8 sprockets at the rear wheel. Paired with some friction shifters – because they are simple and bomb-proof.
2.8. Combined shifter and brake levers (STI, “brifters”)
2.8.1. Friction shifters
I’ll start this chapter with a bit of history. One of the first shifters for bicycles were friction shifters. They had no indexed clicks – you just pulled, or pushed on the lever until a gear change occurred. This required some more concentration when shifting gears, but it gave no problems with derailleur tuning – there is none! 🙂 You just needed to set the derailleur limit screws so that it can’t move the chain completely off all the chainrings.
Their mechanism was very simple, robust – “bomb-proof.”
2.8.2. Down-tube shifters
Shifters were often mounted on the down-tube, hence called “down-tube shifters.”
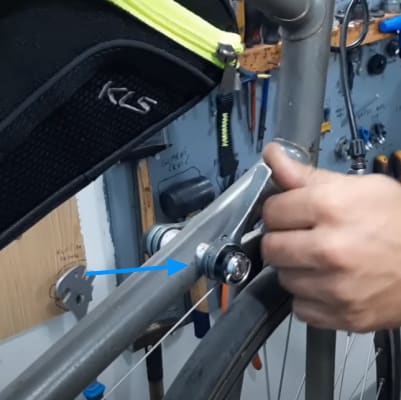
Picture 12
The downside of these shifters is they aren’t at the rider’s fingertips – you need to take your hand off the bars and reach down for the shifter to change gears.
2.8.3. Bar-end shifters
The next evolutionary step are the shifters designed to be mounted at the end of the handlebars – named “bar-end shifters.” With this system, shifters are more conveniently placed – not perfect, but better.
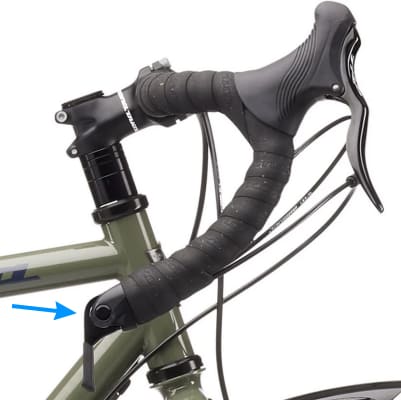
Picture 13
Note that not all the down-tube and bar-end shifters are friction. Some have an option of switching between friction, and indexed mode, while others are indexed-only.
2.8.4. Indexed shifters
Indexed shifters have a click for every gear change, and they pull a pre-set amount of cable with each click – requiring less concentration when shifting. The downside of such shifters: derailleurs and the number of sprockets need to be matched (compatible), otherwise the shifting won’t work properly. I explained this in the article about rear shifter compatibility.
Another downside is they need to be properly (perfectly) tuned before the ride. Otherwise: you click, and get some chain rattling, with, or even without a gear change. Friction shifters, on the other hand, are immune to this problem.
2.8.5. Brifters (STI-s) – and electronic brifters
Modern trend are combined shifter and brake levers – called “brifters,” or STI (Shimano Total Integration).
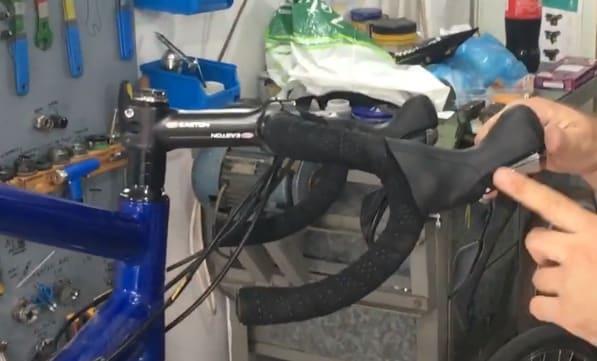
Picture 14
This is the most ergonomic option – you can shift gears with your hands on the hoods, or in the drops. A huge leap compared to everything else.
However, brifters have some downsides:
- They are indexed, with all the pros and cons of indexed shifters.
- More expensive – around 200 $ for a higher-mid class pair of brifters.
- A lot less robust and durable.
- Not designed to be serviceable.
I’ve had a brifter fail mid-ride, without any prior warning – on a well tuned and maintained bicycle. And I know of more such cases (if they lied to me, then I’m lying to you).
A huge majority of the new road bicycles come with brifters.
The newest trend being the electronic brifters (and derailleurs). This works great while it works. You do have to worry about charging the batteries. Besides – in addition to mechanics, there’s also some electronics that can break down, and it’s designed to make any repairs complicated and expensive.
2.8.6. Gevenalle bomb-proof “brifters”
Gevenalle company makes durable and robust brifter alternatives. Selling brake levers with mounts for down-tube shifters – either friction or indexed ones. They aren’t cheap, but they’re bomb-proof – unlike most brifters. The basic principle is shown in picture 15:
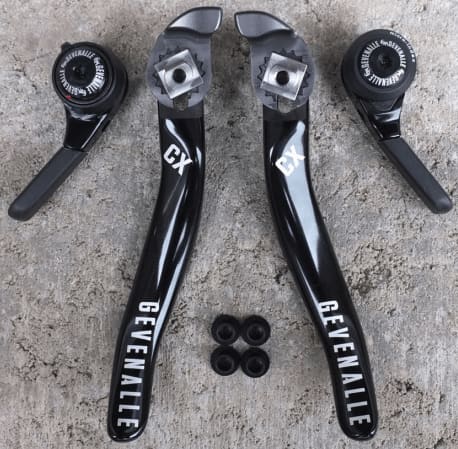
Picture 15
This is Gevenalle AUDAX model, with mounted friction shifters:
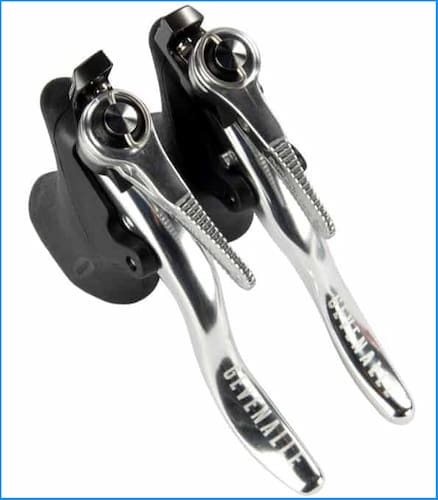
Picture 16
Gevenalle AUDAX is made in two variants: for road brakes, and for MTB brakes (like V-brakes and mechanical disc brakes). For more details see my article on mechanical brake compatibility.
2.9. Carbon fiber frames and forks
In my article about bicycle frame materials, I’ve dedicated an entire chapter to carbon – its properties, pros and cons. Briefly:
Carbon fiber frames are very light, strong, durable – and expensive.
However, when carbon fails, it usually fails suddenly, completely, and without prior warning. This could happen in traffic, or on a down-hill. Manufacturer’s don’t scan every frame, so that’s up to the customers if they don’t want to risk a sudden failure.
Add the cost of a proper x-ray or ultrasonic scan by a certified shop to the cost of your new carbon bike, or even a metal-frame bike if it comes with a carbon fork (very popular practically unavoidable with metal-frame road bikes nowadays).
Again: it’s the failure mode of carbon that’s scary. Metal frames show cracks on the outside before they fail, so it can be noticed in time. Carbon often looks perfectly fine, until it suddenly fails completely (catastrophically).
On the other hand, if a scan confirms there are no manufacturing defects (voids, delamination), then you’re good, and can last for decades.
For more details, read about the pros and cons of carbon-fiber as a bicycle frame material.
2.10. Wheels with very few spokes
Low spoke-count wheels are modern now. Often just over 20 spokes for the rear, and under 20 spokes for the front wheel. With extra style-points, if the spokes are exotic – like “aero” (with a thin, flat mid-section). Exotic spokes are more expensive and more difficult to source if a spoke needs replacing.
Having fewer spokes, especially if they are aero, creates a bit less wind drag. Is this important? For competitors in good shape, certainly. Some argue that fewer spokes result in lighter wheels, but rims held on with just a few spokes need to be stronger, hence heavier – so any gains in lower spoke-count are negated to a great degree.
On new road bikes with rim brakes, front wheels are often radially laced. Radial lacing pattern puts more stress on the hub’s flanges but might save a few grams, and give extra style-points.
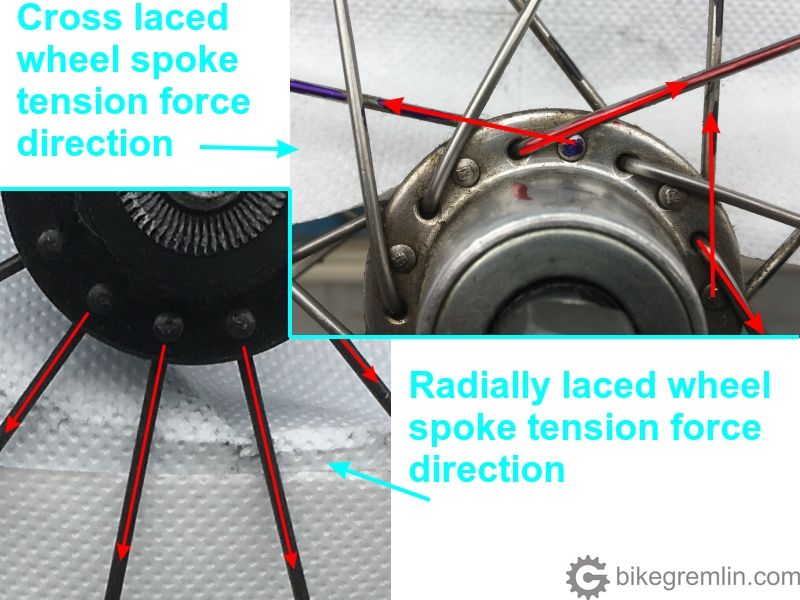
Picture 17
If a wheel has only 24, or fewer spokes, in case only one spoke breaks, the rim might go out of true so much it catches onto the frame. With 36-spoked wheels, one spoke breaking can sometimes go completely unnoticed during a ride, the wheel hardly comes out of true, by just a little.
I’ve explained this in the article about bicycle wheel building basics, but the bottom line is that having fewer than 36 spokes makes little sense for recreational, non-competitive riding (in my opinion & experience).
2.11. Tubeless tyres
Tubeless are the tyres without the (inner) tubes. They require special rims for tubeless tyres, or at least “tubeless-ready” rims. Tubeless-ready rims can be “turned” into tubeless rims by mounting a special sealing rim-tape.
Tubeless tyres have several advantages:
- They’re a bit lighter because there’s no tube.
- They can be run at very low pressures, without the risk of snakebite punctures if you hit a rock.
This feature is more important for off-road riding, on mud, or sand, where low pressure increases traction and grip. - Thanks to the special sealant that is poured into tubeless tyres, they can “self-seal” smaller punctures (thorns or similar).
- It could also be argued that tubeless tyres have a bit lower rolling resistance (all else being equal).
Unfortunately, tubeless tyres also have downsides:
- They require a special sealant to be poured into the tyres, and regularly replaced, at least every six months.
- For the first inflation after mounting (or replacing) a tubeless tyre, a compressor is often required. They need to be inflated very rapidly in order to stick the tyre to the rim and create a seal.
- In case of larger holes that don’t self-seal, your in for a tough, dirty job of removing the sealant-messed tyre, removing the tubeless valve, inserting a tube and then mounting the tyre back onto the rim.
Likewise, if the tyre loses enough pressure to get unstuck from the rim, for whatever reason, you might need a compressor, or a CO2 pump to inflate the tyre.
A separate article gives you a more detailed explanation of tubeless bicycle tyre pros and cons.
My personal opinion is that tubeless tyres make some sense on mountain bikes, but on road bikes they are more of a hassle, than an improvement.
2.12. Hookless rims
Hookless rims often go hand-in-hand with tubeless tyres. It’s generally not safe to mount non-tubeless tyres on hookless rims, because the tyres must have thick and hard enough sidewalls to not fly off the hookless rims. Hooked rims were invented decades ago, for that reason – to keep the tyres more securely in place. Now, hookless rims are making a comeback, because that’s cheaper to manufacture from carbon fiber (mould is simpler and the manufacturing process is a lot faster).
I wrote a whole article about hookless rims pros and cons.
3. Problems with giving any buying advice
People often ask me for advice on buying a bicycle. When giving advice, I try to understand their needs, priorities, and, of course, budget.
For making this article, I looked at hundreds of websites and web-shops, selling road bicycles. My impression:
- if you are looking for a road bicycle that handles nicely, shifts and brakes properly, but that is also simple and cheap for maintenance (if not for purchasing) – the offer is very, very slim.
- If you are willing to put up with more complicated and more expensive maintenance, and with a bicycle that isn’t very robust, then the offer is great. Especially if you have several thousands of dollars at your disposal.
- For those on a budget – I’ll explain in the following paragraph:
To use an analogy: frame is the spine, and the heart of a bicycle. Good wheels are the next most important thing – wheels are the legs.
However, with not-too-expensive bicycles, manufacturers cut costs on these items. They add things that are easy to market and sell, like higher end rear derailleur, greater number of “speeds” etc.
So, for under 1,000 $ you won’t get a high quality frame and wheels, with “only” 2×8 speeds and friction bar-end shifters. You will most likely get at least 9 speeds, with brifters, probably a carbon-fiber fork (with all the pros and cons) and lower end mass-produced aluminium frame. Also, disc brakes are becoming unavoidable, whether you want them, or not.
On top of that, most road bikes’ frame geometry seems designed for fit competitors – with a short wheelbase, and bars put so low, that an average cyclist won’t feel comfortable riding in the drops.
Because of this it’s very difficult for me to recommend a road bicycle for people on a tight budget, or for those who are not in a very good shape. In many cases (not all) I had to recommend “the least bad” option, not being able to find something really good.
The cherry on the top of the cake is I’m not able to personally test most of the bicycles. The market supply for my country (Serbia) is awful. I have to rely on the available pictures, geometry specs, other riders’ feedback, and my knowledge and previous experience with road bikes of various frame geometries and groupset classes.
4. Road bicycle buying recommendations
At the time of writing the first version of this article, in the spring of 2021 (I try to keep all my articles up-to-date), there’s a huge demand for bicycles. Shops’ stocks are practically non-existent, and bicycle repair shops are overloaded. Some of the bikes I recommend might just not be available. That’s why I’ve made an effort to explain the reasoning behind my recommendations, hoping that will help you make a good decision, whichever bicycle you like and find to be available.
4.0. IMPORTANT notes – frame size and handlebar width
Make sure to get a bike with a frame size that fits you. This is especially important if you are buying a bicycle online (Amazon etc.), i.e. if you can’t test-ride it before the purchase.
Assume that even with a new bicycle, you will need to replace the following parts with those that you prefer (after some experience and trying out different models to see what fits you):
- Saddle – how to choose a comfortable saddle.
- Pedals – pedal types and standards.
- Handlebars – drop-bar types and geometry.
A few more important things about frame size:
High-quality modern road bike frames are usually sold like the T-shirts, in sizes: S, M, L, XL… 🙂
Manufacturers provide a list of rider heights (in cm, or feet & inches) that fit a given frame size. For example, here’s the sizing chart for the Giant TCR Advanced Pro 1 road bike:

Table 1
If you need it: an on-line feet & inch to cm converter (give me the metric system, or give me death! 🙂 ).
As you can see from the table 1, a 173 cm tall cyclist can choose either S, or an M sized frame. The choice boils down to personal preference (some people prefer smaller frames). But such a rider should not choose an L sized frame – it will be too big, and won’t fit.
Some sellers only state the seat tube length – in inches, or centimetres. In the article on how to choose a correct bicycle frame size, I’ve explained why such numbers are useless without the manufacturer’s sizing charts. Here, I’ll just put a picture explaining the problem:
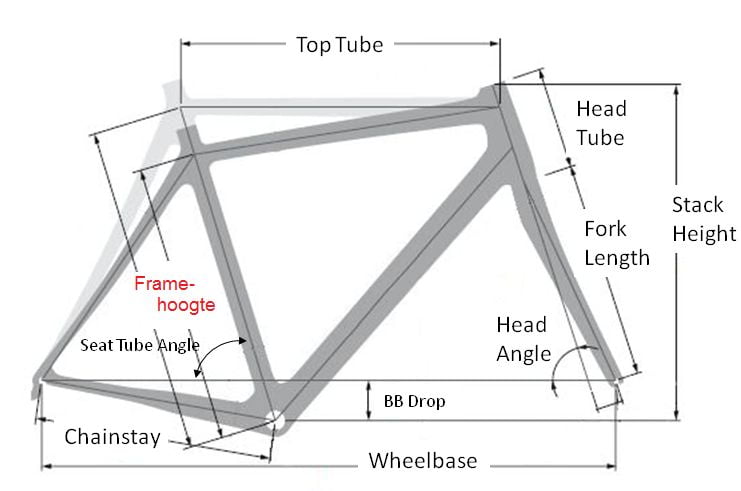
They are effectivelly the same size!
Fitting the riders of the same heights.
Picture 18
So, if someone tells you: “you should get an 18 inch frame,” know that the person may not know what they are talking about.
Such statements only make sense when they are referring to a particular frame (bicycle) model. For example:
“For the Giant TCR Advanced Pro 1, you need an 18.5-inch seat tube length” (which is the M size frame for that particular model).
4.1. Budget opion 1 – old (retro, vintage) bicycle
Old (“vintage”) frames, or whole bicycles, can be a good option if you wish to save some money. However, not every vintage frame is easily used with currently available spare parts (primarily bottom brackets and rear wheel hubs).
I wrote an article explaining what to pay attention to, what could be possible “deal breakers,” and what kind of frames are suitable for this. The article has a video at the end, showing what I’ve explained.
Link to the article: Vintage bicycle frames with modern parts.
4.2. Budget option 2 – used (2nd hand) bicycle
Buying a used (2nd hand) road bike can be a good option for those looking to save some money. High-end used bicycles can sometimes cost about half the price of a new bicycle of similar “class.” But, there is a catch.
If you are not an expert, a cheaper used bike can end up costing you a lot more. Any worn or damaged parts will have to be replaced. Do you have the tools and the knowledge, or will you pay a mechanic for that?
To help you with this, I wrote an article explaining how to check a used bike’s condition. At the end of the article is a video, where I show how it’s done “in real life.”
Link to the article: how to inspect a used bicycle before buying.
4.3. Budget option 3 – new low-end road bike
Here’s a good candidate for a new road bicycle below 1.000 $:
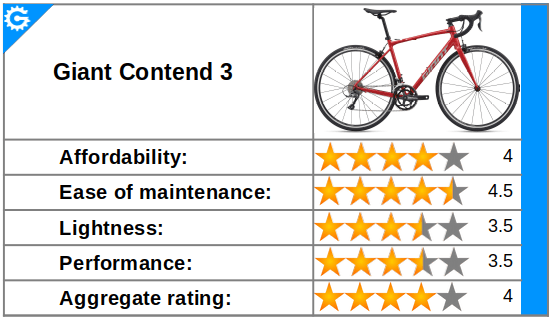
Giant Contend 3
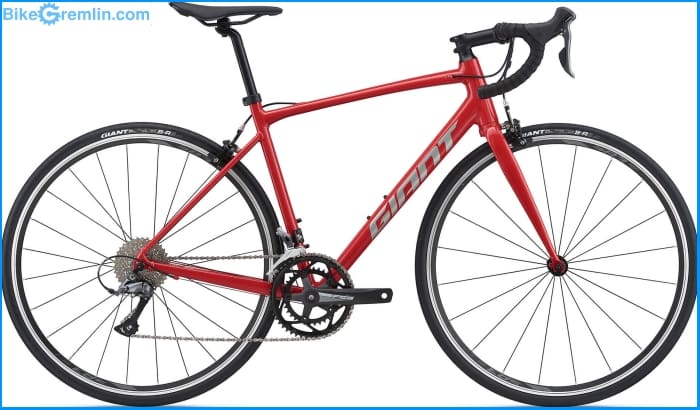
Picture 19
Based on the info from Giant’s official website (www.giant-bicycles.com):
- Price: around 800 $.
- Frame: aluminium.
- Fork: aluminium, threadless (“ahead”), with mudguard mounts.
- Handlebars: aluminium, with compact geometry.
- Shifters: Shimano Claris brifters.
- Front derailleur: Shimano Claris.
- Rear derailleur: Shimano Claris.
- Cranks: FSA Tempo, with two chainrings – 50, and 34 teeth.
A huge gap between the two, but you get a wide gearing range. - Cassette: Shimano Claris HG-50, with 8 sprockets, from 11 to 34 teeth.
You get 2-tooth “jumps” over the “faster” end of the cassette, but a lot of low gearing range. The configuration is:
11-13-15-18-21-24-28-34 teeth. - Chain: KMC Z72 – a low-end chain that doesn’t last very long – but you can replace it with a more durable KMC X-8 once it’s worn (Amazon affiliate link).
- Bottom bracket: British standard threaded cartridge (for all I can tell) – easy to find, and cheap to replace.
- Brakes: Tektro B177.
- Hubs: Giant hubs, don’t know who makes those for Giant, nor how good they are.
- Rims: double-walled aluminium. The front has 20, the rear has 24 spokes.
The front wheel is radially laced, which can’t be avoided with modern rim-brake road bikes. It’s nonsense, it’s not good, but it looks better, and you save a few grams for using a bit shorter spokes. Add a few more buzzwords like “aero,” “more responsive,” etc. – per your liking. - Tyres: Giant S-R3 AC, 28 mm wide (that’s the optimal width for road bike tyres in my opinion and experience).
My tyres of choice for road bikes are Continental Grand Prix 4000, 5000, or 4 seasons, preferably 28 mm wide (Amazon affiliate link).
My comment:
This bike is reasonably made to save costs but still provide decent shifting and braking, without being too heavy. The frame and the fork are designed to take wider tyres, and the factory 28 mm wide ones should provide good grip and comfort. It has low enough gearing for the long, steep climbs, and high enough gearing for the straights with a strong wind at one’s back.
Cables are routed internally, which makes replacing them a bit more complicated – internal cable routing seems hardly avoidable with the modern bikes.
The wheels are attached using a quick-release mechanism, as road bike wheels should be! 🙂
My video explaining the ingenuity of the quick-release mechanism.
4.4. Road bicycle for women
When you compare a woman and a man of the exact same height, the woman will have longer legs and a shorter torso, compared to the man.
Frame design should ideally take this into consideration. Compared to a “men’s” bike, a road bike for women should have the bars set a bit higher, relative to the cranks (that’s called “stack“).
Women also have narrower shoulders, requiring narrower handlebars. Smaller feet, so the average saddle position is just a wee bit closer to the front, compared even to a man with the same leg length.
Clarification: here, I am not discussing the frames without the horizontal top-tube (“step-through” frames), which are generally regarded as “women’s” bikes – I’m talking about the real road bicycles, designed to better fit a woman. And no, I’m not paid by the Giant company – for all I know, they don’t even know this article exists. 🙂
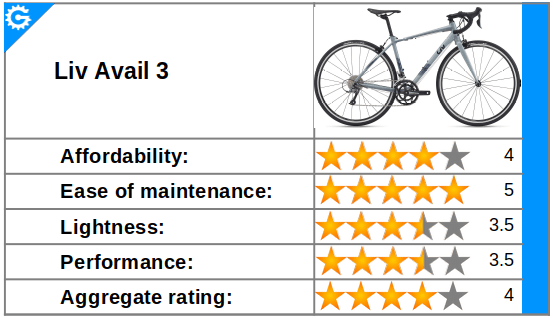
With that out of the way, Giant’s sister company “Liv” (www.liv-cycling.com) sells bikes designed for women, with the above noted in mind. My first pick on a budget would be:
Liv Avail 3
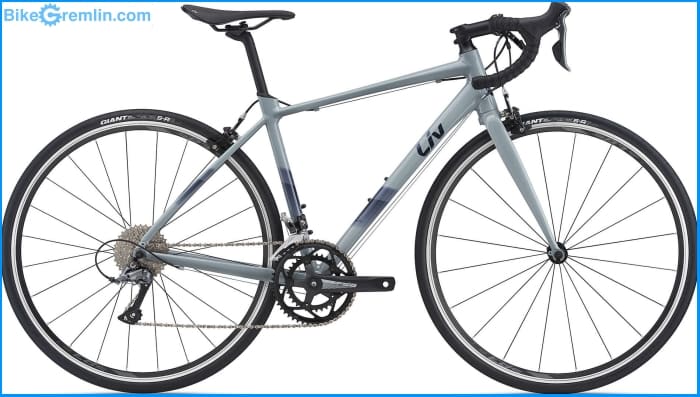
Picture 20
- Price: around 800 $.
- Frame: aluminium.
- Fork: aluminium, threadless (“ahead”), with mudguard mounts.
- Handlebars: aluminium, with compact geometry.
- Shifters: Shimano Claris brifters.
- Front derailleur: Shimano Claris.
- Rear derailleur: Shimano Claris.
- Cranks: FSA Tempo, with two chainrings – 50, and 34 teeth.
A huge gap between the two, but you get a wide gearing range. - Cassette: Shimano Claris HG-50, with 8 sprockets, from 11 to 34 teeth.
You get 2-tooth “jumps” over the “faster” end of the cassette, but a lot of low gearing range. The configuration is:
11-13-15-18-21-24-28-34 teeth. - Chain: KMC Z83 – a low-end chain that doesn’t last very long – but you can replace it with a more durable KMC X-8 once it’s worn (Amazon affiliate link).
- Bottom bracket: British standard threaded cartridge (for all I can tell) – easy to find, and cheap to replace.
- Brakes: Tektro B177.
- Hubs: Giant hubs, don’t know who makes those for Giant, nor how good they are.
- Rims: double-walled aluminium. The front has 20, the rear has 24 spokes.
The front wheel is radially laced, which can’t be avoided with modern rim-brake road bikes. It’s nonsense, it’s not good, but it looks better, and you save a few grams for using a bit shorter spokes. Add a few more buzzwords like “aero,” “more responsive,” etc. – per your liking. - Tyres: Giant S-R3 AC, 28 mm wide (that’s the optimal width for road bike tyres in my opinion and experience).
My tyres of choice for road bikes are Continental Grand Prix 4000, 5000, or 4 seasons, preferably 28 mm wide (Amazon affiliate link).
My thoughts:
Compared to the above discussed Giant Contend 3, this bicycle is very similar, apart from the geometry and configuration being more suitable for a female physique. A great plus in my book is that this one has external cable routing, which makes this bike’s maintenance as simple, and cheap as it gets!
Everything else is as similar as it can be, so you can read my thoughts on the Giant Contend.
4.5. Mid-high class road bicycle
You want a bicycle that is very light? Think that carbon-fiber frames & forks are the way to go? Like to have adjacent rear sprocket sizes differ by only one tooth? Think that internally routed cables look cool and are generally a good idea?
Well, even if you don’t, there’s not much choice in the higher-end road bicycle market. Ladies and gentlemen, without further ado, I present the:
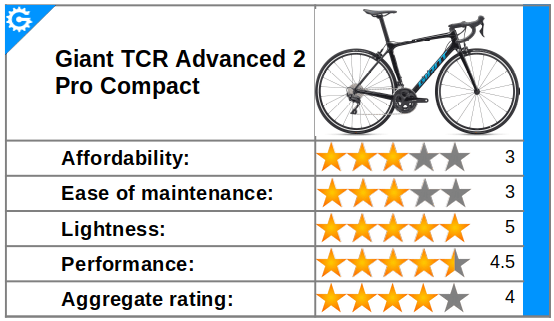
Giant TCR Advanced 2 Pro Compact
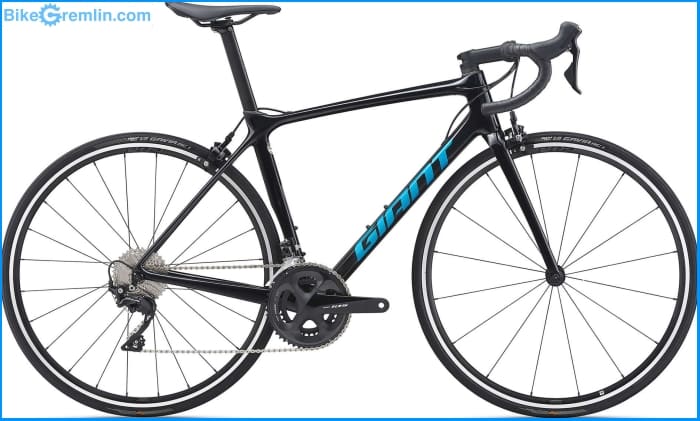
Picture 21
The details are given on Giant’s website (www.giant-bicycles.com).
- Price: around 2,200 $.
- Frame: carbon-fiber.
- Fork: carbon-fiber, threadless.
- Bars: aluminium, with compact geometry.
- Shifters: Shimano 105 brifters.
- Front derailleur: Shimano 105.
- Rear derailleur: Shimano 105.
- Cranks: Shimano 105, two chainrings – 52, and 36 teeth.
- Cassette: 11 sprockets (“speeds”), from 11 to 30 teeth.
- Chain: KMC X11EL-1 – high quality, long-lasting.
- Bottom bracket: Shimano, press-fit.
- Brakes: Shimano 105.
- Hubs: Giant (I don’t know who makes hubs for Giant).
- Rims: aluminium, double-walled. The front one has only 16 spokes, the rear has 24 spokes.
- Tyres: Giant Gavia AC 1, tubeless, 700x28mm, folding.
My opinion:
Modern, very light bicycle, with a bit more aggressive gemoetry for faster riding. A lot of rear sprockets allow for adjacent gear ratios to be very closely packed, which is appreciated by those who like to always be in the “ideal” gear. With the given front and rear chainring sizes, the not-very-fit people might find it lacking on steep, long climbs.
Very tall and very strong riders might find the rear end to be a bit less stiff than perfect, especially during the sprints (frames smaller than the XL size don’t get any such complaints). Speaking of frames, Giant generally makes high-quality carbon-fiber frames – I wouldn’t expect any problems with creaking press-fit bottom brackets with this bike.
The tyres are tubeless (with all the pros and cons of this modern system), 28 mm wide, which helps make the ride comfortable even on bumpy roads, without any measurable performance penalty.
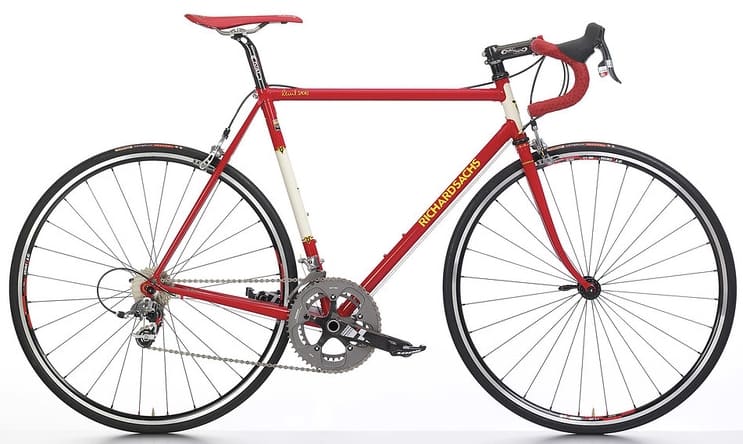
4.6. Richard Sachs – Hand-made bicycles
Richard Sachs (link to his website) is an old man (nowadays this has become an insult, but it’s not how I mean it) who has decades of experience and a lifetime of expertise in building bicycle frames and forks. I’m “using” Mr Sachs as a shiny example of a concept: sensibly and properly built bicycles. I.e. bicycles that have none of the (questionably useful) stuff explained in the 2nd chapter.
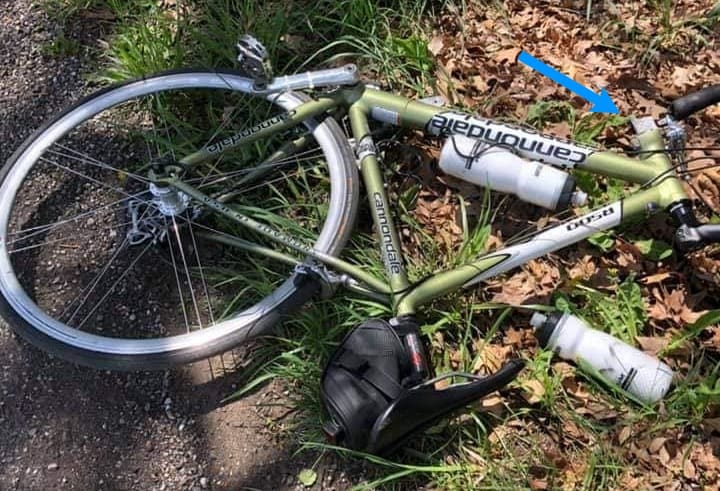
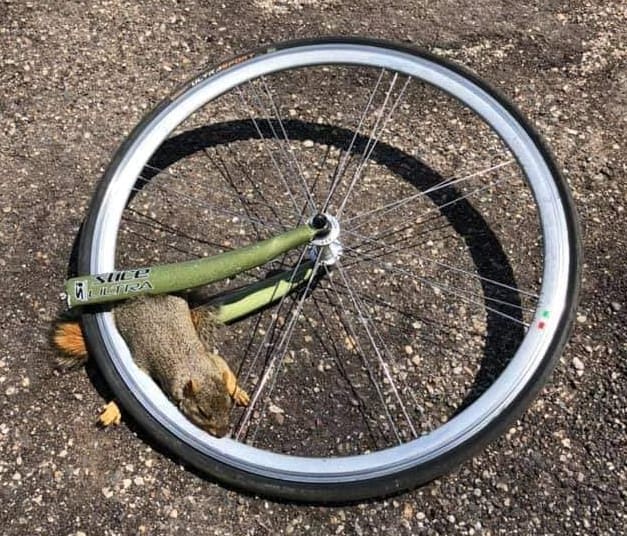
There’s an important safety concern with many (most) modern bikes: forks are built to be as light as possible, hence they are weaker than the frame. Such forks are more likely to break from material fatigue, than the frames. The same goes in case of an accident – such a fork is more likely to snap, with the frame intact, sending the rider face-down.
Here’s an example of a modern frame, where the fork had snapped instantly, so the rider’s helmet had to do a lot of work:
Picture 22
Picture 23
A properly built fork will sustain the impact force, so that the frame gets deformed first:
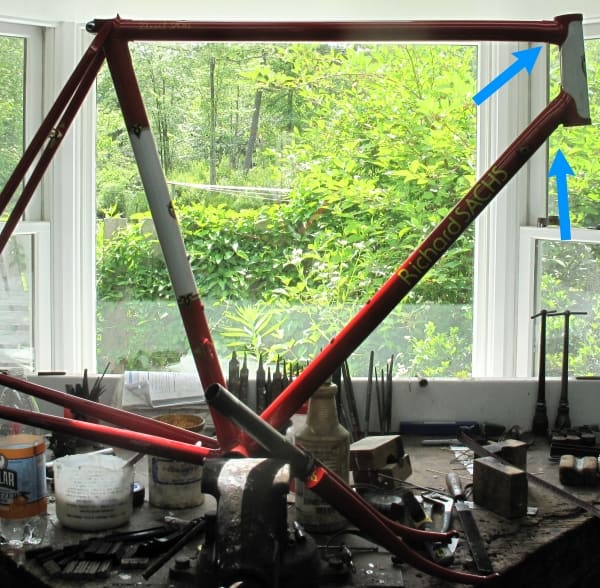
At the bottom you can see the intact fork
Picture 24
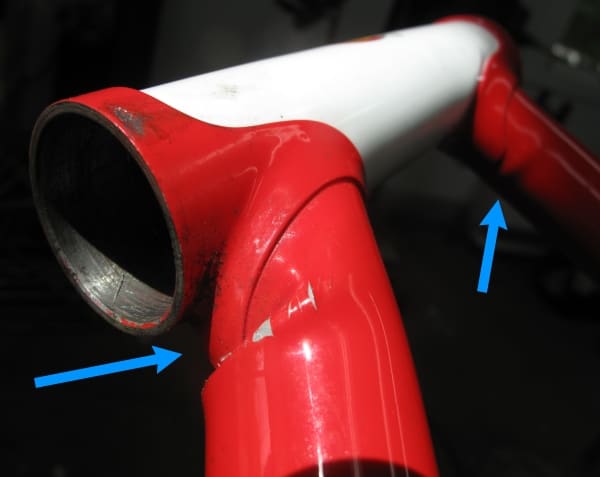
Picture 25
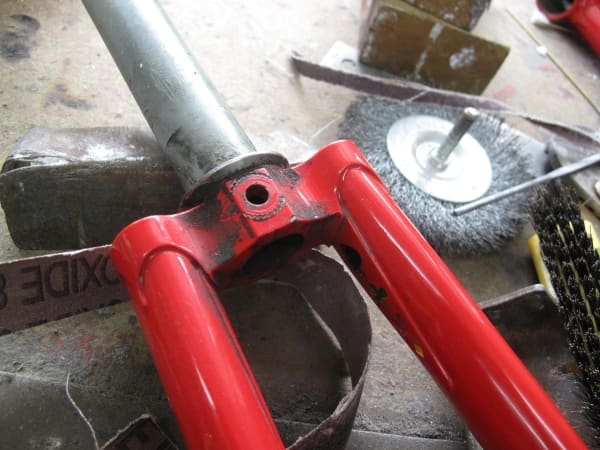
Picture 26
Another advantage of the frames that are built properly, not as the marketing department dictates, is a good frame geometry, i.e. the bike rides and handles well.
This is not an advertisement for Richard Sachs. For all I know, he’s got more than enough work – there are several years of the waiting queue for ordered frames, and the prices start at 6,000 $. Unfortunately, I don’t know of many people who know how to properly build a road bike frame (and fork), and even fewer who are still doing that.
The modern industry will sell you an expensive helmet, and a frame with a fork that sends you straight to the pavement in case of any problem. Guess that’s zeitgeist (link to my nonsense blog article).
To avoid any misunderstanding: I’ve never ridden, nor even touched a Richard Sachs frame. All this is based on the available info, pictures, and customer feedback, so do take it with a bucket of salt. Again, I’m taking Mr Sachs as an example of a concept, an idea. The essence of this website is education – not sales. Bicycles should be built for the cyclists, not just for making money. And I think it’s nice when they “have a soul.”
This… this art seems to be dying, and all that knowledge seems to not be transferred to the new generations. The beauty, and ellegance – but not at the cost of function and durability, quite the countrary!
Picture 27
5. Conclusion
Road bicycle supply at the time of writing this is very unstable. That is why I put more effort into explaining what is important, and the pros and cons of different patents. Hoping it will help the reader make an educated choice when they go shopping, out of the models and sizes that are available.
6. Appendix – buying new vs buying used road bicycle
As many people have this dilemma and have asked, I wrote a separate article about whether it’s better to buy a new, or a used bicycle (in general, regardless of the bicycle’s type).
Here, I made a used bicycle buying tutorial (with a video).
This is a list of my bicycle-buying guides, sorted by bicycle type:
- Road bicycle buying guide
- Mountain bicycle (MTB) buying guide
- Trekking bicycle buying guide
- City bicycle buying guide
- Commuting bicycle buying guide
- BONUS: Is it better to buy a new or a used bicycle?
- Kids’ bicycles – how to pick the right size?
Last updated:
Originally published:

Hey there Relja. Hope you are keeping safe and well.
I got to your site from one of your YouTube videos. I want to thank you for being so informative! Definitely learnt a thing or two from your blog and videos.
Cheers!
Hi Tyler,
Thanks, glad to hear that. 🙂
Great stuff! This is almost the exact same website I have always imagined to build by myself, though lack of time and effort (most importantly, passion!) makes it never a reality. But yet here you come! All contents well laid and just as honest as I have ever imagined.
As for the buying guide, I have another (yet better in my opinion) suggestion, Decathlon RC120 rim brake version. (link to the UK site, as it serves in English: https://www.decathlon.co.uk/p/road-bike-triban-rc-120-grey/_/R-p-308062?mc=8554264 )
At first I thought you might be in North America where Decathlon is not widely recognized due to the availability problem (very few store because they pulled out from NA like 20 years ago). I don’t know if it’s easily accessible in Serbia, but for other parts of the world where Decathlon operates, if one really wants a good yet very cost effective bike, one should really look into the Decathlon ones.
For an 8-speed “entry level” road bike, with “normal” alloy frame and rim, and everything else “plain” but “right”, $800 is still too much to ask. My selection would be Decathlon RC120 rim brake version. As of now I just checked the latest price on UK site is 349 GBP. In other regions it seems the rim brake version is slowly phased out so only disc brake versions are now available, but they are still very competitive. The disc version on China site is 2999 RMB about 400 USD, on France site it’s about 550 EUR. You get the idea. You can always wait for a great deal so that you could get it for an even more competitive price. Though in the US site it’s a little bizarre for which it sells at 800 USD, I guess it’s just to match the $800 “entry level road bike” price tag because American people are notoriously famous for their fondness of expensive things and their tendency for judging things by the price tag. (that’s exactly why Decathlon bailed out from NA like 20 years ago)
I myself got one of this bike for just 2199 RMB (300 USD) for my dad as a cost effective yet “theft proof” option (peace of mind when lock it outside, won’t break a bank if it got stolen, as a means of transportation albeit being a fitness equipment), I know it’s good because I test rode it at the store but actually didn’t expect it to be a real performer, however it just blows my mind. After we bought the bike we did a test ride on the mountains, 120km and 1000m elevation, and we switched bike, it’s just mind blowing how good it is, considering it’s just a $300 bike. Truth to be told, I couldn’t tell a difference. It has everything that matters, a carbon fork so you have that little “compliance” and buzz filtering, a light enough alloy frame, and most importantly, a very correct geometry, so its handling feels “just right”, which is rare especially considering the price.
The only thing I would ever like to change would be 1. Throw some $100 (geez that’s 1/3 of the bike price) fast tires like the Conti GP5K so you eliminate the biggest drag, 2. Get some cheapest $200-$300 (that’s another bike’s worth…) power meter so you can pace and train yourself properly. After that I’m 100% confident this bike can compete with any bike no matter it’s a $1000 bike or $3000 bike.
All the other things? to be honest it just doesn’t matter, especially that dumb shifter, they won’t make you faster, they are irrelevant to the power nor the speed (Hard lesson learned here). What I really love this bike is Decathlon here really did a great job, they made a correct but very hard decision that the carbon fork, geometry and a lightweight frame makes more sense than a Shimano logo, or more “speeds” or “gear counts”, even if it’s an entry level bike, for which their intended customers probably only understand the level of “groupsets” for better or only “X-speed” for worse, and tends to judge bike with these obvious things. I had my concerns about that Microshift shifter and derailleur, but to my surprise, it’s just the same, after just a little accustomization, you just forget them. In practical ways, I just don’t feel a difference.
This is a bike I would never buy when I first got into cycling, the first sight of that “Microshift” and “8-speed” would just drove me away. However it’s the correct bike I would recommend to anyone who would like to get into cycling now after all these years figuring what matters on a bike and what not. How ironic!
As a little background information, I’m no beginner road cyclist, I ride a carbon bike with deep carbon wheels all year around. I have gone through all those marketing gimmicks and fancy tricks (I learned the hard way, as an adult who have the money to pay). I pursuited the marginal gains. I have a 300w average FTP, 3.75-4 watts/kg depends on my weight.
However, as I grow fitter, the less important the equipment feels… I remember when I just get started I can even feel one gear is too hard and one is too light and I will pay for anything that provides something in between, but now I can just climb at any gear (you know what I mean) and almost never run out of a gear. There’re times that I don’t have the time to fix the shifting, I climb just fine without those biggest 3 sprockets in the rear or sometimes only in big chainrings…
After all these years and I just come to a conclusion that bike just doesn’t matter, especially on road. All you need is a Decathlon RC120 with Conti GP5K and a power meter.
I really enjoy the vibe of your content, and I believe you should really check the Decathlons.
Keep the good work up! And if it’s possible, get one of these Decathlon bikes.
Hi Lin,
I very much agree with you and Decathlon does have some very reasonably designed models.
My main “complaint” about the RC 120 models (at least as they are sold in my country) is they have no removable rear derailleur hanger. I’d rather have that instead of the carbon fork (also, I’d like to see a steel or aluminium fork version at a lower price).
Still, it is a reasonably priced decent road bike and, as you say, the most important thing is “the engine,” not the bike. 🙂
Relja