Unless a bicycle frame is by “three sizes” too big/small, it can usually be set to better suit a rider’s comfort. This post gives instructions for setting up a comfortable riding position, i.e. bicycle fitting. For a shorter, simpler explanation, more suitable for beginners, read the post: How to set a comfortable bicycle riding position.
TL/DR
Briefly put, here I’ve explained how you can make your bike be more comfortable by adjusting saddle and handlebar height (and tilt – along with some other minor tweaks).
The main point is to start with the saddle – and adjust your handlebars afterwards. It’s straightforward and yields great results.
I’ve added photos to help you see & understand – and tackled the most common bike-fitting mistakes.
0. Intro
This is post that explains how to tune bicycle riding position so that it is functional and comfortable. Before setting up a seating position, one needs to find a correct size frame. Post about finding optimal sized frame can be read here:
How to choose a correct frame size
Riding position should be such that it is comfortable and enables the rider to pedal efficiently and to easily control (steer) the bicycle. It sounds simple, and it is, but some small things should be taken into consideration and can make a big difference.
1. Contact points
Things that make riding position are contact points. Places where rider comes in contact with the bicycle: seat, pedals and handlebar.
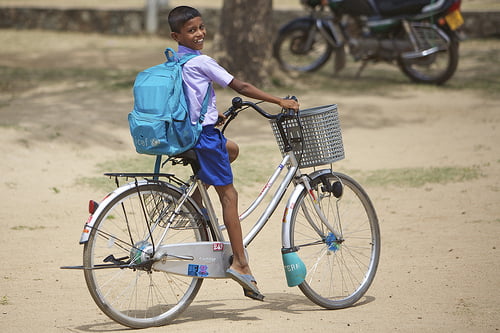
The significance of contact points is clearly shown in the picture below. Small, folding bicycle has seat post and handlebars lifted high enough, so it provides a seating position similar to one on a much larger bicycle.
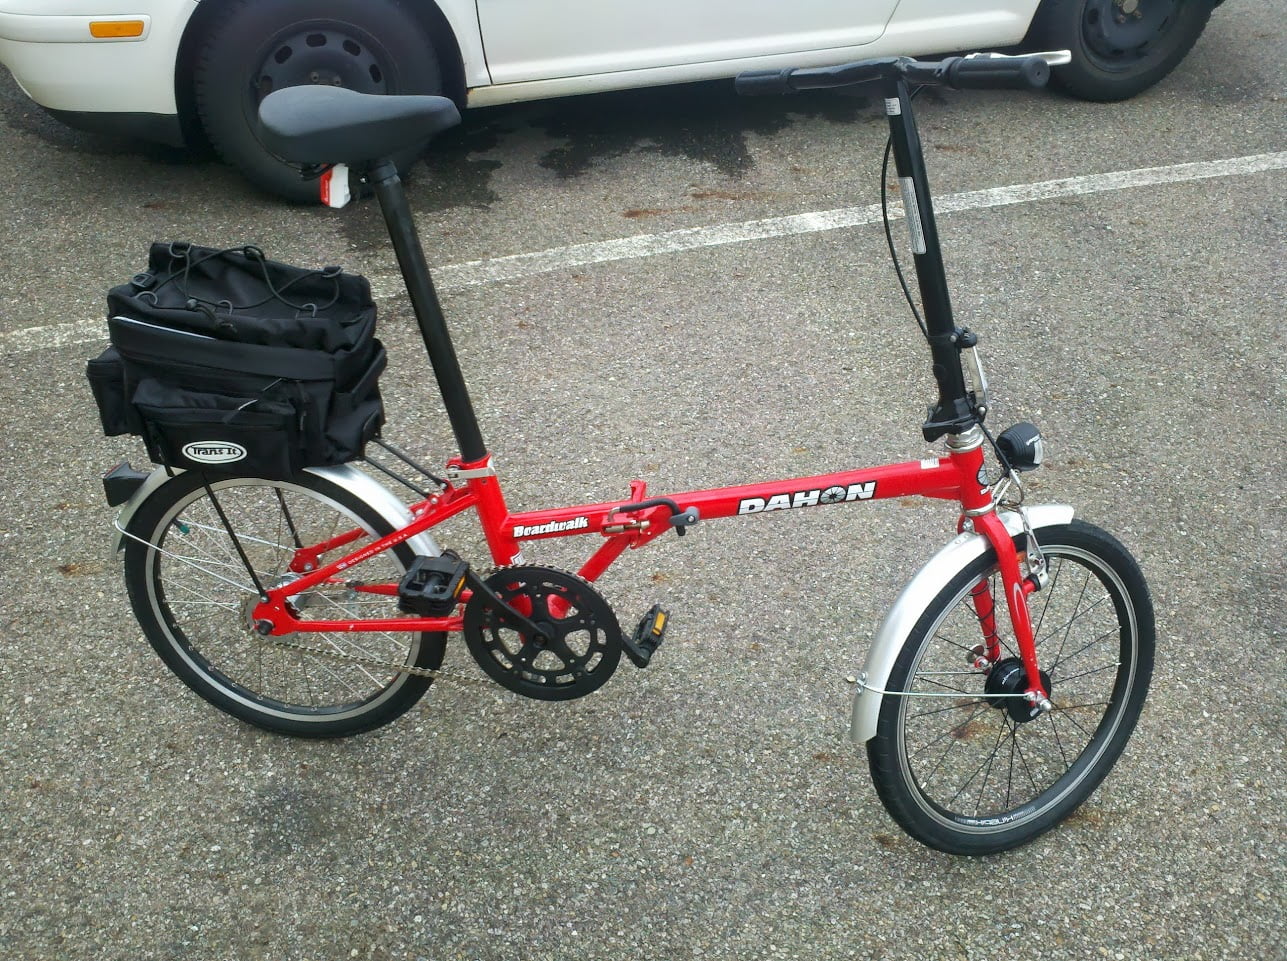
Wheels are small like on a kid’s bicycle, but a full grown man can comfortably sit on this one.
Seating position is upright, for slow urban riding.
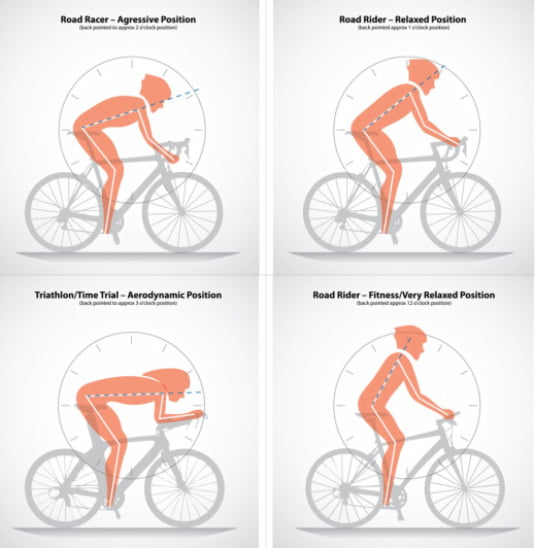
So, for comfortable and efficient riding, contact points need to be set to appropriate distances from each other. These distances are determined by rider’s dimensions: leg and torso length. They are also influenced by the type of preferred position: whether it’s an aggressive racing position, or more relaxed, upright position for cruising.
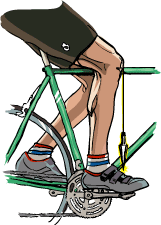
Speaking of contact points, this is the correct way to place a foot on a pedal:
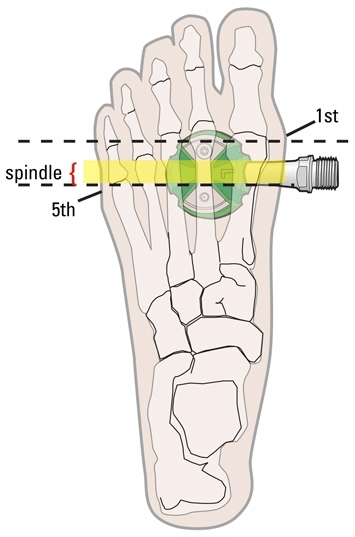
Ball of the foot should carry the weight on the pedal. Leaning with the middle of the foot, or with the toes is not optimal foot positioning.
2. Saddle angle
Saddle should be parallel to the ground. This should be done first. Most men like saddle nose tilted for a degree or two up, most women prefer a degree or two down, but level is a good starting point. It can later be tweaked.
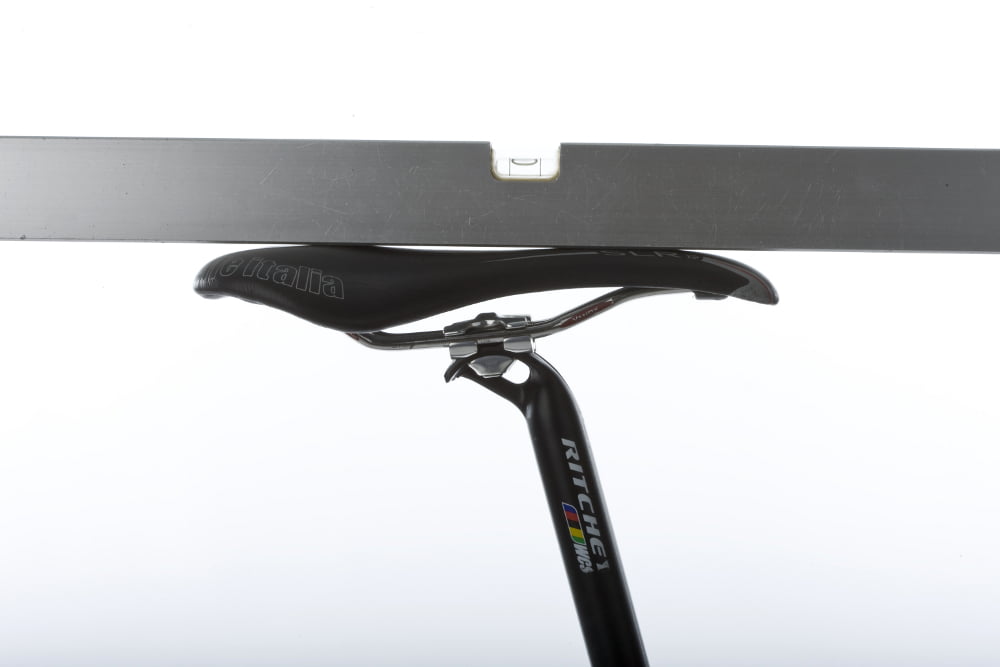
If the saddle is tilted too much forward, rider will start sliding forward, putting too much pressure on the hands and bars. Making bars uncomfortable.
3. Setting up seat height
This is the best starting point. Seat height is first roughly determined by sitting on the saddle, placing heels on the pedals and straightening leg. Pedal shouldn’t be too low, or too high to lift the rider off the saddle. Hips should be parallel to the ground – not tilted to either side.
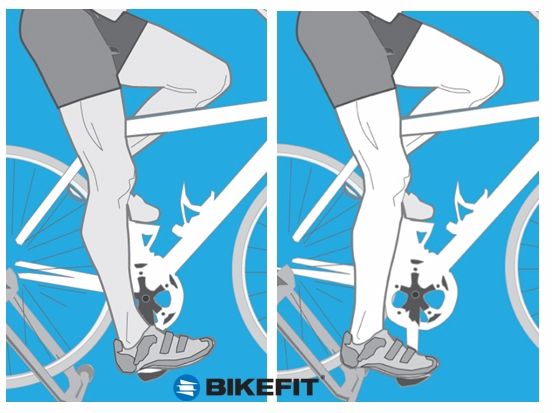
Then, when foot is correctly placed on the pedal, knee will be slightly bent, which is ideal for efficient pedalling.
When doing this, one should lean against a solid object, and hold a brake to keep the bike in place.
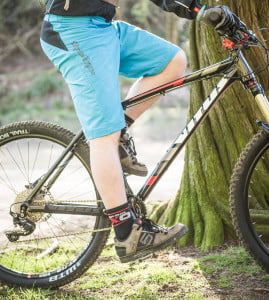
Many beginners place their seats too low, so they can reach the ground when standing still. This was possible (with correct seat hight) on older bicycles. From 1980s, frames are made so that BB is higher. This enables crossing obstacles and leaning in turns more, without pedals hitting the ground. However, it makes impossible putting both feet on the ground when seated, not if the saddle isn’t set too low.
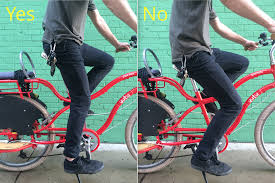
Riding with the saddle too low can cause knee pain and health problems. It’s the equivalent of walking in a crouched position all the time – exhausting and inefficient.
Too high a saddle causes other problems. Foot will move downwards when in the bottom of a stroke, in order to reach the pedal. Hips will also rock from side to side. Too much pressure will be exerted on the back and crotch – because legs aren’t carrying much weight.
How to find the optimum? After finding a starting point with the heel method. Increase height by one cm and go for a long ride. When you reach the point of too much (hips start rocking, pressure on the saddle, feet move downwards in order to reach pedal in the bottom of a stroke): lower the saddle by half a centimetre. “You don’t know what is enough, until you find out what is too much”. 🙂
The heel method itself is precise enough for most recreational cyclists.
Cyclists that like pedaling fast (with a high cadence), prefer the saddle to be a bit lower than the height set up using the previously explained method – by 3 to 8 mm. That is individual and comes with trying and experience. Still, “heel” method is an OK starting point.
In a separate article, I’ve explained what the optimal cranks(et) length is.
4. Horizontal saddle position – for-aft
Seat horizontal position is tuned so that when cranks are parallel to the ground, a pendant hanging from the bottom of the knee cap goes straight through the pedal axle. Make sure that feet are placed correctly on the pedals (explained at the end of the contact points chapter). This (starting) position is also known as KOPS (knee over pedal spindle).
When this is done, seat height should be checked once more with heel method (because for-aft position influences the distance to the pedals). If the saddle is moved. After that, check once more for fore and aft position. That’s how with several iterations, perfect position can be tuned.
Just to note that KOPS is a good starting position. For aggressive riding (or for chronometer), saddle will be moved a bit more forward, while a laid back riding style will be better with the saddle a few cm behind the KOPS position. Also, it depends on personal preference. However, KOPS is a very good starting position, before tuning the rest of the bike (handlebars etc.).
It is wrong to try adjusting the handlebars distance by moving seat forwards and back. Handlebar distance is changed using different stem lengths. Saddle position is determined relative to the BB and pedals, like explained, nothing else.
If the saddle is moved too far back, it will make a crunched position, with bars too far ahead.
If the saddle is too far ahead, there will be too much pressure on the hands. Like trying to lean ahead, while standing leaned with one’s back against the wall.
5. Handlebars: height and reach
When the saddle is fine tuned, all that’s left is to set up the last contact point: handlebars.
Handlebar reach, i.e. distance from the seat to the handlebars, depends on rider’s torso and arms length. The distance should be such that hands are comfortably holding the bars, with a slight bend at the elbows. Without too much stretching, cramping at the back or at the shoulders etc.
Hands are slightly bent at the elbows.
When the saddle is adjusted properly, handlebars should be set according to personal preference. As long as handlebars are at least as wide as the rider’s shoulders, the rest is more-less subjective. Some like high, upright riding position, some prefer more aero. As long as handlebars can be reached with hands slightly bent at the elbows, without uncomfortable stretching to reach, or too much bend at the elbows, it is fine.
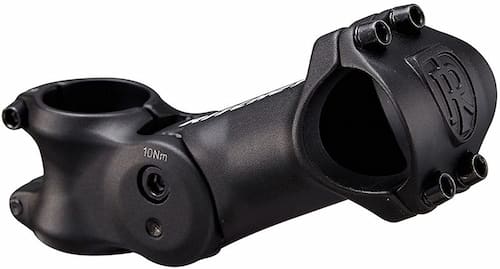
For those with threadless stems, that want handlebars a bit higher than their steering tube allows, one option is using a good quality adjustable stem, like this Ritchey 4-axis adjustable stem (Amazon affiliate link):
For a decent quality stem-riser (in case you need even more bar height), a good option is Origin8 Extra-Lift (Amazon affiliate link):
Posts about setting up handlebars and levers (cockpit):
Setting up handlebar height and angle
Setting up MTB handlebars
Setting up road handlebars
6. Videos about bike-fitting
My video explaining the basics of bicycle frame geometry and bicycle fitting:
![Bicycle frame geometry and bicycle fit basics explained [1018]](https://bike.bikegremlin.com/wp-content/plugins/wp-youtube-lyte/lyteCache.php?origThumbUrl=https%3A%2F%2Fi.ytimg.com%2Fvi%2FajoLYCn7IcM%2F0.jpg)
I’ve made another video explaining the correct frame size in more detail, along with the basics of road bike fitting (link to the video on YouTube).
Last updated:
Originally published:
The existing comments posted under this article (questions and answers) have been moved to this BikeGremlin forum thread:
https://www.bikegremlin.net/threads/setting-up-riding-position-bike-fitting-article-comments.146/
What is the correct distance (cm) on a Trek Domane SL7 road bike between the front of the saddle and the centre of the clamp holding the handlebars. A rough estimate would be appreciated.
Thanks’
I don’t know.
However:
That certainly depends on the size of the bicycle (also depends on the type of the saddle and stem length, but suppose we can assume that when comparing factory set-up bikes, those are similar/same between the frames of the same size).
Also, it is worth noting that stack and reach are a more reliable way of determining bicycle frame size (and fit).
if you are new to bicycles then the most important thing to do is get a proper bike fit either at your local bike shop or from an a good rider,its not as simple as you may think,many things come into play to find the right bike,also if you are just starting to ride a bike give your body a chance to get used to riding,it takes many many months to build up your legs and your breathing,too often people give up on bike riding because they think its too hard,take it easy first then do a few slight hill climbs each week or daily,bikes are the best way to get fit or even loose a little weight,its good for your heart and lungs and it exercises all your body parts,its probably one of the safest ways to exerercise that i know of and you get fresh air for free,we are lucky in australia as we have concrete bike paths to ride on across most cities and we dont need to go near roads and cars,i will never share my bike on a road with cars,thats high risk anywhere,for me its either footpath or bicycle path.most bike paths here are shared with walkers as well,you will not climb a mountain if you are new to bikes but give yourself a chance to get used to the bike and you will actually enjoy riding.i often see 70 year old guys climbing those hills but they have been riding for a few years.i cant think of any better way to keep in shape but by riding a bike,but like i said go get the right bike that fits you.
sorry for the typo mistakes but i am not google i am human
“The heel method itself is precise enough for most recreational cyclists.”
No! Tiptoe on the ground when sitting. City rides require frequent stops. If you cannot reach the ground get bicycle with lower BB otherwise you will ruin your knees.
Hi Rudy,
That is a common misconception, a mistake I see many people make.
Configuring saddle height relative to the ground disregards the bottom bracket height. Modern bicycles are built with higher bottom brackets – in order to provide more ground clearance when going over any bumps and cornering.
Old-style bikes could be set to an optimal saddle height (relative to the BB), with the rider still being able to reach the ground with their toes without getting out of the saddle.
Modern frames, however, would require the saddle to be set too low relative to the BB in order to allow the rider to reach the ground while being in the saddle. That would mean more load on the knees while riding.
I’ve explained these basic frame-design differences and bicycle fitting basics in this video:
Bicycle frame geometry and bicycle fit basics explained
It is possible to easily get on and off a bicycle at every stop, even if one can’t reach the ground from the saddle. I’ve demonstrated the technique in a separate video (so far only in my native language, but the moves work for any language and country 🙂 ):
Starting and stopping with a bicycle
So, based on my knowledge, education and experience, saddle height should be configured relative to the BB height, not relative to the ground.
Different people have different experiences and different opinions – but this one is mine.
Relja
BB is high and unsuitable for a city ride on MOUNTAIN (not comfort) bikes. One cannot get off and on the bike in city numerous red lights – it is not feasible. The bike capitals of the world are Amsterdam and Copenhagen…people use comfort bikes and tiptoe at stopping. Do not confuse bikes use for sport with comfort city rides.
Hi Rudy,
Yes, some comfort bikes are still made with lower BBs. Not all though (at least from what I’ve seen).
My city, Novi Sad, is like a Serbian Amsterdam. 🙂 A huge number of cyclists and very good cycling infrastructure. Many people here “tiptoe at stopping” – and then ride on with their saddles noticeably too low.
I use a bicycle as a main means of transport (hauling groceries, transporting the kid, going anywhere). My city bike has a BB on the higher side. I’ve had no problems getting out of the saddle at traffic stops and getting back on. It beats having the saddle too low, especially when it comes to any load on the knees.
If a BB is low, yes, one can reach the ground from the saddle, even when the saddle is at an optimal height. But regardless of that, I’d say that the saddle height should be adjusted relative to the BB, not relative to the ground – no matter what bike one uses.
Of course, one can set their saddle lower than optimal, for whatever reason, and that’s their choice. Some people aren’t capable of starting or stopping without staying in the saddle. For such people, getting a low-BB bike is probably the best option – so there’s the least amount of compromise in terms of saddle height relative to the BB, while they can still easily start and stop. It is my personal opinion that the better course of action is training to start and stop without being in the saddle, but everyone chooses for themselves what and how they do things.
My point being (“the bottom line” as the Americans say) that relying on the saddle-to-ground height can result in the saddle being too low compared to the BB, thus putting a lot more load on the knees when pedalling.
Relja
two words. dropper post
Thank you. This was very informative. Malta is not bicycle or motorbike friendly as we have poor infrastructure and way too many cars and careless drivers. However in the countryside we still have some space to cycle freely.
Not very relaxed at all without straight back. Look how they sit on bicycles in the Netherlands.
It depends on the riding style and conditions.
Completely upright is not very nice with a strong headwind (as it often happens where I live in Autumn and winter). Also, every road bump goes straight into the spine (not sure how to explain it better) – so it can be less comfortable on bumpy roads, though that also depends on the bike type.
There are pros and cons to different postures, but one still can make a given upper body angle setup be more or less well fitting and comfortable.
Relja