I already wrote about the modern hookless rims (for tubeless tyres). In this article, I’ll explain what tubeless bicycle tyres are, and list their pros and cons compared to tyres with a tube. Based on that, everyone will decide for themselves which option is better suited for their needs (in other words, answering the question I often get: “should I switch to tubeless?”). To make this article clear even to absolute beginners, I will start by briefly explaining the basics and tyres with tubes, before explaining the tubeless tyres.
1. Why do tyres have air inside?
Tyres with air are so common, that it may seem silly, but let us entertain this question for a bit. We all know that tyres filled with air can be punctured (flat), so why do we use them? Why don’t we use just some soft rubber or some springs coated with rubber tread?
In fact, every few years I run across some startup project promising just such “revolutionary, flat-free tyres!” How come no one has thought of that before?! Except that they have – airless tyres is what we had started with in the first place until a crazy Scotsman John Boyd Dunlop patented pneumatic tyres and put them on market around 1846.
Why is the air in tyres a phenomenal thing, despite occasional flats? Because it makes the tyres lighter, comfier, and with lower rolling resistance.
To further explain: air is light, which reduces the total wheel mass, and it is an excellent bump absorber. It compresses and expands easily, with practically no heat build-up, and it distributes compression pressure equally along the entire tyre (inner) surface. This allows tyres to grip better (as their contact patch easily conforms to any terrain irregularities in no time) and absorb smaller bump and pothole shocks.
2. Tyres with tubes
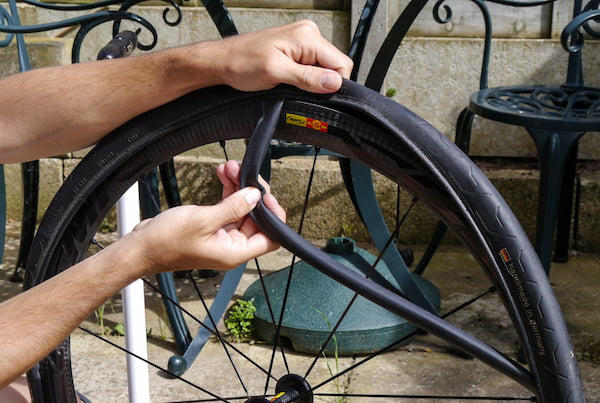
For over a century, the standard for bicycles were tyres with tubes. You mount a tyre (outer one, with a tread) on the rim, and a tube for holding air is put inside.
Picture 1
Separate articles explain:
Thanks to bicycle tyres being quite flexible and light, it is quick and easy to dismount a tyre, patch a tube, and re-mount it all (unlike it’s the case with heavy and rigid car and motorcycle tyres).
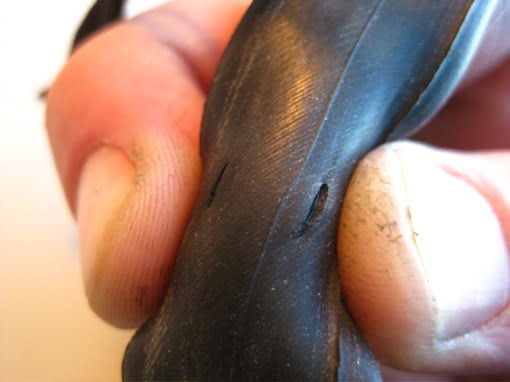
The main downside of this patent is that tubes can be punctured if you run tyres at a lower pressure and hit a bump. When the outer’s tyres tread is compressed all the way to the rim, it pinches the tube and tears it against the rim, creating two holes next to each other (tearing it against the right and left rim wall). This is called a pinch flat. On narrow road bike rims, these holes are too close to each other to fit two separate patches, and too far apart to be covered well with one patch – so it’s generally irreparable damage. Because of the distinct look, this kind of puncture is also called a “snakebite” flat.
Picture 2
Now, why would you ride with low tyre pressure? When riding on mud, sand or snow, the grip is much better if the tyres are wider, and inflated to lower pressure. But then you must slow down when approaching a bump, so you don’t hit it hard and puncture your tube. Is there an alternative solution? A logical question which leads us to the next chapter:
3. What are tubeless tyres?
Tubeless bicycle tyres are constructed so they can keep air under pressure without any help from a tube. To achieve that, they need to fit tightly against the rim – so they are made with a bit thicker and stiffer sidewalls compared to non-tubeless tyres. This makes them a bit heavier, but “ordinary” tyres need a tube, and a non-tubeless tyre plus a tube usually ends up being a little bit heavier in total compared to a tubeless tyre plus sealant liquid (more on that below).
Of course, the rim too must be constructed to hold air – so that the entire “package” can effectively replace the tube. Tubeless rims don’t have any spoke holes on their outer section (the one where the tyre is mounted), so are a hassle to build wheels with and often require special & expensive nipples. Tubeless-ready rims, on the other hand, are more like the normal rims, but they have a “hump” to help seal the air with a special tubeless rim tape.
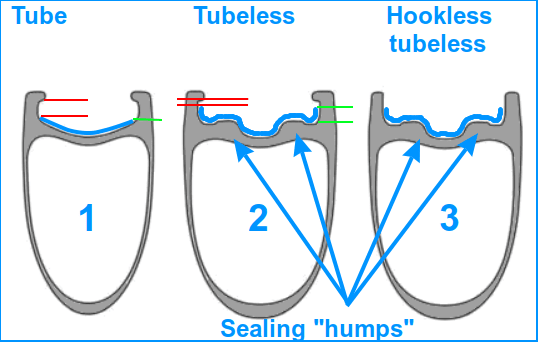
Picture 3
In a separate article, I wrote about modern hookless rims for tubeless tyres.
Tubeless bicycle tyres are still a lot more flexible than motorcycle tubeless tyres – we can’t afford tyres that weigh several kilograms on a bicycle. That’s why they can’t fit against the rim tightly enough, so we must use sealant fluid in order to keep the wheels airtight.
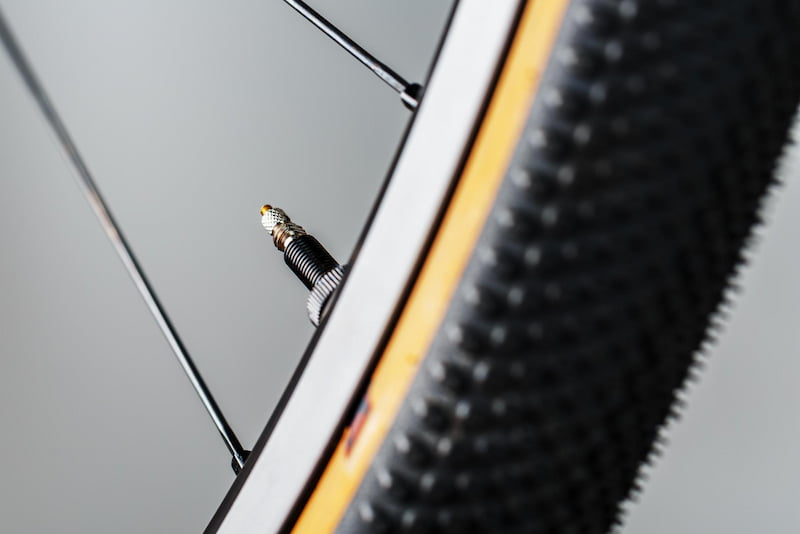
The liquid is poured directly into the tyre when mounting it, or after it has been mounted through the valve (after the valve core has been unscrewed and removed). A separate article explains bicycle valve types.
The sealant liquid is a fluid, containing latex or carbon fibres, which hardens when it comes in contact with the outer atmosphere. This enables “self-sealing” of smaller punctures, but if you park the bike so that the valves are at the bottom, the sealant can harden and clog up the valves, preventing you from inflating your tyres.
Also, the liquid needs to be replaced regularly – every six months, to a year max. Latex-based sealants will harden after a year or two even inside their original, sealed bottle.
4. Pros and cons of tubeless tyres
Here I will list all the tubeless tyre pros and cons, leaving it to the readers to decide how much each of those is important for their use case, and decide what the optimal choice is. The comparison is made against the “ordinary” (non-tubeless) tyres of the same dimension and quality (class).
Tubeless tyre pros
- Lower total wheel mass, though the difference is marginal when you account for the sealant liquid mass (also, see the “Rotating mass myth” article).
- Smaller punctures will self-seal thanks to the sealant liquid.
- They let you ride with lower tyre pressure, without the risk of pinch flats (“snakebites”).
- Slightly lower rolling resistance, because there’s no rubbing of the tyre against the tube (as there is no tube, obviously 🙂 ).
Tubeless tyre cons
- More difficult to mount on a rim due to stiffer sidewalls.
- More complicated to mount – because there is no tube to hold air from the start, you must use an air compressor (or a CO2 cartridge) to pump a lot of air very quickly, so the tyre gets pushed against the rim walls to seal before a lot of air goes out. You also need to add sealant, not too little, not too much, taking care not to make a mess.
- Larger punctures won’t self-seal, but the sealant will leak out and make a mess. Yes, there are tools for quick patching of tubeless tyres (Amazon affiliate link – don’t rely on its frame mount, carry the tool in a bag), large enough punctures still require mounting a tube to get home (after removing the tubeless valve from the rim).
- If you dent a rim, the tyre will start losing air – you must either insert a tube, straighten the rim somehow, or carry the bike home (pushing a bike with a flat tyre can cause tyre sidewalls to crack, ruining it).
- You must regularly top up and replace the sealant liquid, taking care it doesn’t clog up the valve (park the bike with the valve staying up, not near the ground).
- Tyre under low pressure can relatively easily become unseated from the rim in one spot when you hit a bump or put some sideways force on it (like landing a bit sideways from a jump or similar). When that happens, the tyre loses more pressure (that’s called “a burp“). So you need to stop and re-inflate the tyre.
I think that tubeless tyres make some sense for mountain bikes (MTB) ridden on challenging terrain (rocks, mud, sand, snow etc.) because they can be run at lower pressures without any pinch-flat risks. Also, because they can “self-seal,” they make some sense if you ride on thorn-ridden terrains, and you don’t like the rougher ride and more weight of (non-tubeless) tyres with serious puncture protection (like Schwalbe Marathon – Amazon affiliate link).
While they are advertised as “new, improved, better” – tubeless tyres have their cons and I personally still highly prefer the ease, simplicity, and reliability of hoked rims with clincher tyres and tubes. Your preference may differ.
Last updated:
Originally published:
Hi Relja,just wondering about how many different types of bicycle floor pump chucks you have tried,my use of them i learnt that those smart chucks are not very smart at all,reason being they are difficult to pump up presta valves and they do not engage well,then i tried a twin head chuck and found those ones more easier to use as they have separate holes for the presta and car valve,I just bought a lezyne steel drive floor pump and this one has a screw on thread for both valve types,it also has an air bleed function,very impressed so far with this lezyne pump as they also sell separate chucks for this pump if you dont like the screw on chuck,most things on this pump are replacable including the gauge,cheers
Hi Mike,
I think it depends on the chuck’s quality to a great degree. For example, I got a poor quality “twin” chuck (couldn’t source anything better at the time) and it didn’t work very well.
Having said that, I highly prefer double/twin chucks, as they seem to work better with valves that don’t protrude from the rim very much (sometimes people don’t get a proper valve length for their rim).
I have a Lezyne mini pump with a screw-on chuck. It feels a bit more fiddly with presta valves, especially for novice users (even when I’m giving them instructions). In my experience, the screw-on mechanism is safe, with a very positive engagement so to speak, but more time-consuming. So I would say I prefer the lever-operated locking mechanism for pump heads. But I definitely don’t prefer the “smart” heads.
P.S.
I ordered a floor pump head from Lezyne (this one doesn’t screw on) – and found it to be designed for a bit slimmer hose than I generally see with floor pumps). Here, you can watch and have a bit of a laugh at my failed attempt to mount it on my favourite pump: 🙂
Replacing a floor-pump head FAIL
Relja
Hi Relja,yes i had a laugh too when i saw your youtube lezyne clip,i have pulled apart a few old floor pumps and yes they all have secret size hoses and piston O-rings,the O-rings only cost a few dollars but alot of pump makers dont sell spare parts which is why i got the lezyne floor pump,every thing on the pump you can replace,the screw on chuck works well its very secure but yes its fiddly to use,i think its mainly for using on really high pressure tubes,so far in Australian market i can only see spares for two types of pumps,topeak joe blow and lezyne floor drive,i have one older pump that i cant even find an O-ring for,topeak are saying that they do a universal pump re-build kit and hose for all pumps but i have not used one yet, i like the topeak hammer head chuck design,cheers
just did some digging on bicycle floor pump piston O-rings,when your pump looses pressure its most likely that piston O-ring needs replacing,its a very cheap part,but it must be a good nitrle rubber one,some hardware or auto stores have these in kits,you might find them there,if not most industrial O-ring suppliers have them,they do hard to find sizes in all thickness,the O rings are sold by the internal diameter of the O-ring plus the thickness of the O-ring,my old serfas fp-200 floor pump has O-ring 24mm I.D x 3.5 mm thick,my new lezyne steel floor pump has O-ring size 22mm x 3mm thick,its a very easy replacement to do you just pull off the old O-ring,put the new one on and put a light film of rubber O-ring grease or similar on the O-ring,to get to the O-ring most pumps unscrew at the top,some pumps unscrew from the base,the good pump makers have service rebuild clips on youtube,some pump makers do sell seperate O-ring service kits as well,they even do spare gauges so with these service kits you should have a pump for along time,alot of pump makers also do different type chucks,that is you can try 3 different types of chucks on the one pump but they usually have to be from the same pump maker,cheers
if your just pumping up schrader valves or car valves as they are better known as the best chucks i have used for those is the high end brass chucks that screw on the valve is best,i got those ones from a good auto store,they also sell numerous fittings to let you join hoses etc,and match up different fittings to different size hoses,its probably better idea to run two pumps,one set up for presta and the other set up for car valve
most pumps around 1970 all had leather cup shaped washers instead of O-rings,including car pumps just like the silca pump now has,then towards the late 1970s they made an all alloy portable pump that cliped onto the downtube and that pump had a rubber cup shaped washer and that one was the best pump on the market at that time,you could get high pressures with those and they were a nice pump,we had dunlop valves back then and the pump came with a rubber hose that screwed onto the dunlop valve,if your pump did fail you cut out a car valve from old car tube and sat that on top of the dunlop valve and used the air pump at the local service station
ok back to the future,check out these simply awesome presta only all metal chucks that can connect to just about any pump hose,they are hiro pista and harame chucks,not cheap but very nice ones,can do well over 200 psi and replacements parts are there as well around $100 per chuck but a good investment for your workshop if you do alot of presta valve pumping