Like it was explained in an earlier article about choosing a correct frame size, modern frame designs make it impossible to tell if a frame will fit a rider just by measuring the seat tube length. Quick and relatively simpler way for sizing, explained in the mentioned article, is measuring the effective top tube length. However, since saddle position is set up relative to the bottom bracket (see: setting up a comfortable riding position), the most precise method for measuring the effective bicycle frame size is measuring relative to the bottom bracket – which is achieved using “stack and reach” measurements. What are stack and reach and how to measure them? That is explained in this article.
In a separate article, I explained how to choose the optimal bicycle size for a child.
0. Introduction – why does this even matter?
In order to get a frame that fits the rider, it helps a lot if the rider, or at least the salesman/mechanic know a given frame’s effective size.
When buying a new bicycle, it is best to try a few, find one that suits with size, then measure and write down that bicycle frame’s stack and reach (will be explained later how to measure it), in order to know when shopping which effective frame size is suitable.
Two riders of the same height, depending on their flexibility and riding style might look for frames with two different effective sizes. Even the type of riding affects the optimal stack and reach for each rider (relaxed or aggressive riding, off-road riding etc). That’s why in this article I won’t tell you which stack and reach are optimal for you, but I will explain how to measure them, so that you can tell if a bike will be a good fit for you (once you’ve tried different sizes and found one frame that fits you).
This is a lot like buying shoes. Imagine you never wore any shoes and have no idea which size is right for you. You could measure your foot length, and measure a shoe’s length – even if manufacturers sometimes use a bit larger molds and not always precisely mark the shoe size. However, for football, most people prefer shoes that are more tightly fitting (better ball control etc.). For hiking, it’s usually better to go with a size larger boots, so you can wear thick woolen socks. And that’s without even considering whether your foot is wider, and if the shoe model you are looking at is narrower, or designed for a lower arched feet etc.
Similarly, the optimal frame size depends on rider’s flexibility, leg length, intended riding style (relaxed road bike riding is not the same as competitive aggressive road bike riding – not to mention the variances for different types of bicycles). That is why you must determine the optimal stack and reach for yourself, once, through trial and error, but then using the methods explained in this article you will be able to easily figure out if a frame is a good fit for you.
Frame sizes expressed in seat tube length (like 54 cm, or 21″ inches) are very unreliable. Sizes expressed by manufacturers (such as S, M, L, XL…) are also very roughly given, even if a suitable rider height charts are provided for the sizes. Stack and reach are the only really reliable frame size measurements. Another important note: the optimal stack and reach for the same rider will not be the same for every type of bicycle (MTB, road bike, etc.). So you may have a different optimal stack for a road bike, and for an MTB. I.e. optimal stack and reach differs for every rider, and for every bicycle type.
1. Explanation of the terms “stack and reach”
1.1. What is “stack”?
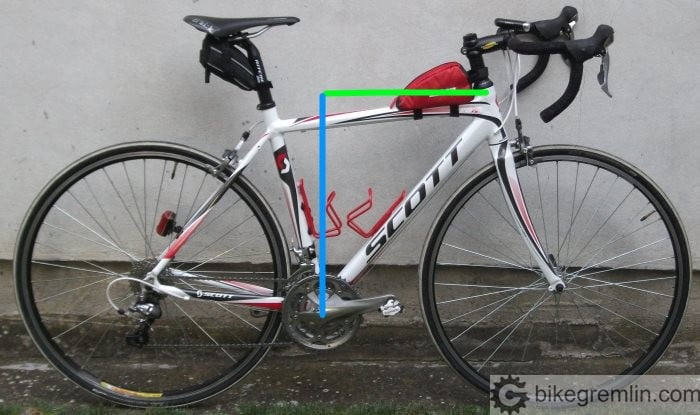
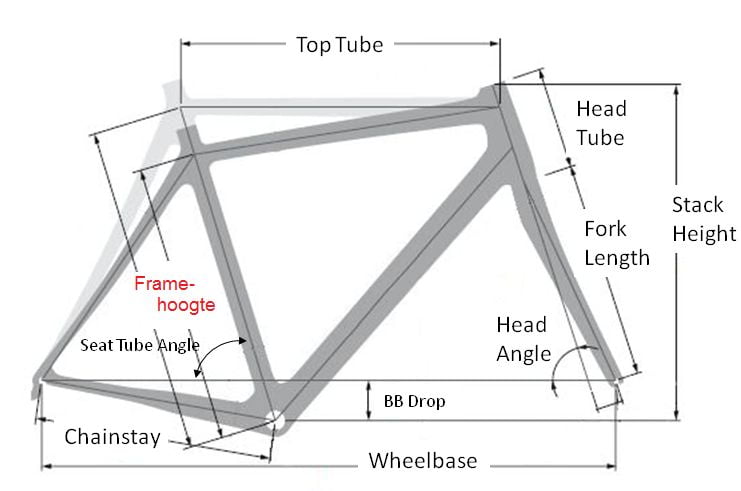
Stack is (watch out now! 🙂 ): vertical distance from the (middle of the) bottom bracket, to the top edge of the head tube. Sounds more complicated than it is, picture 1 shows it clearly.
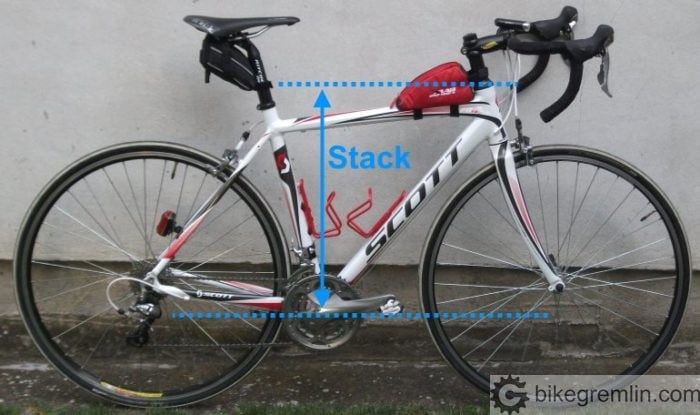
Picture 1
1.2. What is “reach”?
Reach is horizontal distance from the (middle of the) bottom bracket to (middle of) the top of the head tube. Picture 2 says it all.
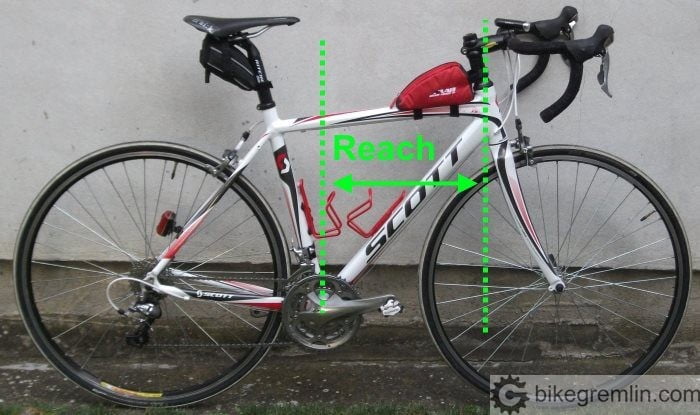
Picture 2
Cycling literature usually shows these two measures together (picture 3), but that can look a bit confusing, pictures 1 and 2 show exactly what is meant by the terms.

Impressionism. 🙂
Picture 3
2. Methods for measuring effective frame size
When measuring stack and reach, it is important that the bicycle has both wheels and that it is put upright, on a flat surface. Best done in a corner of a room – leaned against a wall to stay upright, and rear wheel put against the other wall so there is a vertical surface from which measurements can be taken. This can be improvised, as the following pictures will show. Also, as long as the bike isn’t moved between measurements, the rear wheel doesn’t have to touch (and stain) the wall.
The measures are usually expressed in millimeters, less often in centimeters.
2.1. Stack measurement
Measure the height of the top part of the head tube from the floor, then the height of the (middle of the) bottom bracket. Subtract the bottom bracket height from the top tube height and that give the frame’s stack. Pictures 4a and 4b show the procedure. It is important that the bicycle is vertical!
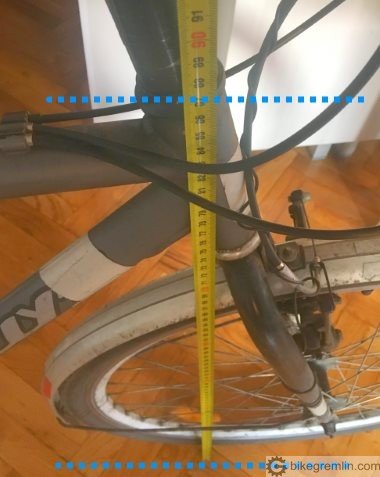
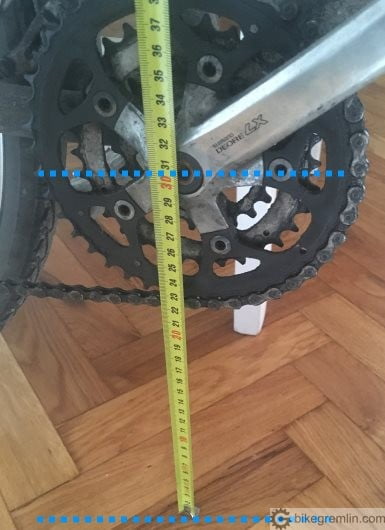
In the example from pictures above, stack is: 870 – 305 mm = 565 mm.
2.2. Reach measurement
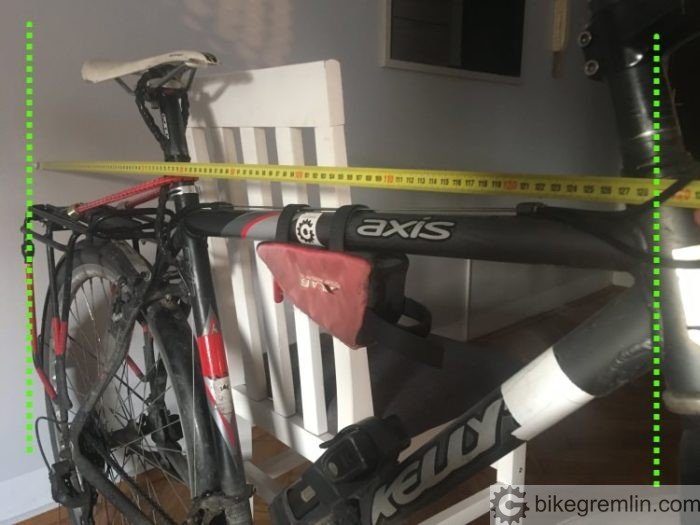
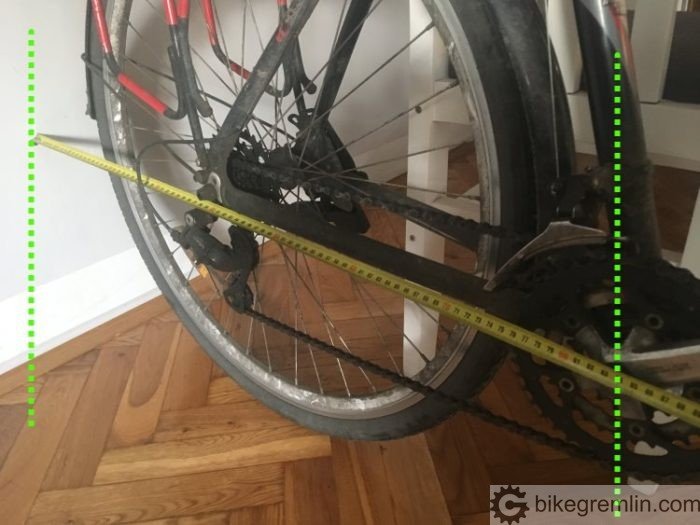
First measure distance of the head tube top middle from a wall behind (or in front) of the bicycle, then the bottom bracket distance from the same wall. Subtract larger from the smaller measurement and that gives the reach. Shown in pictures 5 and 6.
Picture 5
Picture 6
In the example from pictures above, reach is: 1285 – 835 mm = 450 mm.
3. Final notes – saddle and handlebar stack and reach
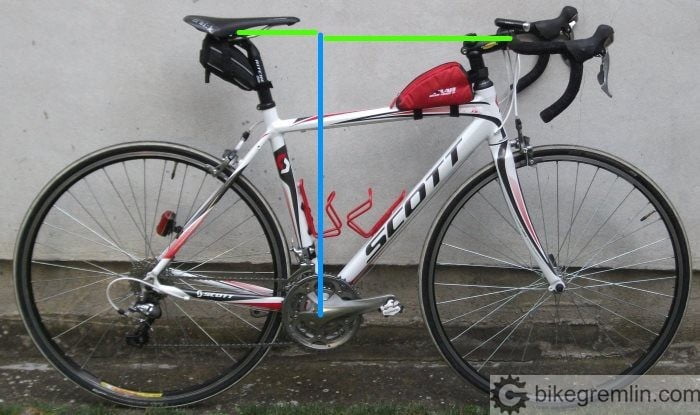
Stack and reach, apart from the frame, can also be measured for other contact points of rider and bicycle: saddle, handlebars etc. They are always measured as vertical and horizontal distance from the bottom bracket. See picture 7.
Picture 7
Both saddle and handlebars have a relatively wide range of setup closer-farther and higher-lower. However, if effective frame size is too far from optimal (dependent on rider height and riding style), needed position alteration of handlebars and saddle may be too much to make the alteration possible.
That is why if a frame’s effective size is off by more than 20 mm, it should be checked which saddle and handlebars stack and reach fit the rider and whether that can be achieved on the frame.
Saddles can usually be moved up and down easily (stack), but for and aft position (reach) is limited to several cm. With handlebars, vast changes of height and “distance” can affect bicycle handling (using a stem that is too long, or too short for example). That is why it is preferable and easier to use a frame with a stack and reach that fit the rider.
Method of measuring effective top tube length, explained in the post about “correct frame sizing” is a (pretty good) approximation of the stack and reach method. Main advantage is that it also accounts for seat tube angle. That is also the main disadvantage 🙂 – it practically includes saddle reach into the head tube reach “dimension”. Stack and reach method, with included seat post stack and reach, takes more time to measure and compare, but gives a full, spot on view of a frame’s fit.
4. Making this simpler – more practical
Today, high-quality bicycles and frames are usually sold like the T-shirts, in sizes: S, M, L, XL… 🙂
Manufacturers provide a list of rider heights (in cm, or feet & inches) that fit a given frame size. For example, here’s the sizing chart for the Giant Fathom 29 1 – which is an XC MTB (but the same goes for any other type and model):
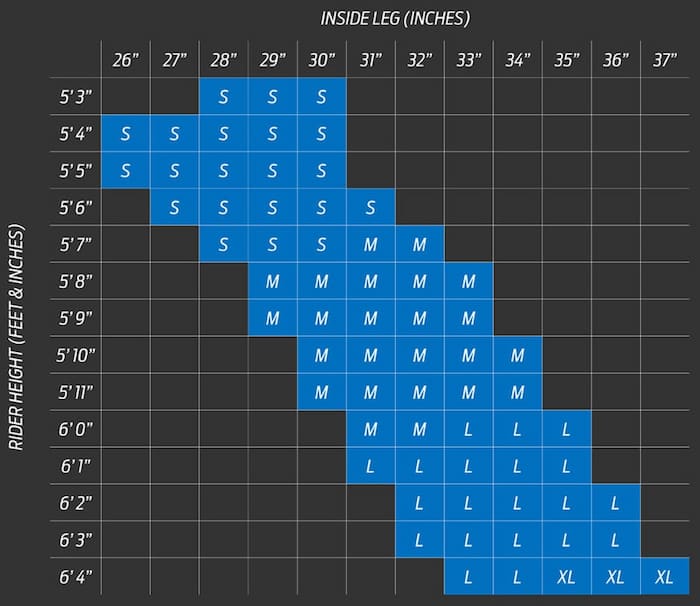
Picture 8
If you need it: on-line feet & inch to cm converter (give me the metric system, or give me death! ).
As you can see from the pic, a 5’7″ cyclist, with a 30″ inside leg, can choose either S, or M sized frame. The choice boils down to personal preference (some people prefer smaller frames). But such a rider should not choose an L sized frame – it will be too big, and won’t fit.
Some sellers only state the seat tube length – in inches, or centimetres. In the article on how to choose a correct bicycle frame size, I’ve explained why such numbers are useless without the manufacturer’s sizing charts. Here, I’ll just put a picture explaining the problem:
They are effectively the same size!
Fitting the riders of the same heights.
Picture 9
So, if someone tells you: “you should get an 18-inch frame,” know that the person may not know what they are talking about.
Such statements only make sense when they are referring to a particular frame (bicycle) model. For example:
“For the Giant XTC ADVANCED SL 29, you need a 17-inch seat tube length” (which is the M size frame for that particular model).
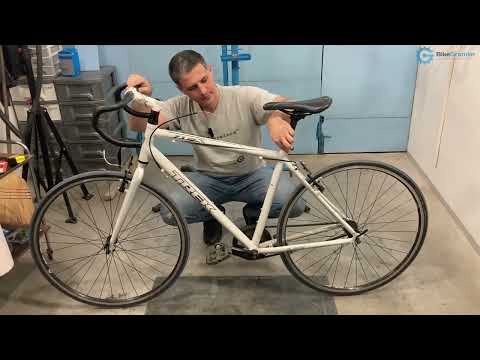
My video about the frame sizing and bike fitting basics:
Related post – Setting up (a comfortable) bicycle riding position:

Sources:
Last updated:
Originally published:
Thanks for this useful information. I have unusual measurements, being only 175cm tall but having an 86cm inside leg. This means medium frames are far too small. My current bike had an original stack of 626mm and reach of 429mm in size large. It was easy enough to raise the saddle to get the right leg position on the pedal, but in order to get the handlebars level and comfortable for my back I had to raise the stack with a stem riser to 715mm and shorten the reach with a shorter stem to 386mm. I have been reading your hybrid bike reviews and the Cube Travel 62cm would be perfect for me as it has a high stack and short reach. It also has all the equipment need for commuting. But due to Covid there is a shortage of bikes generally and due to Brexit I cannot import one from Germany to the UK.
Great! But how stack & reach correlate with one’s body measurements?
Hi Eduardo,
That’s a very good and logical question.
There are some general guidelines, but a great deal of bicycle fitting is quite individual so to speak.
So, different people of the same height might prefer different stack and reach.
Generally, taller riders will prefer more stack and reach, and vice versa.
Also, for the same height, riders with longer legs (and, hence, shorter torso) will prefer a bit more stack, but a bit less reach – and vice-versa for riders with shorter legs.
Preferred stack and reach also depend on the desired riding position. Fit, flexible riders that want to go as fast as possible on the road will not use the same stack and reach as riders who go on long tours hauling a lot of luggage – even if their height and leg length is the same.
On the upside, once you determine what stack and reach fits you, for say a road bicycle (or an MTB), you can relatively easily measure stack and reach of any frame/bike you are considering, and know whether it will fit or not.
With another note:
Just like the effective top-tube length, stack and reach aren’t perfect. For example, they don’t tell the whole story when comparing two frames with different seat-tube angles (they could have the same stack and reach, but the one with the seat-tube more angled towards the rear will have a longer effective reach).
Still, I’d say stack and reach are as good as it gets to figure out whether the frame size is about right and getting the stack&reach right usually lets one use different length stems, bar height, saddle setback etc. in order to get a good riding position.
On the other hand, getting the wrong stack and reach often results in a frame that can’t reasonably be made to fit the rider (e.g. it might require an outrageously long, or extremely short stem etc.).
This was a great, informative post. especially Trek bikes using Alpha sizing. So, rather than seeing a Trek 17.5 frame size, I’d see terminologies such as Trek medium frame size or extra-small, small, large, extra-large, etc.