In this article I’ll explain how to route housing (and cables) for bicycle shifters and brakes. Is it better to go with sharper bends, but shorter housing, or the other way round? I’ll answer this and other routing dilemmas. I’d like to thank mister Mark Barrilleaux (author of Killa’s Garage website) for helping improve this post with good notes and feedback from his experience.
How often should you inspect and replace cables (and other bike maintenance intervals)?
0. Golden rules of housing and cable routing
I’ll list the golden rules of housing and cable routing that should be read like the gospel. The rules are listed by priority: each consecutive rule must be respected within limits of not breaking any previously listed rules. I will explain each rule in detail in separate chapters after the list. At the end of the article, I’ll explain in more detail why it is best done the way it is recommended here.
- Use appropriate cables and housing for the intended use.
- Length of cables and housing should be sufficient for normal turning of the bars, shock absorbers movement etc.
- Total number of degrees of direction change should be as small as possible.
- Plan for any bicycle additions when routing (bags, panniers, luggage mounts etc.).
- Length of cables and housing should be as small as possible.
- Radius of the turn that housing makes should be as large as possible.
1. Use appropriate cables and housing
I wrote a post that explains bicycle shifter and brake housing and cables. Read it if in doubt and make sure to use proper cables and housing for brakes and shifters. Using inappropriate cables and housing can cause poor performance and, when it comes to brakes, can even be dangerous.
2. Length of cables and housing should be sufficient
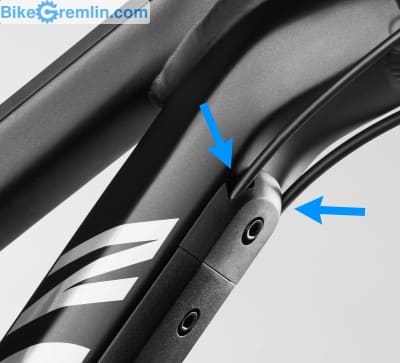
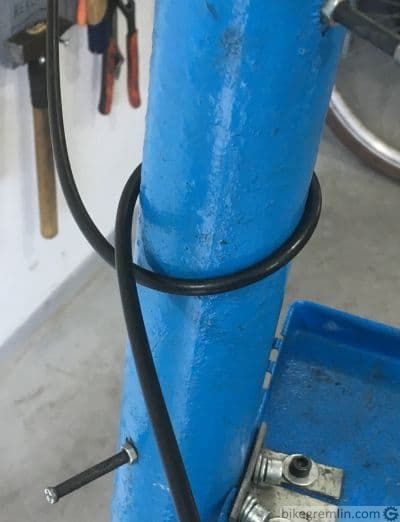
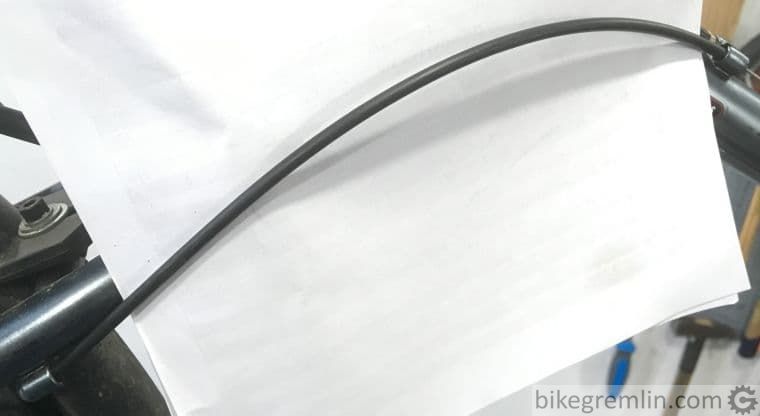
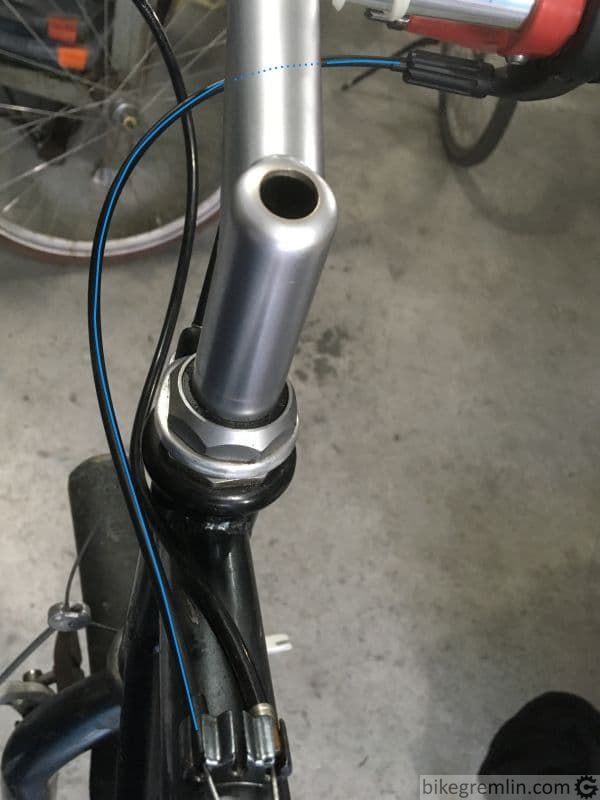
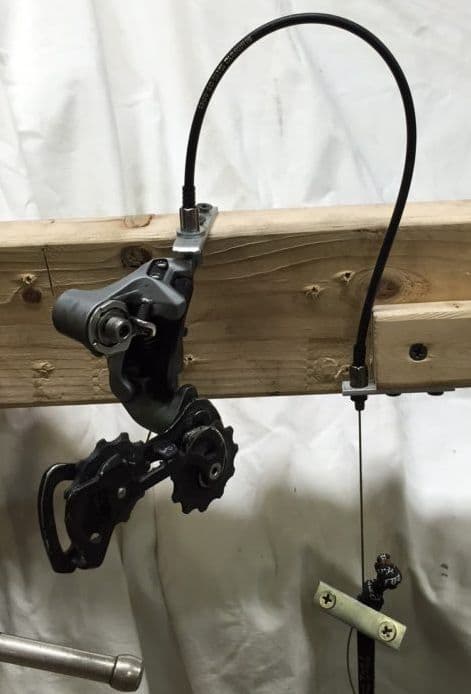
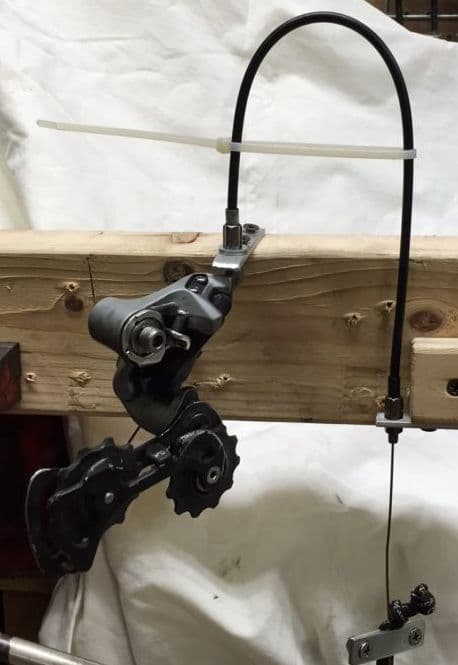
Bars should be able to turn for at least 90 degrees both left and right, without pulling the housing and cables, i.e. without cables and housing limiting the bar motion – unless you have a very good reason to do otherwise.
Likewise, shock absorbers should be free to move for their entire travel, without being limited by cables and/or housing.
Picture 1
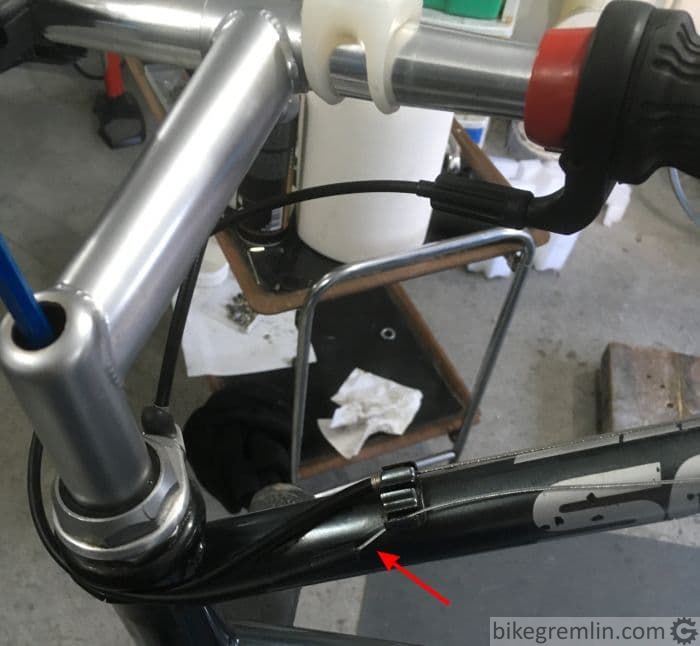
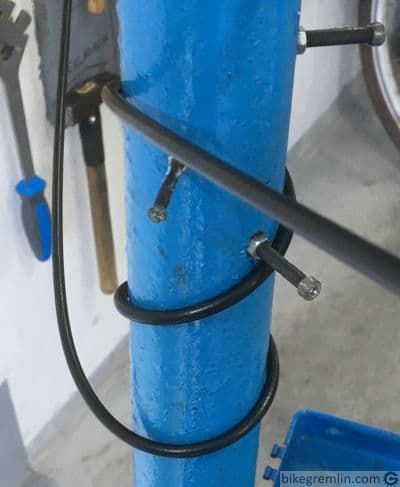
3. Total number of degrees of direction change should be as small as possible
The more housing turns (and turns “back”), the more cable friction there is (explanation why is given in chapter 8) Pictures show what I mean better:
Picture 2a
Picture 2b
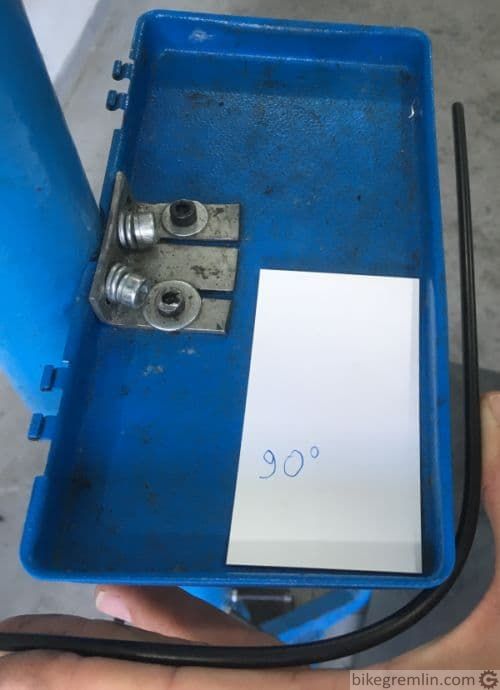
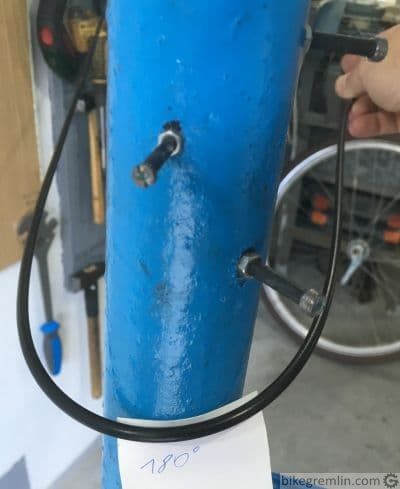
Why more degrees of direction change increase friction is more obvious from the following pictures:
Picture 3a
Picture 3b
4. Plan for any bicycle additions when routing
When the bicycle frame is “naked”, housing and cables are not always in exactly the same position (situation) as when it is packed with add-ons. This should be planned for in advance.
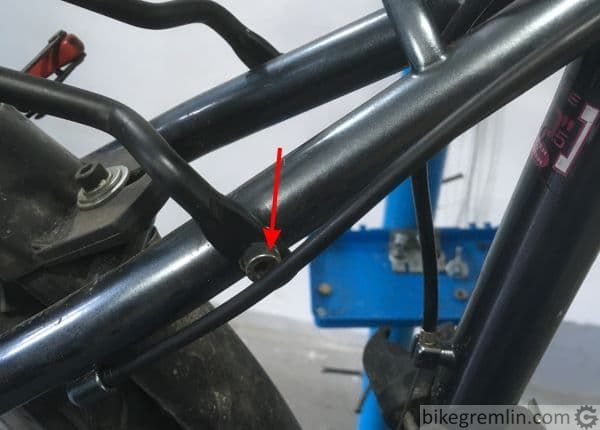
Picture 4a
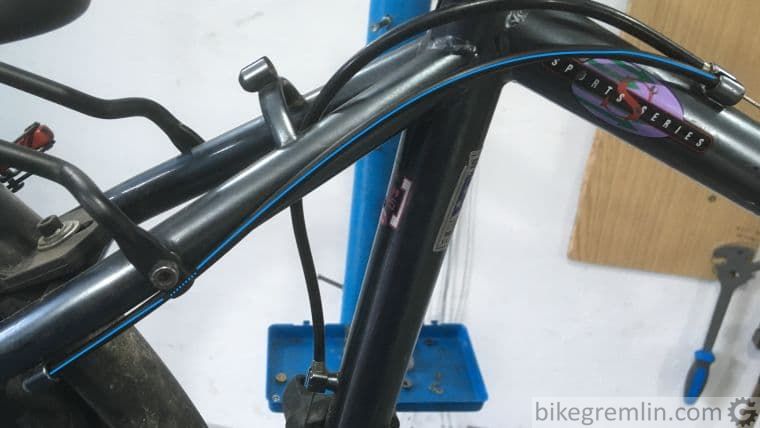
Picture 4b
I often see on cargo bicycles that front basket was not accounted for when routing cables. They often end up squashed, pinched and/or awkwardly bent.
5. Cables and housing should be as short as possible
As long as none of the above listed rules is broken, shorter path is preferable.
Picture 5
With brakes, housing gets squashed, while cables get stretched (to a lot lesser degree). Having them too long results in a “spungier” brake lever feel and lower braking force (all else being equal).
For shifters, it usually results with less precise shifting.
6. Radius of the turn that housing makes should be as large as possible
Again, provided no above listed rule is broken (“all else being equal”), less steep angles are better. This is something that many get wrong: choosing nice, wide curves and hence adding more degrees of direction change.
Picture 6a

Picture 6b
Picture 6c
7. Tips and tricks
Here I’ll provide a few helpful tips for optimal housing and cable routing.
7.1. Bike Gremlin cable cross
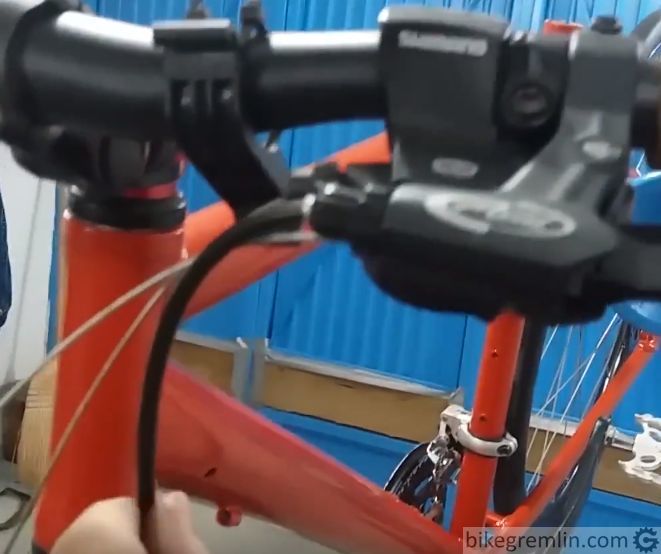
This is a trick I like using with shifter housing. Without a wide-spread common term for this technique, I’ll name it “Bike Gremlin cable cross”, if for no other reason, then for convenience when writing about it and for fun – to see if it catches on. 🙂 What is it about? Common way of routing shifter housing is along the near side of the frame (relative to the shifter). This alternative method uses crossing. Pictures 7 and 8 explain it better:
See how the housing bends, creating more direction changes.
– note that housing must be left long enough so that bars can be turned both left and right for at least 90 degrees.
Picture 7
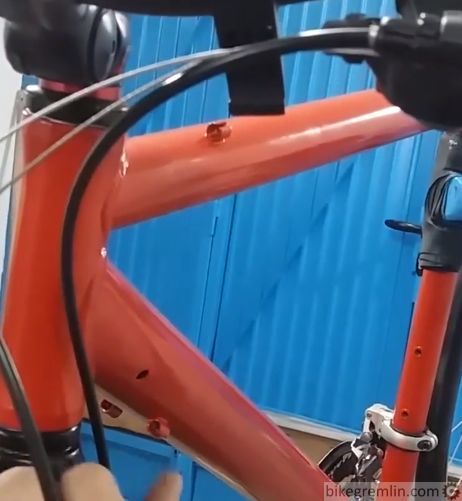
Housing, even when left long enough to accommodate for bar turning, still makes smaller direction changes than with traditional routing, especially when bars are in the position mostly used – straigh.
Picture 8
After this, the cables get crossed, so that each ends up where it should at the rear part of the frame. Cable crossing does not create measurable increase in cable friction. Another advantage of using Bike Gremlin cross, visible when comparing pictures 7 and 8, is that housing doesn’t scratch the frame.
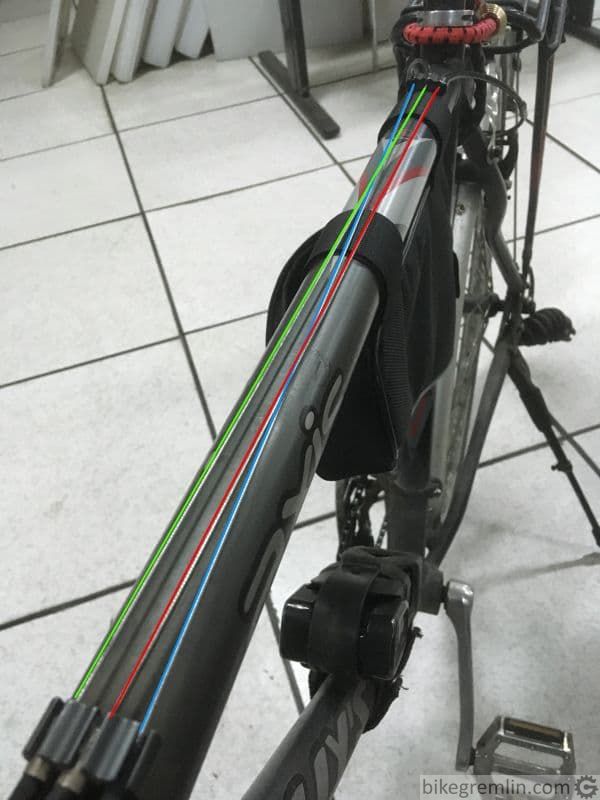
Green: front derailleur cable.
Blue: rear derailleur cable.
Red: (rear) brake cable.
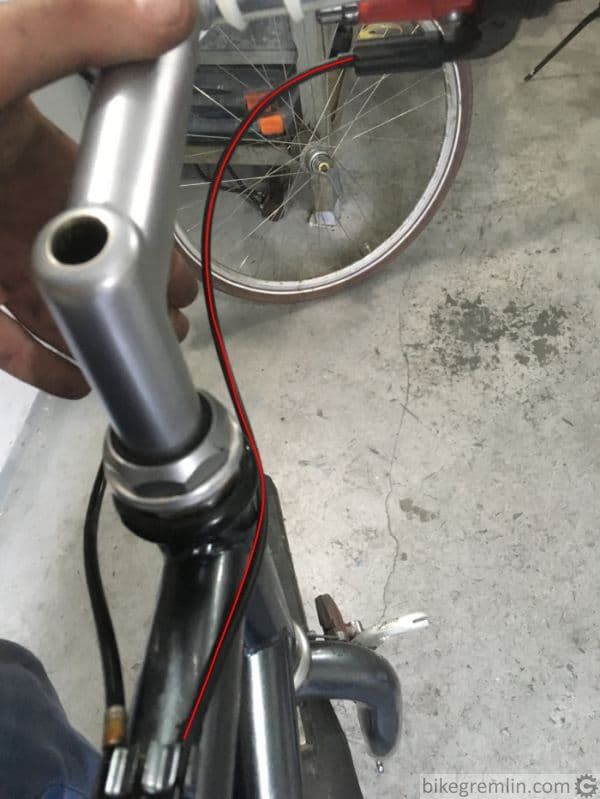
Picture 9
With frames where cables are routed along the bottom, it is even clearer:
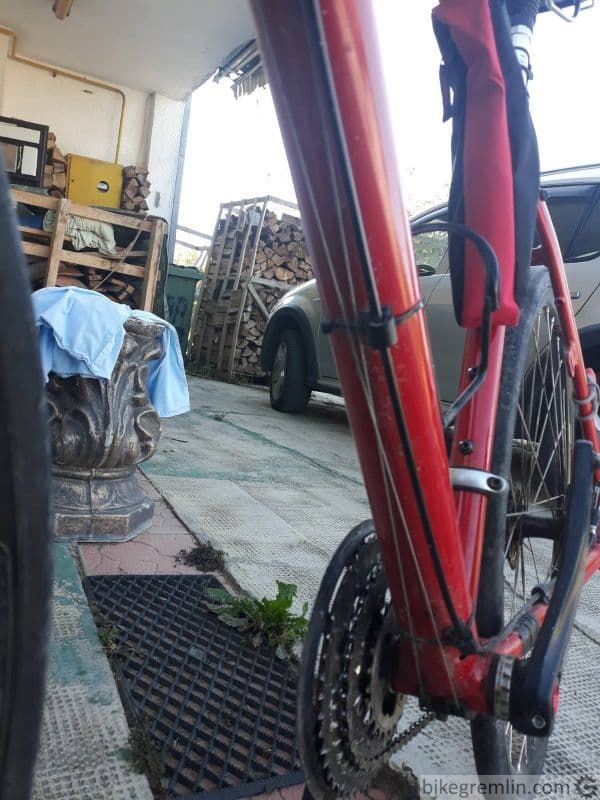
Picture 10
7.2. Preparing the housing
This goes especially for shifter housing. Try to pre-bend, pre-shape housing in the way it will be mounted on the bicycle. Preferably do this before the final shortening. If housing is cut while straight, the longitudinal steel wires (of shifter housing) that are on the inside of a curve, will bend along a shorter diameter than those on the outside, hence sticking out more. Also, pre-shaping housing so that it has the least possible number of direction change degrees is always good (see picture 12).
If housing is not pre-shaped before cutting, a few strands of housing wires can stick out too much, get bent towards the inside and start hindering free (shifter) cable movement.
7.3. Lubricating
Don’t! Especially with new cables and housing. If you are riding in wet, muddy, or “salty” winter conditions, rust and mud will eventually become a problem. In those cases, use lubricants of low viscosity (“thin”). Such as Teflon (PTFE) spray, WD40 etc. Shimano sells special cable grease (affiliate link). I haven’t put it to the test – WD40 and Motip PTFE spray do the job for me, even in the winters (anything can be fixed with WD40! 🙂 ).
7.4. Shimano’s table for optimal rear derailleur cable housing length
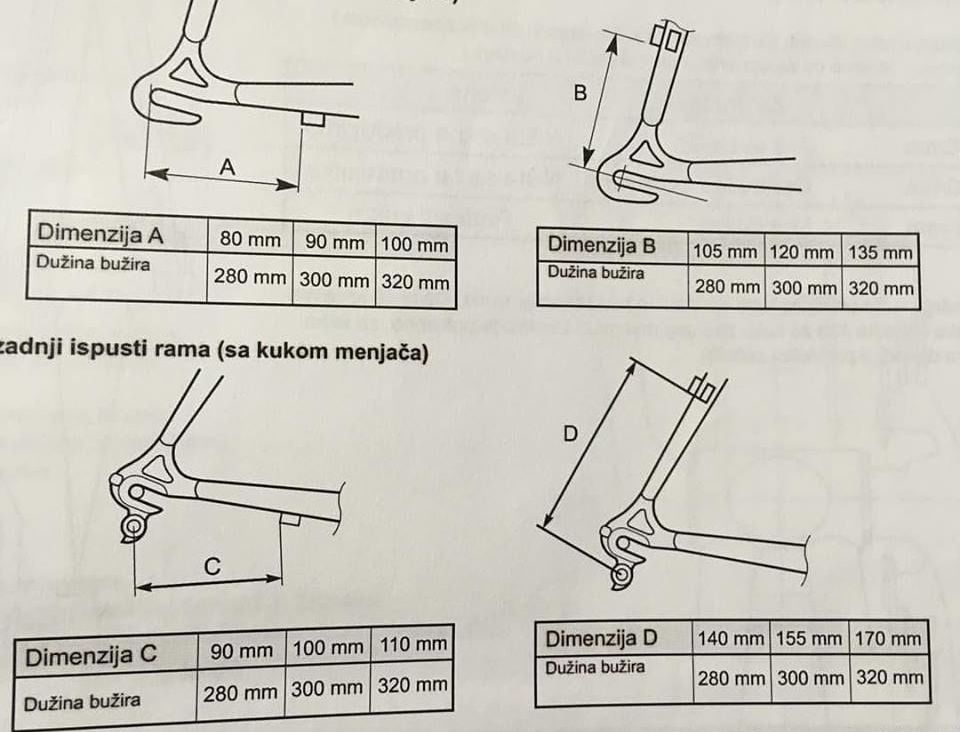
“Dužina bužira” = “Housing length”
Picture 11
Note:
The above-listed recommended lengths are usually too long for direct mount rear derailleurs (even if you mount them on a “standard” derailleur hanger using a b-link).
Tip:
Don’t cut the cable right after the pinch bolt (either at derailleur, or brake caliper). Leaving the cable some 2 inches (5 cm) longer prevents cable wires from unwinding after being cut and it also makes any future adjustments a lot easier (whether it’s tightening, or loosening the cable), by providing a good leverage to pull the cable.
7.5. Housing and cable quality
Using good quality cables, shifters, cable stops and inline barrel adjusters is of crucial importance. At a cost of this sounding like an advert, I completely agree with Mark Barrilleaux’s remark: why would anyone use other housing than Shimano’s? It is of great quality and reasonably priced.
Likewise, if using inline barrel adjusters (often used for easier fine-tuning of road bike front derailleurs), choose good quality ones that stay in place when set, not start turning in due to road vibrations.
At the end of the post about bicycle housing and cable standards I’ve already given some recommendations, but here I’ll also give a short list of (affiliate) shopping links – though I suggest shopping from your local bicycle shop and supporting it (it’s better to have a source of parts, knowledge, experience and good mechanics close by, on-line shops are killing that business). Of course, by shopping using my affiliate links, you’ll support this site, but I’d prefer if you support your local bicycle shops (disabling ad-blocker for bikegremlin.com is more than enough as far as I’m concerned, or buying a t-shirt from Bike Gremlin webshop. 🙂 ).
My recommendations (with Amazon and Bike24 affiliate shopping links):
- Shifter housing: Shimano SIS SP41.
- Shifter housing cap: Shimano SP40 plastic, or Jagwire brass ones (better).
- Shifter cable cap: any decent one, like this SRAM.
- Shifter cables: I’ve had luck with cheap Promax ones, though I’d recommend Shimano, or Jagwire.
- Inline barrel adjuster: Jagwire – light, stable, good.
- Brake housing: Shimano, or SRAM.
- Brake housing cap: Shimano, steel ones.
- Brake cable cap: Shimano, thick, aluminium ones.
- Brake cables: Shimano, again.
7.6. Grinding housing ends
What can cause problems, even if everything else is done perfectly, is poor preparation of housing ends.
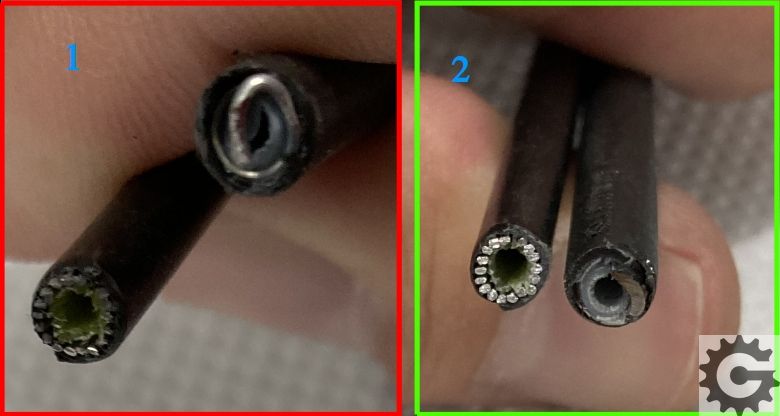
Picture 12
How to achieve this? First grind the ends so they are even (using a file, or a grinding stone), with no housing plastics left hanging, and with steel inner sleeve ground to be flat at the housing’s face:
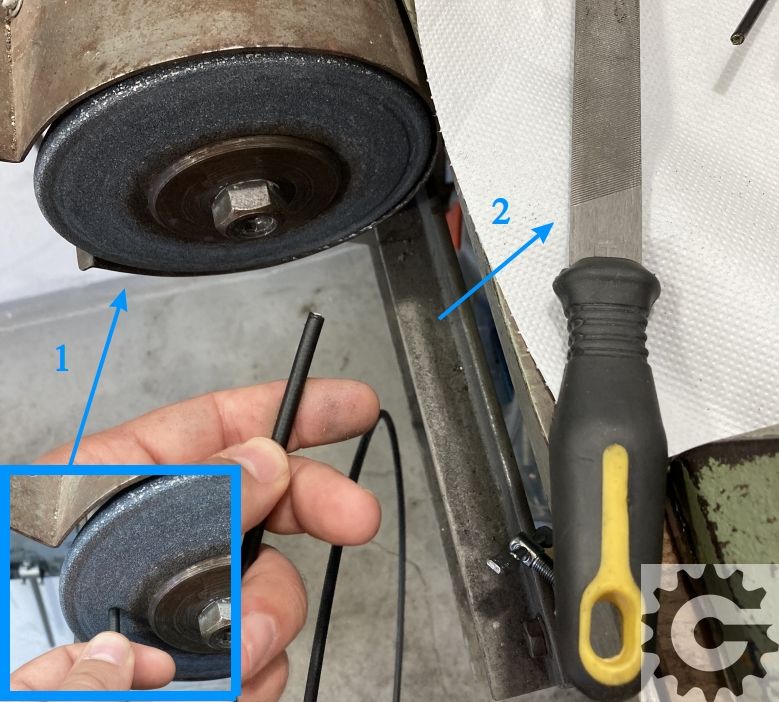
Picture 13
Finally, shape the ends so they are round. For this any sort of point, angled steel object is good, or use a tool designed for the job:
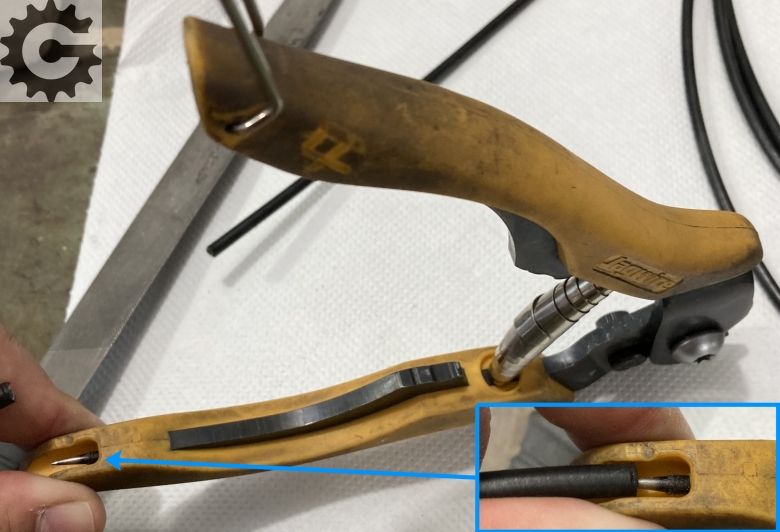
Picture 14
If you did everything right, you should get the housing ends to look like those in picture 12 (2), if not even better. 🙂
8. Why is this the best way to do it?
When I’m learning something, I like knowing why. Not just repeating like a parrot. When it comes to cycling and bicycle mechanics, there’s too much (folk)lore (and marketing) and too little engineering, in my opinion. This is why I think it’s only fair to explain why it is best to route cables and housing as explained here.
First thing that got me thinking and experimenting are old Shimano 10 speed road systems (105 5600, Ultegra 6600 etc.). With those systems, so little cable is pulled for each shift, than any imperfection in cables, housing, or routing them results in frustratingly imprecise shifting. With those systems, Shimano started with under-the-bar-tape housing routing – adding insult to injury (with additional degrees of direction changes). So everything had to be set as good as possible.
In time, with experience, I came to conclusions described here. However, this is still the level of hear-say. What got me to finally write this article is a beautiful experiment conducted by Mr Mark Barrilleaux, described on his website Killa’s Garage – Cable Routing – Experimental Results. There he provided measurable and comparable results (engineering/scientific approach) of various setups and nicely explained why total number of direction change degrees is of crucial importance when it comes to cable friction.
Small digression: I’m a huge fan and subscriber of Killa’s Garage website mailing list. As the sub-title says: “esoteric observations on bicycles and cycling” – Mark Barrilleaux deals in great detail with some aspects less thought about (considered). Along with generally good, common sense, mechanics articles and advice.
Here, with permission, I’ll post a brief summary of experiment results, but I recommend you read the entire original article.
As I like to say – “one good measurement is better than a thousand expert opinions”:

Source: www.killasgarage.bike
Picture 16
VIDEO tutorial: How to route shifter and brake housing & cables
I’ve made a video tutorial showing and explaining (step-by-step) how to install or replace brake and shifter housing and cables:

Last updated:
Originally published:
Reader questions/comments and replies – below:
The existing comments posted under this article (questions and answers) have been moved to this BikeGremlin forum thread:
https://www.bikegremlin.net/threads/routing-brake-and-shifter-housing-and-cables-article-comments.150/
Hi there Relja,
Thanks as always for the informative posts. I wish you happy holidays!
Dmitry
Thank you,
Happy holidays and the New Year. 🙂
Great article! Especially liked that “why” section. If only there were more people like you, or late Sheldon B. in this industry – true mechanics, with more common sense than marketing mumbo-jumbo.
Sheldon Brown was a great man and his website was an inspiration for creating this one.
I’m also appalled with the level of marketing and lack of good engineering in the bicycle industry. I’ve met many good mechanics, good engineers, but most of them are not very good at writing and don’t like the idea of posting things on the Internet. It is my long term goal to get them to write – either on this site, or one of their own – or both.
For full disclosure: I’m not a mechanical engineer (I’m an IT engineer – getting paid to work as a systems administrator) nor a professional mechanic. I have worked as a bike mechanic in order to gain more experience and see what a fast-paced “real bike shop” environment looks like, but don’t do it for a living. I do run a small one-man bicycle shop as a hobby / part-time job – because I love it and it feels good, but doesn’t pay nearly as much as the IT job, so not a good choice to make a living (sales are what makes money with bike-shops and I don’t really like talking people into buying stuff – prefer teaching them to repair them themselves, which doesn’t pay 🙂 ).
Mr Mark Barrilleaux is a real mechanical engineer – and a great writer at that, so I love his website.
Another real engineer is the owner of Hambini YouTube channel – some good videos (though I prefer reading than watching, it’s faster way to get information for me):
https://www.youtube.com/user/nrgizerbunny
i find shimano stainless steel cables the best on the market,these ones hardly ever break and they never stretch much,i cut the cable itself with a pair of side cutters or a very sharp pair of nail pinchers,then i cut the cable housing with a small dremel cutting wheel,then i smooth that of with another dremel sander ,,wheel,this gives your cable housings very good finish and trouble free finish for years to come,i never lube any stainless steel cables at all.there is no need to oil them,once i install these cables i dont need to touch them again except for a minor adjustment,put that little crimp on the end of cable and its done,very impressed with shimano stainless steel cables and shimano cable housing.
another tip when cutting brake cable housing with dremel tool put a thin nail inside the housing when you cut it to stop the inside from melting,also use a very thin cutting wheel as this gives a neat finish,dremel is only one type of tool but there are many cheaper similar type tools,they are basically called small rotary tools,any professional cable cutter will squash that cable housing.save your cable cutter for the cable not the housing.
What type of grinding stone do you recommend for smoothing the housing? Would a bench grinder work? I’m open to buying a small bench grinder or something similar for this and other purposes.
I tried smoothing the end with a small rotary tool (cheap Dremel-like device) with a grinder attachment and, although it worked, the housing cables ate right through the attachment. I can’t use a file because I only have one working hand.
Thank you for this detailed and help article.
Hi Guy,
I use a relatively rough stone (not sure about the exact grit) on a bench grinder.
On my YouTube channel in my native, I’ve shown what I do in this video, at 4:55 – this link should start the video at that time:
Grinding brake housing ends
I try to press relatively hard and move back after a second or so. Doing it longer doesn’t seem to further improve the smoothness of the steel inside the housing, it just melts the plastic.
Relja
i have tried so many methods over many years,found the dremel tool or similar to be the fastest and cleanest method to cut and clean cable housing,you cut the housing with a very thin cutting wheel,then you smooth the sharp edges off with a drum sanding wheel,this wheels is made from rubber and a sandpaper sleeve fits over the rubber attachment.i have also had problems using those cheap grinding attachments and yes they do chip off or wear very fast,try the drum sander attachment,forget even trying a proffesional cable cutter for the cable housing as that tool is best for cutting stainless steel cables only,other methods for cutting cables do work but tools must be larger tools and they must be new and very sharp,big nail pinchers work,big side cutters work.
some dremel wheels look like they are grinding wheels but alot are basically polishing wheels,depends on who makes them,most pink coloured or white coloured ones are polishing wheels,bench grinder will do the same job as a dremel wheel
dont press hard with a dremel like tool just hold it on an angle and take of the sharp edges around the cable housing,if the plastic melts you are pushing to hard