What is a correct, “real” (i.e. effective) bicycle frame size? How to measure it, tell which one will fit? While most other things can be “tweaked” to fit a rider, if a frame is too small, or too big (especially by more than “one size wrong”), it is very hard “fix” – since it usually requires changing the frame itself. If a new frame has different fittings: headset, bottom bracket shell, seatpost diameter etc, it calls for changing many othre components as well – costing a lot of time and money.
In a separate article, I explained how to choose a correct frame size for a kids’ bicycle.
That is why getting the frame size right is important both when buying a new bicycle, or buying a second hand (used) bicycle.
Important note: this post explains reasons why old sizing methods are unreliable and provides one better, more universal method. Author strongly recommends that after reading this, readers check a more precise method – “stack and reach – effective frame size measurement“.
TL/DR
In this article, after a bit of history (that you can skip by using the table of contents), I’ve explained how you can measure and compare bicycle frame size(s).
Yes, measuring stack & reach is more accurate (especially when comparing different frames), but the method I explained here (effective top-tube length) is simpler and faster, and it too will give you a ballpark size value.
1. History
Up to ’80s of the twentieth century, bike frame producers made quite similar geometry frames. Top tube was horizontal, going from almost the top of the seat tube, to the top of the head tube. Here is where most of the conventional wisdom and measurements in selecting a correct frame size for a cyclist come from.
Those methods can still often be heard. E.g: “stand over the bicycle and a fist should fit between the top tube and the rider’s crotch“. And similar. Many things have changed since the “old days”. Bottom brackets are no longer at a standard height, they vary often from bicycle to bicycle. Top tubes are no longer horizontal, they are often at an angle, sometimes even curved, just to make measuring a bit more complicated. 🙂
2. Why old, “standard” measures are not reliable
Today, frame producers give measurements in two ways:
- Inches (or centimetres for road bike frames)
- Sizes, like S (small), M, L etc.
Because of the afore mentioned differences in frame design, these measurements are also not very useful. The only thing to rely are exact measures of a particular frame or a manufacturer table. Most frame manufacturers give tables with recommended frame size (out of their product lines) for rider height. These tables are a good starting point. They differ from frame to frame – that is not all the 19″ frames of a particular manufacturers are the same. Depending of the production year, model, designs differ.
For some decent starting reference, this site is also useful:
Bicycle frame size calculator – ebicycles.com
Here is why these measures should never be taken for granted:
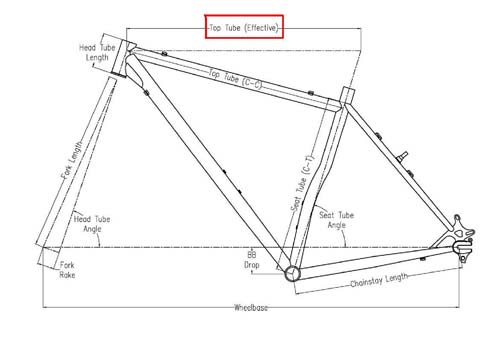
Two differently designed frames of the same relevant sizes, for the same rider size.
Dark grey frame will have for about two inches smaller nominal size, than the frame with a horizontal top tube. E.g. if the darker frame is noted as 19″, the other horizontal top tube frame will be 21″. Rider who fits one frame, will be positioned exactly the same on the other frame – the only difference being visual, the amount of seat post coming out of the seat stay.
3. Which measures are then relevant?
The only important measures for fitting a bicycles are the points in which a rider comes in contact with the bicycle: pedals, saddle, and handlebars. Contact points. Link for: detailed explanation of contact points and setting up a comfortable bicycle riding position.

When saddle is set to a correct height (relative to the pedals, i.e. bottom bracket), it is left to measure distance to the handlebars. This is called reach.

Reach can be determined through trial – finding a comfortable position. Arms should be at least slightly bent and, rider should feel comfortable. Not cramped, not stretched.
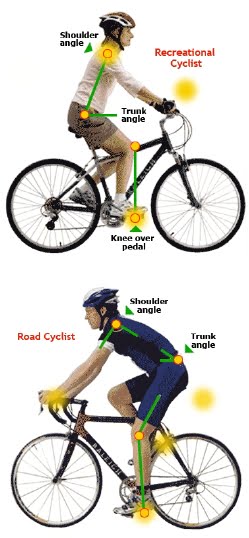
However, it is important that the fit is comfortable and that arms are slightly bent at the elbows.
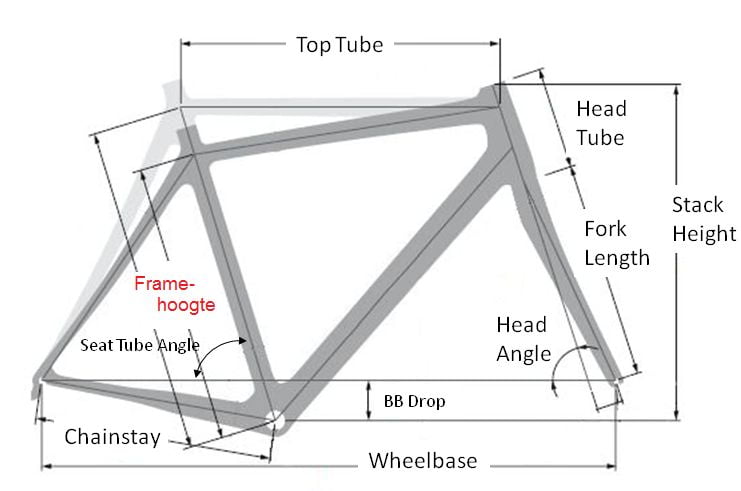
This is why one of the most important measures is the effective top tube length:
The optimal frame size can be determined even more precisely if you know which stack and reach (what they are and how to measure them) are optimal for you. Unfortunately, to figure that out, you need to try different frame sizes until you see what fits you best. And it also depends on your desired riding stance (whether you prefer to sit more leaned forward, or more upright).
The table below gives recommended effective top tube lengths for a rider height, as well as more or less standard frame size that fits. This should also be taken with a grain of salt. Riders of the same height can have different proportions of legs and torso lengths. Women usually have a bit longer legs (and shorter torsos), than men of the same height.
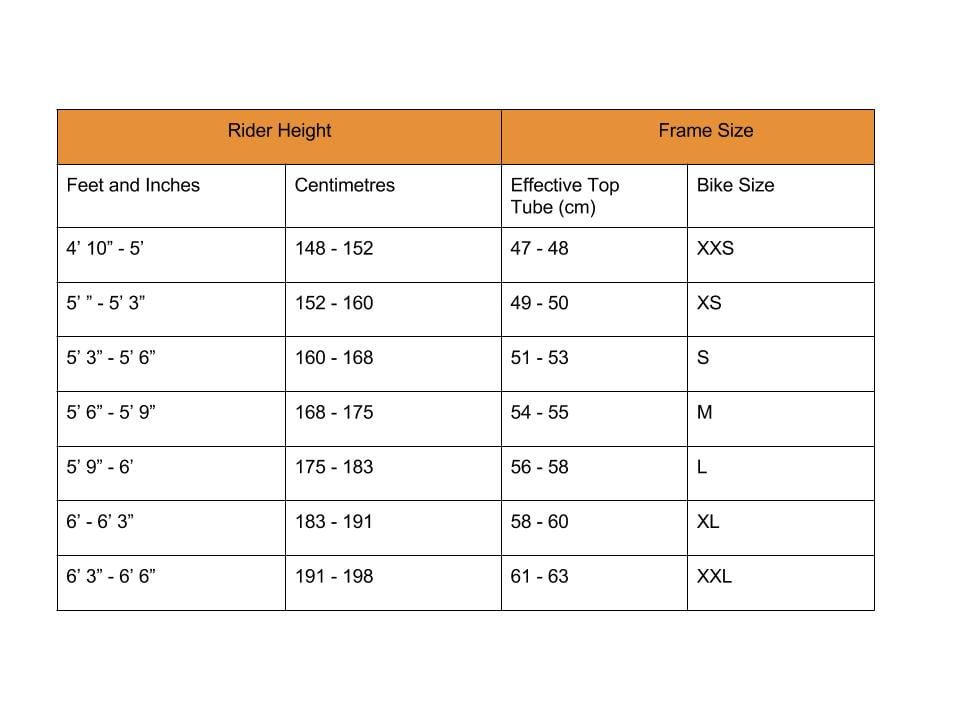
A 176 cm high rider with a shorter torso might look for a 55 cm effective top tube length, instead of a 56-58 cm as the table suggests.
4. How complicated is this, really?
Lots of numbers and data, but it basically all comes down to the last table. Fine-tuning can be achieved with different-sized stems, seatposts etc, but one should find a frame with roughly fitting effective top tube length.
Video in which I explain the basic bicycle frame differences, and how to set a comfortable riding position:
![Bicycle frame geometry and bicycle fit basics explained [1018]](https://bike.bikegremlin.com/wp-content/plugins/wp-youtube-lyte/lyteCache.php?origThumbUrl=https%3A%2F%2Fi.ytimg.com%2Fvi%2FajoLYCn7IcM%2F0.jpg)
5. Making this simpler – more practical
Today, high-quality bicycles and frames are usually sold like T-shirts, in sizes: S, M, L, XL… 🙂
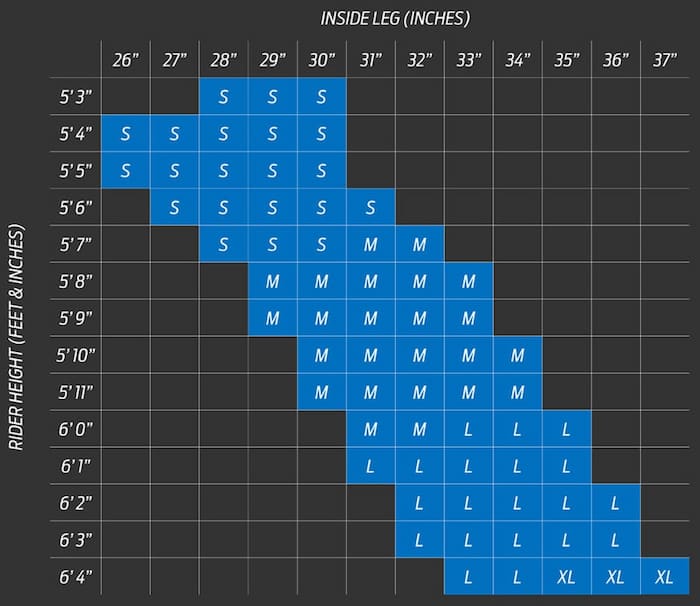
Manufacturers provide a list of rider heights (in cm, or feet & inches) that fit a given frame size. For example, here’s the sizing chart for the Giant Fathom 29 1 – which is an XC MTB (but the same goes for any other type and model):
If you need it: online feet & inch to cm converter (give me the metric system, or give me death! ).
As you can see from the pic, a 5’7″ cyclist, with a 30″ inside leg, can choose either S or M-sized frame. The choice boils down to personal preference (some people prefer smaller frames). But such a rider should not choose an L-sized frame – it will be too big, and won’t fit.
Some sellers only state the seat tube length – in inches, or centimetres. In this article, I’ve explained why such numbers are useless without the manufacturer’s sizing charts. Here, I’ll just re-post the picture explaining the problem:
So, if someone tells you: “you should get an 18-inch frame,” know that the person may not know what they are talking about.
Such statements only make sense when they are referring to a particular frame (bicycle) model. For example:
“For the Giant XTC ADVANCED SL 29, you need a 17-inch seat tube length” (which is the M size frame for that particular model).
Also do read: “Stack and reach – the effective size of a bicycle frame“:

Sources:
Last updated:
Originally published:
Not possible to get the right answer. I need the distance from the top tube of a low step thru frame to the floor.
It should not be more than 18 inches.
How precise has the effective top tube length to be? How much can I correct using different stem lengths/heights/angles?
What is the upper limit of the frame size, when the frame size is becoming too big?
What is the lower limit of the frame size, when the frame size is becoming too small?
Hi Roman,
That’s a good question. A short answer:
It is subjective, but the further away one goes from their optimal size, the less likely it is they’ll be able to make the bike fit (and handle) them properly.
A longer explanation:
1. First, let’s define the optimal frame size
Some people prefer frames that are half, or one whole size larger or smaller than optimal. Even for such people, choosing a matching frame size and “altering” the fit using longer/shorter stems and similar often does the job. For such people, for all practical purposes, the optimal frame size choice should be considered accordingly to both their height (and other measurements), and their preferences.
The (vast?) majority of people are most comfortable on frames that are “their size” though.
Either way, there is an optimal frame size for the person. Even for two same-sized people (so to speak), the optimal size can differ if their preferences are different (riding conditions, riding style, or one just prefers smaller/larger frames).
2. Now, let’s discuss the frame fitting
If a frame is of the rider’s optimal frame size (as explained above), it is a lot easier to fit.
If a frame is one size larger/smaller than the rider’s optimal frame size, it may be next to impossible to fit, and/or making the optimal fit will badly affect handling.
Some examples, considering size mismatches:
A road bike frame that is too large is very difficult to fit.
A road bike frame that is a size smaller can be “fixed” by using a longer stem, if the rider is fine with using a more “aggressive” riding stance (or if a stem-riser is used, not a good idea for carbon steerers though).
An MTB frame that is too small can be made to fit using a longer stem, but that might make handling a bit more “tricky” if one rides technical trails (very long stem makes bars sweep in a larger radius curve, for the same bar width).
And so on and so forth.
3. The bottom line
It’s best to figure out what one’s optimal frame size is, and to look for frames that are closely matching it.
Going “out of spec” can be compensated, with more or less problems, and that is subjective (i.e. how sensitive a rider is to any fitting or handling “imperfections”).
The further away from the optimal size, the more difficult it gets. There is no hard-set limit how far one can go, that too is subjective.
If I had to give some “general” advice:
– Avoid more than one-size too small for the road bikes.
– Avoid even one-size larger than optimal road bikes.
– Avoid more than one size too large MTBs
– Avoid even one size too small MTBs.
Pretty useless article. I still have no idea what kind of stack or reach are even close to optimal for the road bike I plan to build for my kid.
Thank you for the feedback.
In my experience, the optimal stack and reach are best determined by trial (and error). Once you see what fits well on a “test bike,” you know what to look for.
For the kids that are still growing, that will change over the years, of course.
If you are buying a built bike, many manufacturers provide lists of their recommended frame size for a rider’s hight.
If you are building a custom bike or even a frame, it makes sense to see one of those charts (by Giant or similar), then see the geometry of the model that fits by their chart, and see its stack and reach.
That would probably be a good start.
Here’s an example of the recommended frame sizes and stack and reach table (for each frame size) for a Giant road bicycle:
https://www.giant-bicycles.com/gb/tcr-advanced-2#geometry
Here is a similar chart for a Liv Avail road bike (smaller frame sizes, marketed as “for women”):
https://www.liv-cycling.com/gb/avail-1-2021
with a separate sizing chart:
https://images2.giant-bicycles.com/b_white,c_pad,h_1000,q_80/ieuzhvo4jbbjfp4ef9kw/sizingsheet.jpg
Relja
A kind response would be to say “could you please expand upon the sizing regarding stem and stack adjustment?” “What you’ve given above is very good.” “Thanks in advance.”