If you need some expert advice on buying a city bicycle, you are at the right place. Welcome to the most comprehensive city-bike buying guide in the Solar system. 🙂
Table Of Contents (T.O.C.):
- What do I mean by a “city bicycle?”
- City bike variants and equipment on them
2.1. “Men’s” vs “Women’s” (step-through) frames
2.2. Kickstand
2.3. Luggage racks, baskets, and stems
2.4. Speeds, and belt drive instead of a chain
2.5. Chainguard and “skirt-guard”
2.6. Disc brakes, roller brakes, and suspension forks
2.7. Wheel and frame size
2.8. Lights and dynamo hubs - City bicycle buying recommendations
3.1. Simple and cheap city bicycles
3.2. More expensive city bike with disc brakes
3.3. Electric city bicycle - Conclusion
1. What do I mean by a “city bicycle?”
I already wrote in great detail about trekking bicycles (as a sort of a cross between a mountain bike and a city bike). In that article, I also mentioned hybrid bicycles (as a cross between a road bike and a city bike).
Those are quite good bicycles for urban city riding, but they are not what is called a “city bike” when we are talking about bicycle types. By “city bicycle” I mean what’s often also referred to as “Dutch bike” – the bicycle that puts you in a relaxed, almost completely upright sitting position, intended for more casual, slower riding:

Picture 1
Of course, many city bikes have a “step-through” frame (i.e. without the high, horizontal tube) – those are often referred to as “women’s bicycles” (as there is no tube to interfere with a skirt, for example), though many men ride them too for their convenience:

Picture 2
The bicycle in the picture above has a front suspension and, by construction, it does resemble a trekking bicycle with a bit higher handlebar.
So, for this article (and in general), I’ll define the city bicycle as:
A bicycle designed for a relaxed, upright riding position and with gearing suitable for leisure riding.
Folding bicycles are a separate group, and I’ll write more about them some other time.
For other bicycle types, see my other buying guides:
- Road bicycle buying guide
- Mountain bicycle (MTB) buying guide
- Trekking bicycle buying guide
- City bicycle buying guide
- Commuting bicycle buying guide
- BONUS: Is it better to buy a new or a used bicycle?
- Kids’ bicycles – how to pick the right size?
2. City bike variants and equipment on them
Let’s give a brief overview of different city bicycle variants and equipment that comes with these bikes. I think that if I explain the pros and cons of each, it may help you figure out by yourself what’s best for you. It’s also a good reference for any recommendations I may later make.
2.1. “Men’s” vs “Women’s” (step-through) frames
To explain this difference, we’ll start with a picture:

Picture 3
See how the men’s bike (to the right in the picture above) has a high horizontal top tube? This creates a triangle with the down tube and the seat tube, making a structure that is relatively light yet very rigid. The downside is that it makes it a bit more difficult to get on and off such a bike. Also, it’s not very convenient when you’re riding in a dress or a skirt (yes, there are workarounds for riding a men’s bike in a skirt, but they aren’t too practical).
Women’s frame must be much heavier or twist a lot more when pedalling hard since it doesn’t have the triangle structure. But it is more convenient for riding in a skirt. Also, some of my bearded friends prefer such frames for carrying kids on a bicycle because it’s a lot easier to get on and off a women’s bike.
Both frame types have their pros and cons – the choice is up to you (I prefer men’s frames because they are stronger, and I like jumping off kerbs, riding down stairs and similar, but I know people heavier than me who’ve ridden women’s frames without any issues).
2.2. Kickstand
In my trekking bicycle buying guide, I’ve already discussed the beauty of kickstands.
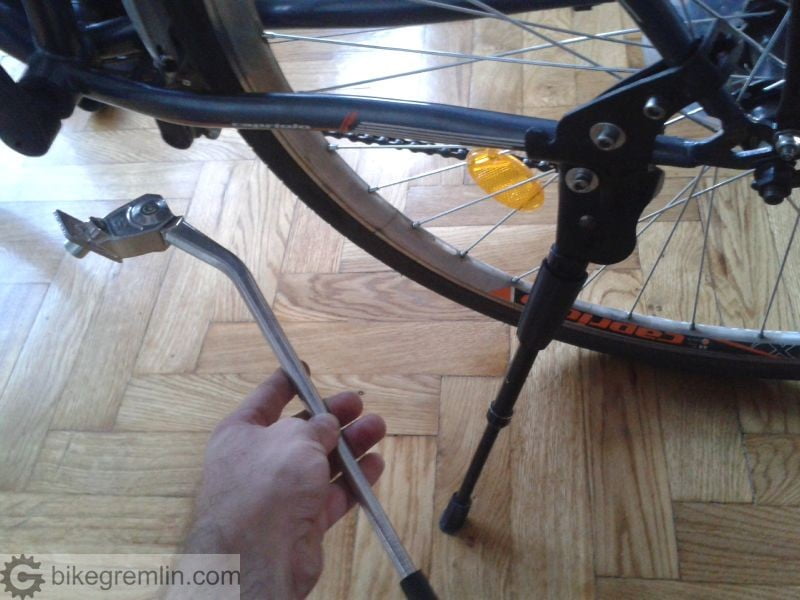
Picture 4
There are people who swear by this “accessory” (I am among those), and people who can’t stand it.
Fortunately, you can mount or dismount a kickstand with practically every city bicycle. If you buy it separately, a decent-quality kickstand costs about $20.
2.3. Luggage racks, baskets, and stems
What do handlebar stems and baskets have to do with each other? 🙂 Let me try to explain it, starting from the baskets:
It’s more comfortable and less sweaty when you don’t haul stuff on your body (using a backpack or similar) but just put it on your bicycle. A rack (usually at the rear) and a basked (either at the front or at the rear) can be very convenient for hauling stuff for work, groceries and similar.
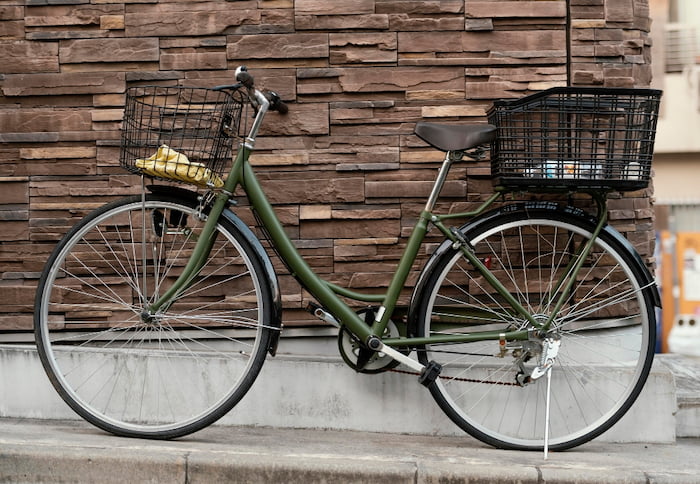
Picture 5
Bicycles that have front and rear shifters on the bars or that come with the modern “ahead” (“threadless”) stem mounting system are more difficult (and more expensive) to mount a front basket on. Let me explain the difference in stems:
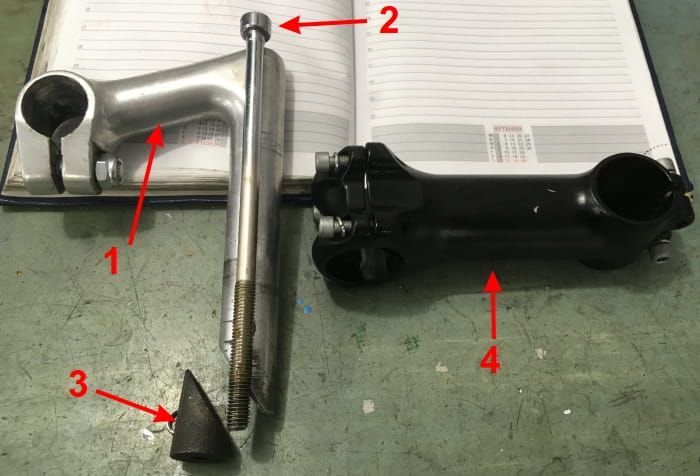
Picture 6a
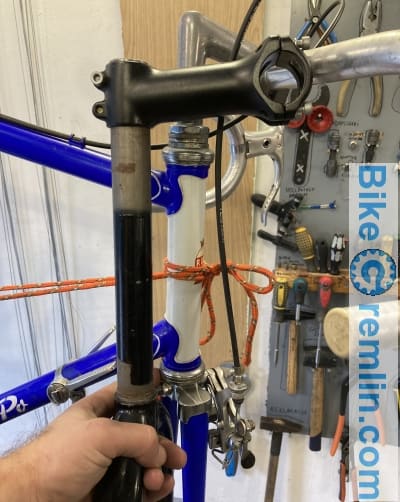
Picture 6b
I think that the old quill-stem standard is not safe, but for urban riding without fast descends, it could work (though I would not recommend it, thus eliminating a lot of affordable and otherwise good city bicycles – unfortunately).
The advantage of quill stems is they allow for a huge amount of handlebar height adjustment. Modern, threadless stems are more limited in those terms (there are adapters and adjustable stems, but the quill stem’s versatility is hard to beat).
2.4. Speeds, and belt drive instead of a chain
In a separate article, I’ve explained what bicycle speeds (gear ratios) are and how they work. Briefly put: when riding uphill, it’s good if you have a lower (“easier”) gear ratio, while for riding on the flats, a higher (“harder”) gear ratio will allow you to go fast without pedalling super-fast. More gears (“speeds”) will not make a bicycle any faster in and of itself. In the best-case scenario, more gears will give you a wider gear ratio (easier low gears).
For riding on flats and to shorter distances (5 miles or so), having several gears is not really necessary. You can save some weight and some money with a single-speed city bike. For hilly terrains and greater distances, having a few gears can help a lot.
City bikes with gears often come with a geared rear hub:
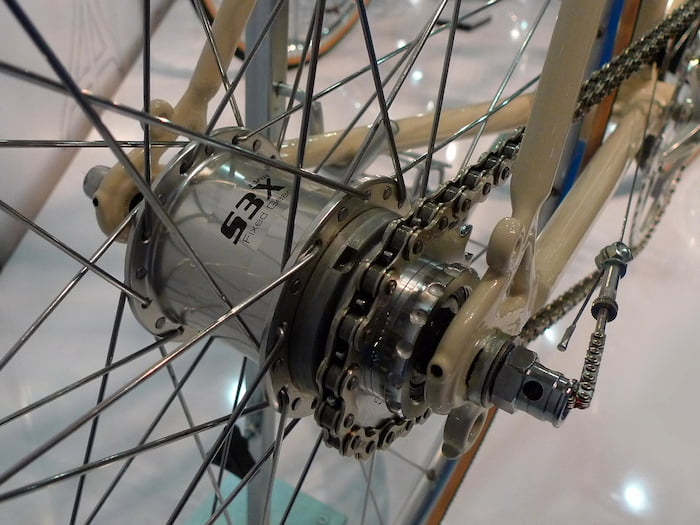
Picture 7
Others come with a standard rear derailleur and a cassette:
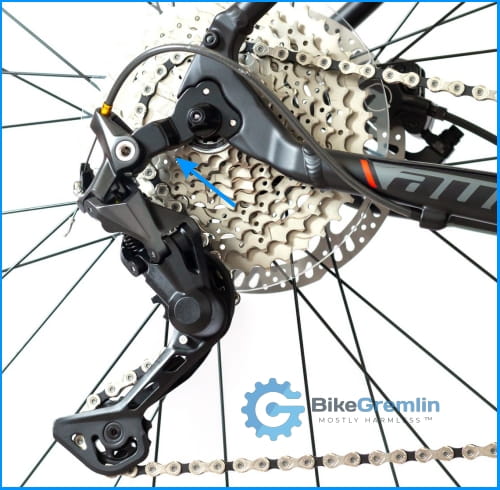
Picture 8
Gear hubs (picture 7) have a few advantages:
- They are resistant to deep freezing temperatures when classic derailleurs (picture 8) can have their cables or mechanism freeze.
- There is no external derailleur to be bent or damaged in case of a fall or in case someone stacks their bike on top of yours without any caution or care.
Unfortunately, they have many downsides too:
- They are heavier, and their transmission makes more losses (it’s less efficient).
- They are a lot more expensive than ordinary hubs (though you save some money by not buying a rear derailleur and cassette).
- More complicated to service.
- Removing the wheel with a geared hub and putting it back on (to replace a tube, for example) is a lot more tedious compared to using a “normal” hub.
If you are buying a used bicycle and it has problems with its geared hub, it’s often necessary to buy a new hub (which can be expensive, even with used hubs in good condition).
Now let’s discuss the belt drive briefly:
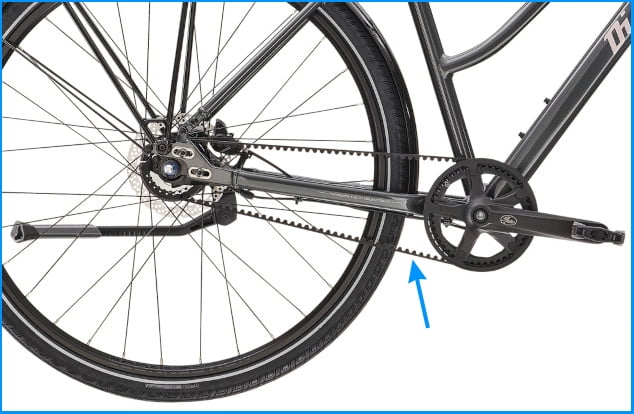
Picture 9
A belt drive is less dirty than a chain, and it requires less maintenance (no need to lubricate it). It also lasts five to ten times longer than a chain (unless it snaps on you in the meantime for reasons beyond the scope of this article).
However, it creates a bit more mechanical losses (less efficient), and in case it needs to be replaced is a lot more difficult to source. It also requires special “chainrings” (both the front and the rear) that aren’t easily sourced either.
You must also have a bike built for belt drive since a belt can’t be disassembled to thread it through the frame’s rear triangle when installing it.
Need I even mention it all costs an arm and a leg?
There are people who ride belt-drive bicycles, are happy with them and have no problems. I know that I would not like to do a rainy night tube change on a bicycle with a gear hub or with a belt drive.
2.5. Chainguard and “skirt-guard”
City bikes are the type of bicycle where you are most likely to come across a proper, full chainguard.
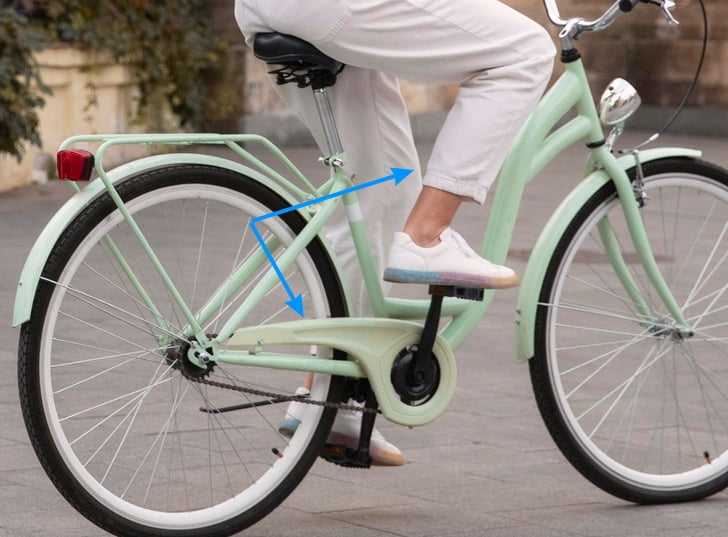
Picture 10
Sure, ankle straps go a long way, and I use them, but a full-length chainguard is awesome at keeping your clothes from getting stained or torn by the chain and the front chainring.
For me, it’s getting more and more difficult to find high-quality aluminium or steel chainguards, while the modern plastic ones are often too flimsy and can break if you sneeze at them. 🙁
Chainguards can usually be mounted on (or removed from) a bicycle even if it doesn’t come with any – though it can get tricky if the bike has a front derailleur.
If you often ride in a long skirt or with a long overcoat, you might find this to be useful as well:
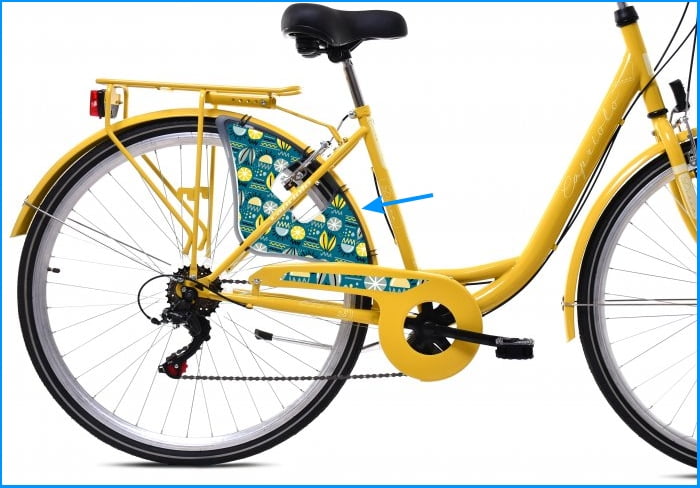
Picture 11
2.6. Disc brakes, roller brakes, and suspension forks
In my opinion & experience, disc brakes and suspension are needless on a city bicycle.
Of course, some people will disagree, and that’s OK. I wrote articles about disc brakes vs rim brakes and about the pros and cons of suspension on bicycles. You can read them and decide what’s best for you.
Whatever you decide, (non-)existence of disc brakes or suspension on a bicycle need not be a reason to ditch it if everything else on the bike suits you.
We must not forget to mention hub brakes. Either inside the rear hub (often called “coaster-brake”), actuated by turning the pedals in reverse (but not always, some are brake lever actuated), or in the front hub. Shimano makes a popular model called “Shimano roller brakes.”
These are all basically different versions of drum brakes, and I wrote in a separate article about the drum brake pros and cons. Briefly put: if you are not in a hilly area, drum brakes are OK.
2.7. Wheel and frame size
City bikes most often come with 622 mm wheels (28″). However, I often see “smaller, women’s” city bikes with 559 mm (26″) wheels, as well as compact (often folding) city bikes with 406 mm (20″) wheels.
622 mm (28″) wheels roll best, but riders shorter than 170 cm may find smaller frames and smaller wheels to be better fitting.
Regardless of the wheel size, it is important to get the right frame size.
See the linked text for details, but briefly: manufacturers usually make charts stating which frame size fits which range of rider heights.
2.8. Lights and dynamo hubs
As city bikes are used in traffic, having lights is a must. I’ve dedicated a whole article to bicycle lights and explaining why they are irreplaceable.
Now, in addition to various battery-powered lights, there is a thing called dynamo hubs – and lights for dynamo hubs. Dynamo hubs are front hubs which, when the wheel turns, generate voltage to power bicycle lights. Dynamo hubs are awesome! 🙂 Why?
- They make no noise (unlike the old-style dynamos that used a tyre to spin) and create very little drag.
- Dynamo lights are bolted on the bicycle, so there’s less chance of someone stealing them when you leave the bike parked.
- There are no worries about charging batteries, so you can easily leave the lights on during the day, which improves your visibility and safety.
Dynamo hub, wires, and lights can be installed on a bicycle after purchase.
3. City bicycle buying recommendations
If you like more spirited, faster riding, you can take a look at my trekking bicycle buying guide. Here, I’ll talk about upright-riding models for more leisurely riding.
3.1. Simple and cheap city bicycles
If you are looking for a simple no-nonsense single-speed city bike with rim brakes and no shock absorbers – you’re out of luck. New bikes with that setup come with very crappy parts. It’s better to look for a used bicycle that fits you (and looks nice to you) and then replace any parts as needed.
If you don’t mind having a few gears, a decent choice is Decathlon ELOPS 500 (decathlon.uk site link), costing about $550.
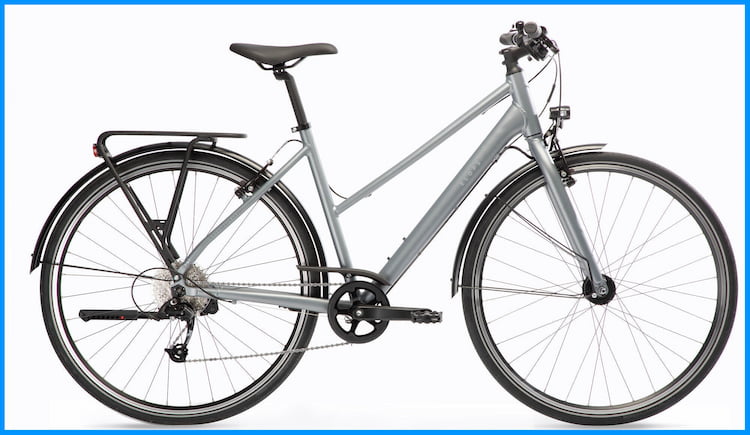
Picture 12
This bicycle has an ahead stem (so mounting a front basket will be a bit more complicated, but ahead is a more secure system). Kickstand, dynamo hub with lights, rear rack, mudguards, rim brakes, and 1×9 drivetrain.
Quite a decent city bike. The factory stem can be replaced with an adjustable stem (or a riser stem) to bring the handlebars higher (you’ll have to do this yourself or pay a bike shop to do it for you).
It also comes in a men’s frame variant (“step-over”).
Of course, it’s worth looking into the similar offers of other manufacturers, though “no-nonsense” city bicycle offers are very scarce at the time of writing.
Cheaper Decathlon city bicycles come with quill stems, so I can’t recommend them with a clear conscience – otherwise, they aren’t bad.
3.2. More expensive city bike with disc brakes
If you are looking for disc brakes and a bit wider gearing range, you could consider Decathlon LONG DISTANCE CITY BIKE 900 (decathlon.uk website link).
No, this article is not sponsored by Decathlon – I wish it were. 🙂 They just seem to offer bikes with quite “reasonably” picked components at competitive prices, and over the past year, I’ve been recommending them more and more.
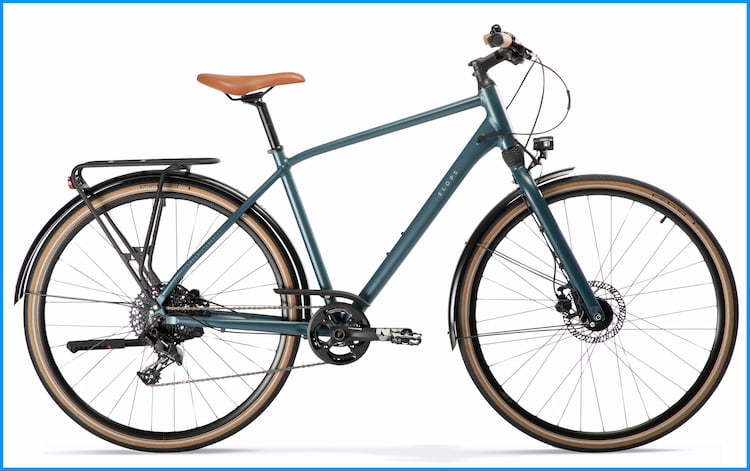
Picture 13
It comes in a men’s frame variant (“STEP-OVER”) and a women’s frame (“STEP-THROUGH”).
You get all the bells and whistles: kickstand, mudguards, rear rack, dynamo hub and lights, disc brakes, and a suspension fork with 30 mm of travel.
Drivetrain is 1×11 SRAM NX. 36 teeth on the front chainring and an 11-42 T cassette. Enough for steep climbs.
Chainguard is what I’d call “adequate” (as with the previously-described bicycle model).
3.3. Electric city bicycle
If you are among those who think that electric bikes are a pretty neat idea, one of the less bad choices could be Trek FX+ 2 series. It comes in a standard version with a men’s frame and a “Stagger” version with a women’s (step-through) frame.
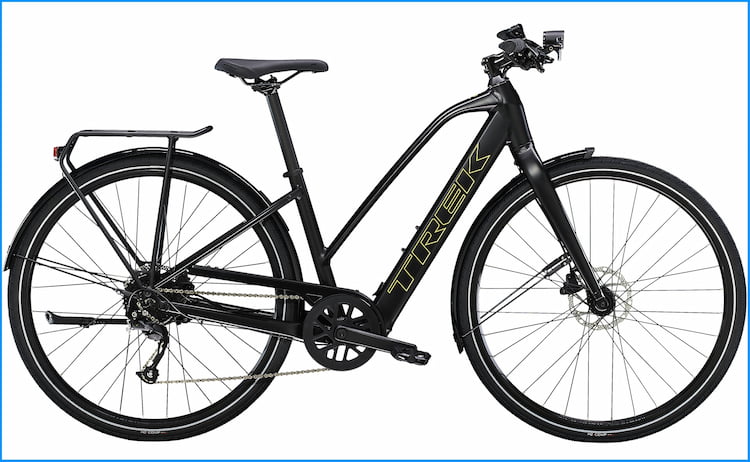
Picture 14
This one is surprisingly not-heavy for an electric bike. The battery range is not too impressive, nor is the rear-hub motor very powerful, but it’s a city bike, not an electric MTB. The main downside is that you can’t easily and quickly detach the battery to haul it home for charging. So if you can’t carry the bike indoors for a charge, it’s a highly impractical choice.
With that in mind, when I consider all the pros and cons, I think this is among the least bad e-city-bikes.
4. Conclusion
According to the clockify tool (their website link), the creation of this article took about 16 hours (and about four decades of cycling and wrenching). I wish I could recommend you a good city bicycle for $200 or at least $400. Unfortunately, I haven’t found any (which doesn’t mean that there aren’t any).
Regardless of the concrete recommendations (and their availability at the time you are reading this), I tried to explain what’s important and all the pros and cons of different patents and parts. Hoping that will help you decide for yourself, based on your preferences, priorities, and budget, what’s best for you of all the models available at the time you are reading this.
Last updated:
Originally published:

