In a different post I explained bicycle wheel building basics. This post deals with only one aspect of those – effective rim diameter (ERD). If you are new to bicycle wheelbuilding, I suggest you first read the afore linked post, then the post about important hub dimensions and how to measure them, only then come back to read this one.
1. What is the effective rim diameter (ERD)?
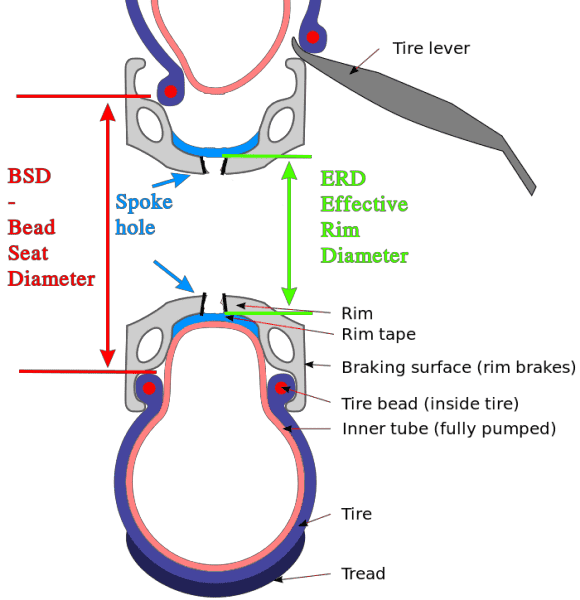
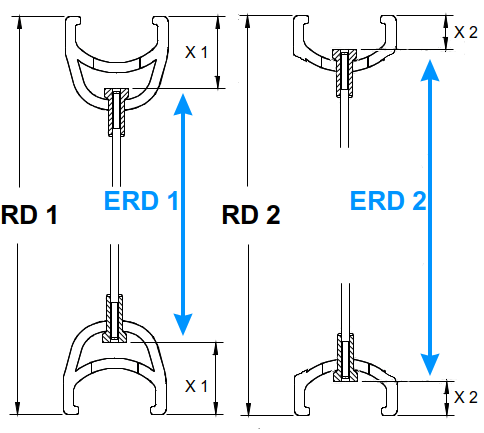
Effective rim diameter is the maximum distance that spokes need to bridge going from one end of the rim to another (on the opposite side, just like when measuring a circle’s diameter). Deep section double walled rims usually require shorter spokes, since the point where spoke’s nipple is attached to the rim is closer to the rim’s centre – than it is with single walled rims of the same outer diameter.
So all the bicycle rims have two important dimensions (some extra, but more on that in chapter 4):
- Tyre bead seat diameter (BSD)
- Effective rim diameter (ERD)
Picture 1
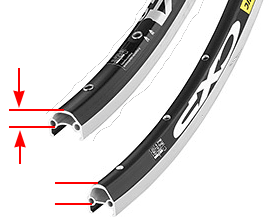
Pictures 2 and 3, below, show how rim wall depth can affect ERD – two rims of the same BSD are depicted, but the one with the deeper section wall has a smaller ERD – i.e. spokes are attached a bit closer to the wheel’s centre:
Picture 2
Picture 3
2. Why measuring ERD is important
When building a bicycle wheel, it is important to choose spokes of the optimal length. In order to calculate the optimal spoke length, it is important to know the effective rim diameter (ERD), among other things. Because manufacturer provided data is not always correct (perhaps because of a different measuring method), I feel safest when measuring personally.
So this post is primarily intended for my personal use/reference – I will be filling it with measurements as time goes by. I will briefly explain the measurement method, then provide a list that can easily be searched.
3. How to measure the effective rim diameter (ERD)?
Before explaining ERD measurement technique, I’ll first explain what tools I use for measuring it, and how such tools are made – that will make measurement technique easier to understand.
3.1. Making an ERD measurement tool
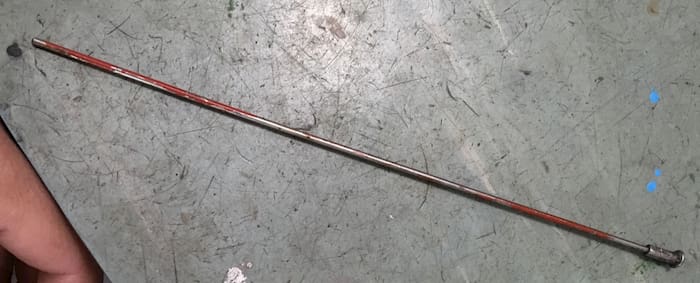
This is the final goal, and I’ll explain how to get to it:
Picture 4
Take a spoke, then measure and mark a distance along the spoke – starting from the top (where the nipple threads are), measuring a “round” number. I use 20 cm (200 mm) length. For those building small wheels, like 20″ ones, 10 cm is better, 20 cm will be too long for those. You can make two sizes, spokes and nipples aren’t outrageously expensive. Mark the measured length using a pen, or some tape – whichever is convenient for you.
Cut it to a roughly desired length (the part where the spoke’s elbow is will go to the garbage), making sure to err on the longer side. Then use a grinding stone, or a file (which takes more time) and finely get it down to the desired length (to within 1/10 of a millimetre), measuring from time to time in order not to overdo it.
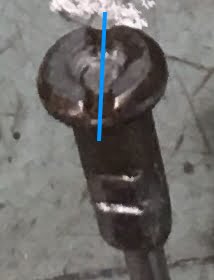
Then screw a nipple onto the spoke, so that the spoke’s end is perfectly aligned with the end of the nipple, in the part where the screwdriver slit is, like shown in the picture 5:
Picture 5
You can put some thread locking glue (like Loctite 243 – Amazon affiliate link) on the threads before screwing the nipple on – I did that, just in case.
After aligning the nipple, pinch it in place so it can’t turn any more, best using some medium sized cutters. Be careful not to overdo it and not to cut it all the way, just make dents that prevent turning. Test by hand if it’s held firmly, then press some more if it still looks flimsy.
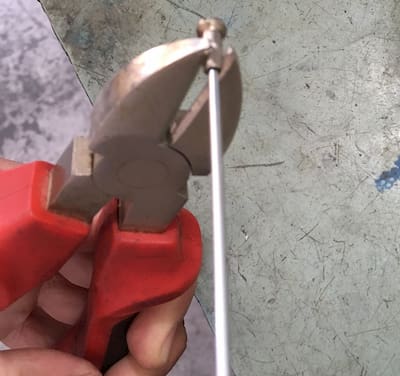
Picture 6
If you used thread locker, you could wait another 24 hours for it to cure, but that’s it – you are ready for measuring. 🙂
3.2. Measuring ERD
The procedure is really simple – first place the rim on a flat surface, it will be easier. Then, insert the above described tools into two spoke holes of the rim that are on the opposite sides. Make sure they really are exactly opposite from each other – count the holes between them if needed.
Place the tools so they fit properly, as far as they can go, through the rim holes.
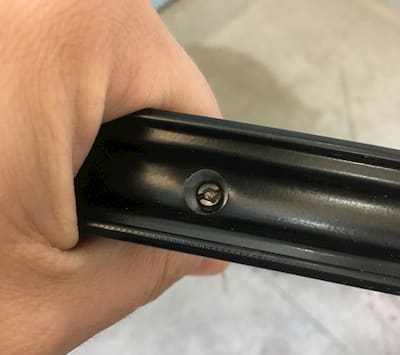
Picture 7
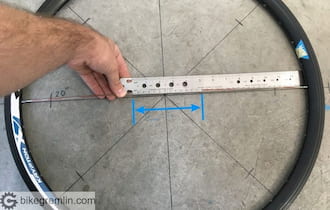
Now that the “measuring tools” have been inserted on the opposite sides, pull them tight towards each other and measure the distance between their ends:
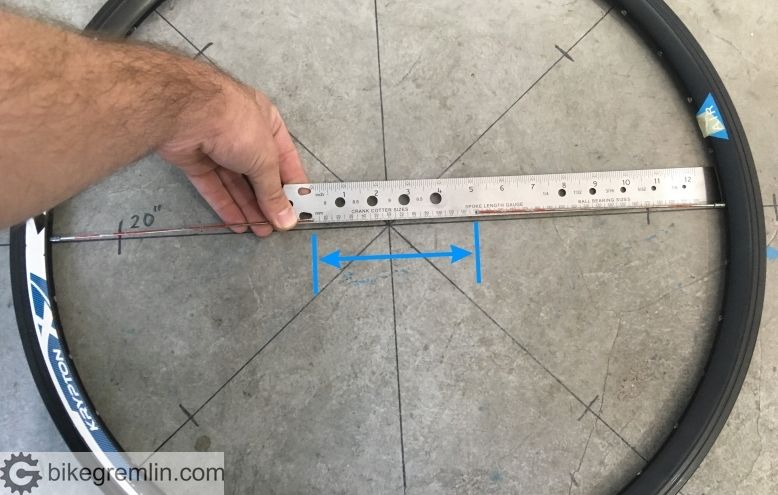
Picture 8
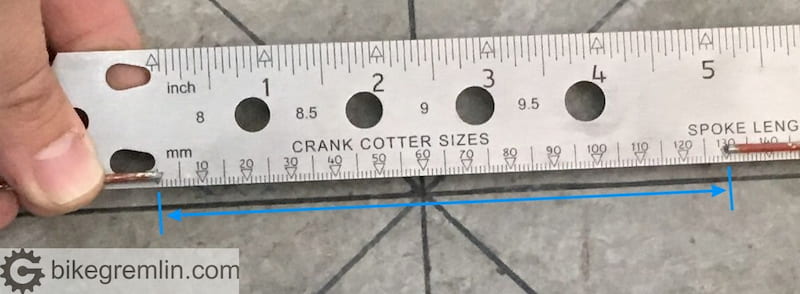
Picture 9
Since my tools used here are 200 mm long each, ERD is the measured 129 mm + 400 mm (two 200 mm tools). Which is 529 mm – a decent 26″ rim.
My video explaining and demonstrating the measuring of ERD, hub dimensions, and calculating the optimal spoke lengths:
4. Additional (exotic) rim dimensions
OK, I’ll admit – I lied to you at the beginning – for strictly pedagogical reasons, so don’t take it too harshly. Rims do have some other dimensions that are also important for calculating optimal spoke length – for building bicycle wheels. It’s nothing complicated and this is finally it, I promise. 🙂
4.1. Asymmetric rims
Some rims have spoke holes drilled a bit closer to one side of the rim. They are called “asymmetric rims“.
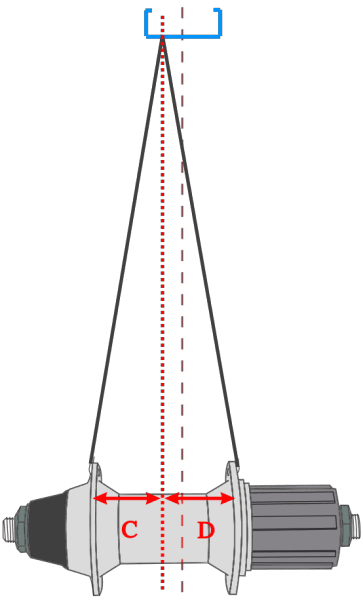
Picture 10
Rim manufacturers usually note how offset to a side spoke holes are, and that information is usually correct (reliable) – unlike ERD. For now it is important to know that the amount by which the holes are moved to the side decreases the C dimension, while increasing the D dimension (shown in picture 10) – what those are exactly is explained in the post about the important hub dimensions.
Also, it should be noted that we can usually choose how to orient the asymmetric rim – whether the holes are moved to the left (as shown in picture 10), or to the right. For disc brake front wheels, it is better to orient an asymmetric rim so that the holes are more toward the right – in order to have a more equal spoke angle and tension of right and left hand side spokes.
Briefly put: asymmetric rims are used to equal the angles of left and right hand side spokes, with hubs that are not symmetrical (most rear hubs, and front hubs for disc brakes). They should be oriented accordingly.
4.2. (Lateral) width between spoke holes
Some rims have adjacent spoke holes placed a bit to the left and right – alternately. Shown in picture 11:
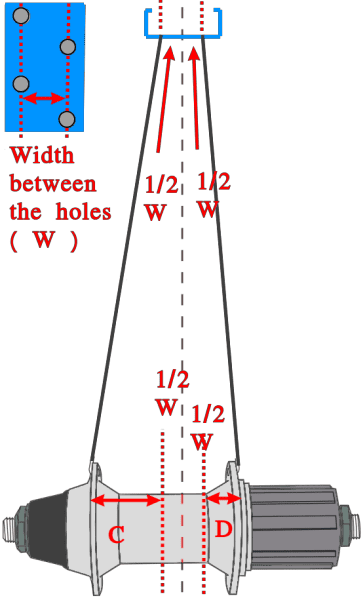
Picture 11
This dimension (noted with “W” in picture 11) is usually correctly noted by rim manufacturers (again, unlike ERD, which is not always correctly noted). As far as we are concerned, for wheelbuilding, both C and D (see important hub dimensions) are decreased by one half of W. Unless we build the wheel by crossing the right hand side spokes to a hole further to the left, while crossing the left hand side spokes to a hole further to the right. In that case, C and D are increased by one half of W.
If this width is smaller than 2 mm, it can be disregarded when calculating spoke lengths (especially if it is only 1 mm).
4.3. Offset frames
Some frames have rear wheel dropouts a bit offset. That is: the right hand side dropout is moved a bit further to the right, so it is further from the bicycle’s centre-line, compared to the left hand side dropout. How does this affect spoke lengths? Picture 12 shows it:
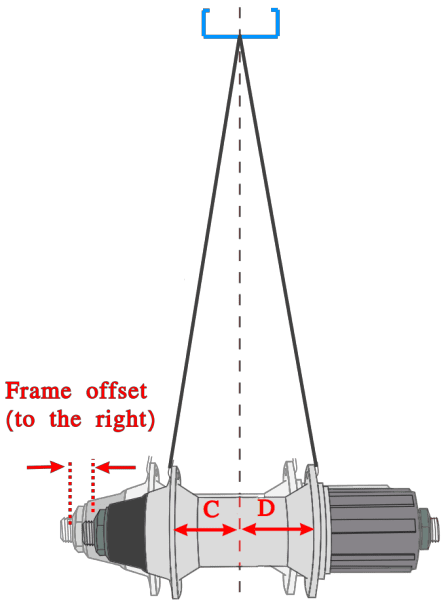
Picture 12
Pale hub silhouette in picture 12 shows how hub would be positioned if the frame were not offset. The amount of frame’s offset is information that frame manufacturers usually give correctly. As far as we are concerned: C is decreased by the amount of frame offset (because the left hub flange is practically moved toward right by that amount), while D is increased for the same amount.
Caveat: be careful if using asymmetric rims with offset frames. Because, if you orient the rim incorrectly, you could make the angle of spokes from one side almost vertical – instead of making it more equal to the opposite side spokes angle. For example: rim from picture 10, if used with the frame from picture 12, would be oriented so that spoke holes are more to the right. If done otherwise, left hand side spokes would end up going almost straight up, while the right hand side spokes would be at a sharper angle.
5. Conclusion
I hope the procedure is clearly explained. The goal was to explain exactly how and why various rim types affect spoke length – so you can understand the basics and adapt to whichever rim-frame combination you run into. This spoke calculator takes all the above noted dimensions into account, so you don’t have to think about it too much (but this article was written so you can understand the basics, and not depend on any particular tool):
https://www.wheelpro.co.uk/spokecalc/
Update 2024:
The above-linked calculator is no longer supported, while the new version is available only for those who have purchased Roger Musson’s wheelbuilding book (linked below). This is the up-to-date calculator version:
https://spokelength-project.com/calculator/
NOTE/UPDATE 2022: See Christophe’s comment and the following reply below for some more info regarding this spoke length calculator.
I would also recommend buying an excellent book that explains all this even better:
Professional Guide to Wheel Building, by Roger Musson (not an affiliate link – I don’t get a penny from the sales).
For those who are more of a “show me” type (and don’t mind tedious explanations in Tarzan English), I have also made a video:
Measuring and calculating optimal spoke length
In a separate post I list ERDs of various rims as I measure them – Effective Rim Diameter (ERD) datasheet.
Last updated:
Originally published:

Hey Relja,
John Musson changed the way to measure ERD in its new calculator… Suddenly spokes were too long ! (Took me 3 wheels to get there…)
Here on the help on ERD.
“Take two spokes and cut them down to exactly 200mm. Screw a nipple onto each measuring spoke using light finger pressure tighten it until it goes no further,* then back it off 2.5mm (for the 56tpi spoke thread, this is 5.5 turns)”
Yep… ERD is now smaller.
All the best !
Hi Christophe,
Thanks for the heads-up, much appreciated! 🙂
Just double-checked. The interface states clearly, right from the start, the “new method.”
The “Calculate” button is not visible – it’s messed up a bit, at least on Linux (Chrome browser).
For some years now I’ve been using the calculator by rounding down the given results and it’s worked fine that way. Regardless of what the book or the manual said/says.
Tried now the data from years ago – it still provides the same results with the same input data (looked up some old notes).
I think I can see the advantage of this new method for ERD measuring. It seems more likely to introduce a measuring error, but at the same time give you more thread to work with in case of any error.
Anyone interested in my reasoning: see the first picture that shows when opening this page – Sapim and DT Swiss 12-mm nipples don’t have the same thread engagement.
The downside of this method is that one is more likely to have a spoke not protrude to the top of the nipple, leaving it unsupported and more likely to crack – with Sapim nipples shown in the above-linked picture. An example of this problem is shown here.
So, as far as I’m concerned, I’ll keep measuring the ERD as before and just round down the results to the nearest even, or odd size, depending on which spoke lengths are available, and using DT Swiss 12-mm nipples (I buy those in bulk).
Not 100% sure if I’ve explained my reasoning (and re-testing the “new” calculator).
Relja
Thank you for your answer !
I was just about to build some wheels and I felt something was wrong with this new ERD… So I checked if you have answered, and bim ! Confirmation.
Here is what happens with the “new method” :
– ERD is 3 mm shorter.
– ERD does not correspond any more with manufacturer ERD… (Always nice to double-check)
– I build a lot with rims with oriented hole. Not possible to measure the ERD, I have to take the manufacturer ERD. So then what…? Need to adjust 3 mm shorter… Complicated… Then you have big 4.9mm diameter nipples, so I add again 2-3 mm… It’s a mess !
– What about other calculators ? How can I double check and be confident ?..
In short : I don’t like it because it is too specific to this calculator and rounding method. It has this taste of new, uncompatible, standards that I really don’t like in bikes.
In all : I will do the same as you : classic ERD measurement and rounding down. I also check some old data and the results of the calculations are the same.
About threads : some people like to screw past the thread to kind of “lock the nipple on the non threaded spoke” and support of the nipple head. Particularly with aluminum nipples. Saw this in one of Bill Mould video. https://billmouldwheels.com/
So I am not shy anymore about a bit too long spoke. I avoid too short.
Best
I just had to double-check and built a wheel that wasn’t really necessary. Haha 🙂
Anyway, based on that, here is my experience:
I measured how far the spoke protrudes from the nipple (at the place where the slit is, that I used to align the head with when measuring ERD).
Using callipers. It was 2 mm out when screwed in finger-tight until a resistance is felt.
So I tried using the calculator with the 4 mm shorter ERD (2 times 2 mm) from what I had measured using the “old” method (that gives me the correct ERD actually 🙂 ).
Using the “adjusted” ERD (4 mm shorter) gave me an optimal spoke length – rounding to the closest available size (in this case – even sized lengths were available). Rounding either up or down, to the closest match.
Using the actual measured ERD resulted in spokes being too long in this case – by exactly 2 mm for the right, and 1 mm for the left (zero if I went to the closest lower even length size)!
All in all – using the 4 mm shorter ERD (accommodating for the new method) gave me the length that was the right one when the wheel was built and tensioned!
P.S.
I too don’t like spokes too short, but I don’t like burring the threads either – I prefer to have them go all the way through the nipple, but with maximum thread engagement, not having some nipple thread damaged against the spoke’s section without any threads.
Luckily, I can easily compensate by measuring how far the spokes I’m using protrude from the nipples I’m using – going with a smaller ERD in the calculator (not sure if I’ve explained this properly).
I’ll try this method a few more times on different wheels to see if it’s good – but I don’t see how it could not, considering how the new method is explained to work and calculate.
P.P.S.
I too think this is a step back as far as the calculator goes. But I can see the (theoretical) advantage – and it’s not too hard nor too time-consuming to “adjust” the method the way I did it (a few extra seconds with callipers). It’s more difficult to explain than it is to execute. 🙂
Thank you for the info and I’m looking forward to hearing your thoughts on this.
Hey Reyja,
Was a bit busy, here are my thoughts :
I came across this nice website from Australia, in the meantime.
https://www.bicyclespokes.com.au/shop-1/nipples
He measured every nipple and specify when and why he uses them. Got my attention on the size of the holes in a rim, angles, specificity for each built, etc… It was a nice feeling to learn more about nipple choice.
John Musson calculator is a bit of an advance calculator now, you might want to know what you are doing if you don’t follow exactly what he prescribes, especially the measurement of the ERD and rounding method. I think we both learned a bit more on spoke length and nipple, which is nice.
But I really don’t like the fact that the ERD is now different from manufacturers and other measuring methods. I like to double-check.
But I understand the need to be nipple specific… Especially with so many different nipples available.
I would like to read the future new version of the book and the full explanation to justify this choice. Might learn a bit more.
For my use : I deal with a lot of different wheels and nipples size. I can see the purpose AND I am interested. But for someone building from time to time, might turn confusing.