This post explains important facts about bicycle rear derailleurs. From construction and parts, to important characteristics such as chain wrap capacity etc.
If you have any questions (or additions and corrections), please use the BikeGremlin forum:
www.bikegremlin.net
Table Of Contents (T.O.C.):
- How does the bicycle rear derailleur (RD) work?
- Rear derailleur bicycle frame mounting
2.1. Hook type rear derailleur mount
2.2. Standard mount rear derailleurs (RDs)
2.3. Direct mount rear derailleurs - Standard vs “rapid rise” rear derailleur
- Derailleur capacity – cage length
- Max sprocket size limit
- Number of speeds, compatibility
1. How does the bicycle rear derailleur (RD) work?
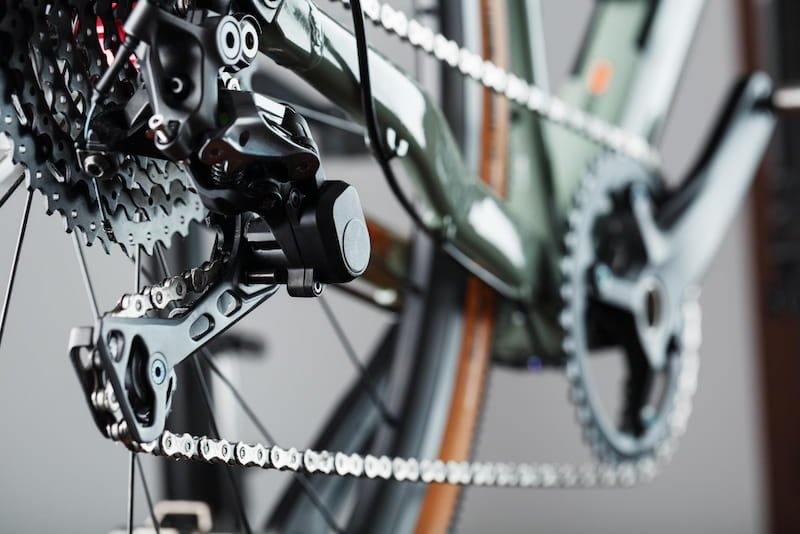
Rear derailleurs (often refferd to as RD) are used on bicycles with external gearing and multiple sprockets at the rear hub. They work on a simple, brute force principle: moving the chain sideways, until it slips off a sprocket onto the adjacent one.
This derailleur movement is usually operated via shifters (shifter levers), that are located on the bars (or somewhere at hand). Shifter cable is attached to shifters at one and and at the derailleur at the other end.
It consists of a metal cage and a spring. The spring moves derailleur to one side when the shifter cable is released, while the shifter cable, when pulled, moves it to the opposite side. It also has jockey wheels on a cage, with a spring, used to pull extra chain when changing to different sprocket sizes, so it doesn’t fall off.
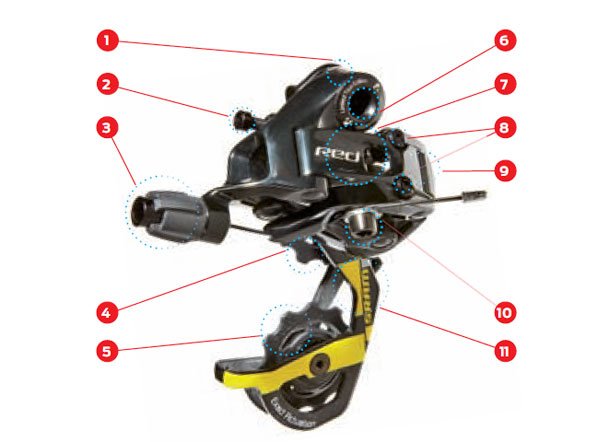
2. On Shimano and SRAM derailleurs, the b-tension adjuster fine-tunes the height of the guide pulley. On Campagnolo derailleurs, the adjustment is done via a screw near the p-knuckle.
3. To adjust cable tension, use the barrel adjuster.
4. The guide pulley keeps the chain in line as it moves from cog to cog during shifts.
5. The idler pulley helps hold tension on the chain regardless of gear choice.
6. The mounting bolt connects the derailleur to the frame.
7. The parallelogram linkage lets the chain move left and right and up and down the cassette while remaining parallel to the cogs.
8. High and low limit stops are usually found near the b-knuckle but sometimes on the front of the parallelogram. The low limit (often marked L) prevents shifts into the spokes; the high limit (marked H) prevents the chain from dropping off the smallest cog.
9. The p-knuckle holds both the guide pulley and a spring that keeps tension on the cage to hold the chain taut.
10. The cable bolt pinches the shift cable in place. .
11. The cage keeps the chain in line between the pulleys.
Help BikeGremlin
stay online & independent
This website is educational, free, objective, and not commercial
(sponsors don’t enjoy paying if you mention all the product downsides that you notice 🙂 ).
How much does a WordPress website cost?
If you find this site to be good and helpful,
and if $5 per month is what you can afford to set aside,
please consider supporting my work with a Patreon donation:
2. Rear derailleur bicycle frame mounting
There are three standards of rear derailleur attachment:
- Hook type (derailleur has a built in hook).
- Standard mount (frame must have a point for screwing the derailleur onto – derailleur hanger).
- Direct mount (a modern version of the standard mount, basically)
Which one of these derailleur mount types is used, depends on the frame rear dropout type:
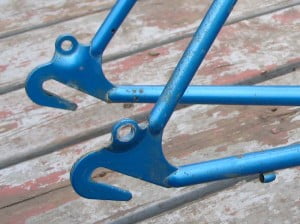
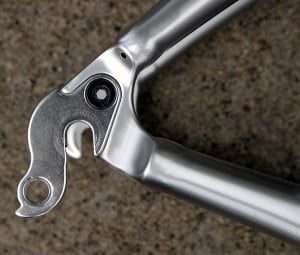
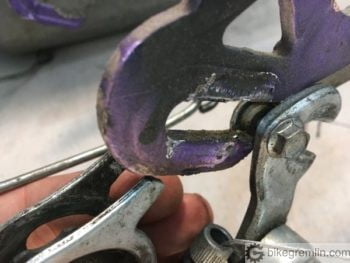
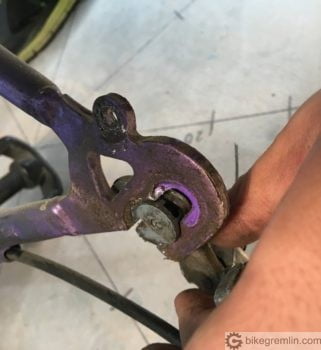
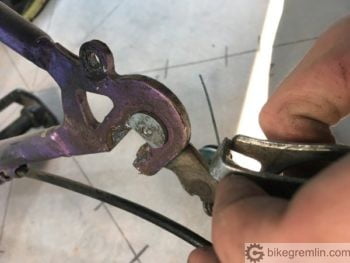
2.1. Hook type rear derailleur mount
These RDs have a mounting hook built in, enabling them to be mounted on frames without any RD mounts.
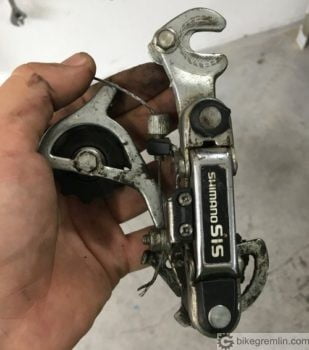
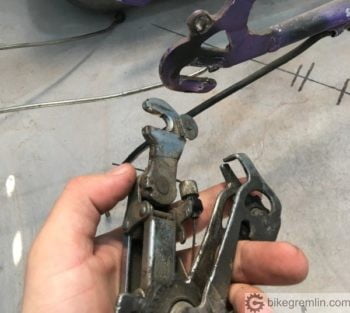
In practice, they can often be mounted even on frames with a standard RD mount, if the frame’s standard mount doesn’t get in the way (either when mounting or during RD’s movement later on).
The way of mounting this derailleur type is shown in the pictures below:
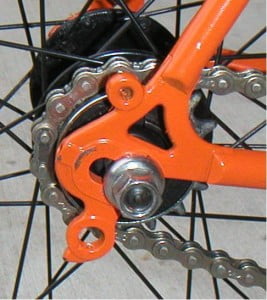
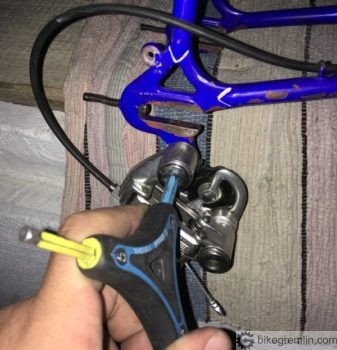
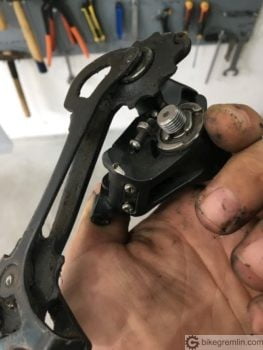
2.2. Standard mount rear derailleurs (RDs)
These RDs are screwed directly into a mount on the frame. But don’t mistake this type of RD for a direct-mount type.

2.3. Direct mount rear derailleurs
In 2012, Shimano decided to move the rear derailleur a bit further to the rear. 🙂 And so the “direct mount” RDs were born. Why?
- This rearward movement allowed for easier rear wheel removal/installation. RD no longer needs to be pulled back, out of the way.
- Also, this enabled the RD to be tucked a bit closer inwards, i.e. not sticking out so much, protected from impacts. Hence Shimano named this new type of RDs “Shadow” (kudos to their marketing team).
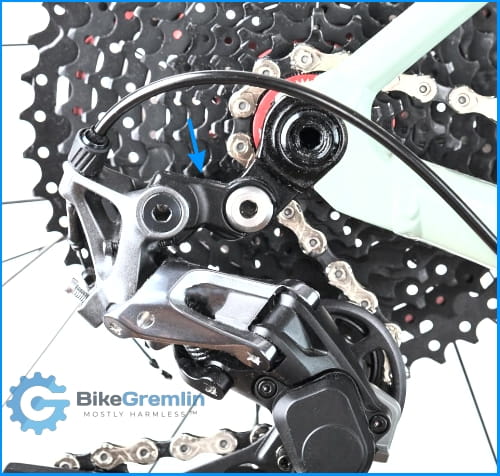
These derailleurs require a compatible direct-mount frame mount.
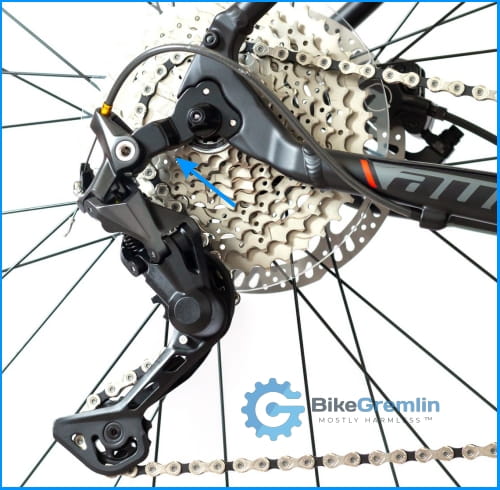
However, these RDs can also be mounted on a standard mount, if a “b-link” is used:
This drawing from the Shimano website nicely explains it:
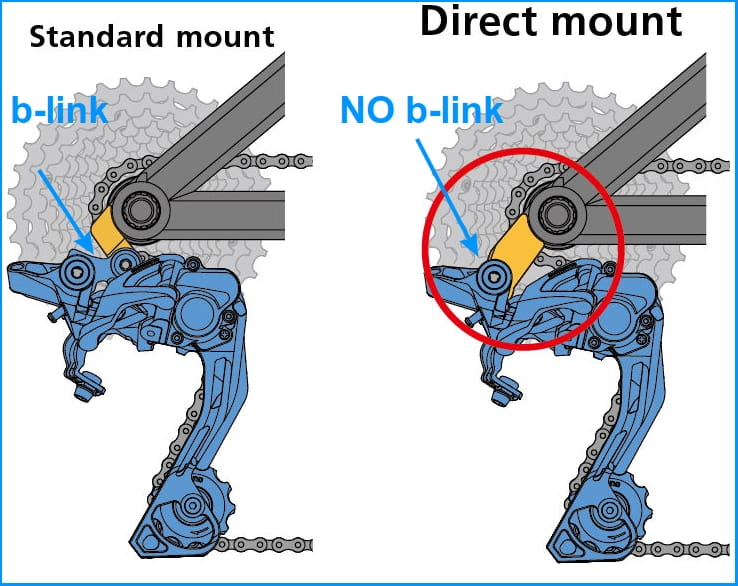
Source: shimano.com
To reiterate:
- Standard mount RDs can’t be fitted on a direct mount hanger.
- Direct mount RDs can be fitted on a standard mount hanger if a b-link is used.
- Direct mount RDs are fitted to direct mount hangers without a b-link (i.e. directly).
3. Standard vs “rapid rise” rear derailleur
Most rear derailleurs have a spring pushing them outwards. When shifter cable is released, the derailleur moves outwards, towards the smaller sprockets. When shifter cable is pulled, movement is reversed – towards the wheel, bigger sprockets. This way of functioning is called “high-normal“, or “top-normal“.
“Shimano Rapid Rise“, also called “low-normal” derailleurs work the opposite way: spring pushes them towards the wheel, while pulling shifter cable moves them towards smaller sprockets. Same shifter levers can be used for both standards. If a shifter lever has gear indicator, if a rapid-rise is put instead of standard (or vice-versa, for rapid rise shifter levers), indicator will show “upside-down”. But shifting will work correctly.
4. Derailleur capacity – cage length
Derailleur capacity is a number of tooth difference between front and rear sprockets that the derailleur can compensate. When chain is put on the largest chainring up front and the largest sprocket, the chain needs to be long enough to wrap. Then, when chain is placed on the smallest sprocket at the rear and smallest chainring, there will be a lot of “extra” chain length that rear derailleur pulleys must “gather”, to keep the chain tensioned. These are both extreme combinations, with worst cross chaining, so not recommended in practice.
So manufacturer chain capacity data can be taken with some liberty, if the user is experienced and careful, never using extreme combinations.
Derailleurs come in three sizes: short, medium and long cage. Derailleur capacity is proportional to cage length. For wide range MTB cassettes with three front chainrings, it is practical to have a long cage derailleur. A typical narrow ranged road cassette and two front chainrings will make do with a short cage derailleur.
Shimano notes RDs as: SS (short cage), GS (medium cage) and SGS (long cage).
Example: if a bicycle has a crankset with 48-38-28 teeth, and a cassette that ranges from 11-32 teeth, then a needed RD capacity would be:
(48-28) + (32-11) = 20 + 21 = 41
This would take a long cage RD with over 40 teeth capacity
For a typical road bike setup with 53-39 crankset and a 11-25 cassette:
(53-39) + (25-11) = 14 + 14 = 28
A short cage RD with under 30 tooth capacity would suffice.
With 1x drivetrains, you only calculate the difference between the largest and smallest rear sprocket tooth count (since there’s only one chainring at the front, of course).
See here about: what if RD’s chain wrap capacity isn’t big enough?
5. Max sprocket size limit
Apart from RD capacity, an important characteristic of a RD is the maximum number of teeth of the biggest rear sprocket that RD can handle. For short cage road bike RDs, this is usually about 25, or 28, while long cage MTB ones often enable use of 32, 34, or even more teeth at the cassette.
6. Number of speeds, compatibility
A series of posts explaining what can be combined with what: Compatibility
MTB rear derailleurs from 6 to 9 speeds, and road RDs from 6 to 10 speeds are interchangeable and compatible. Slight difference in jockey wheel thickness is not a problem – a 6 speed RD will work on any number of speeds – up to 9 with a MTB and up to 10 with a road bike. It is the same ratio of derailleur cage movement per cable movement, so the shifter levers determine the movement and the number of “speeds”.
10 and 11 speed MTB derailleurs, as well as 11 speed road bike derailleur are not interchangeable. Different cable pull ratio and parallelogram movement for each. There are exceptions from these rules, so if some combining (mix-matchin) is planned, it is best to first read the post about bicycle rear derailleur compatibility.
If shifters used are indexed, shifter mechanism determines the amount of cable pulled for each gear, with each shifter click. So rear shifter compatibility needs to be accounted for. There is a difference in cable pull ratio for Campagnolo, SRAM and Shimano. That is why a SRAM rear derailleur will not work properly with indexed Shimano shifters (and vice-versa). With friction shifters (those that don’t have a click for each gear), this is not an issue.
So, one could say that if using indexed shifters, they will work as long as the RD is by the same manufacturer as the shifters. Though, apart from Campagnolo and SRAM, most other manufacturers are compatible with Shimano.
If you have any questions (or additions and corrections), please use the BikeGremlin forum:
www.bikegremlin.net
The existing comments posted under this article (questions and answers) have been moved to this BikeGremlin forum thread:
https://www.bikegremlin.net/threads/rear-derailleurs-explained-article-comments.136/
Hi Relja,
What kind of lubrication do you generally use for pulley wheels with steel bearings?
Thank you for all of the content on your website!
Hi James,
You’re welcome. 🙂
Grease or oil can do the job.
They both have their downsides.
Grease offers longer-lasting lubrication (doesn’t have to be re-applied nearly as often), but it attracts a bit more dust and dirt.
Oil is the opposite – requiring a more frequent re-application but accumulating less dirt.
For greasing you have to disassemble the cage (freeing one jockey wheel at a time is fine – I’ll make a video on that), clean, lubricate, assemble.
For applying oil, spray from the sides is good.
If using grease, the “regular,” “general-purpose” grease is usually of NLGI2 hardness, and I haven’t had any problems with that, though for the application, a softer grease would be a better match (NLGI 1, or even NLGI 0 hardness).
What I’ve been doing over the past decades has worked fine for me, though I’m sure some (many?) would not recommend it – still, it’s worked fine for me and that’s what I do with my bike(s):
I disassemble, clean and put some grease, about twice a year.
In between those “major overhauls,” I wipe off any dirt and dust from the outside (as best as I can) and spray some fine oil lubricant (MOTIP PTFE spray is my lube of choice – but any fine oil should do the job).
The properties and “quality” of lubricant are of little importance. Regular cleaning and re-application is what makes the difference. Those systems aren’t sealed too well from dirt intrusion and it’s dirt that creates problems, not the lubricant imperfection.
Having said that, spare jockey wheels (with the bushings) aren’t too expensive, and they are quite durable, even when not maintained properly. So I don’t sweat it too much – the bike(s) should serve me, not the other way round.
Thanks Relja!
Which type of mounting is better? Im trying to buy a new bike and im looking for better details
Hi Stan,
I prefer a direct mount with a replaceable hanger.
I discussed that at about 11:30 in the video about modern bicycle frames.
Hi Relja,just got myself a new rear mech shimano claris 8 speed rd-2000 series short cage,this one has one jockey wheel that has the shimano centeron G-pulley on it just wondering does the G-pully thing make any difference as i cant tell the difference,shimano also says this short cage will run on a 32 rear cog but when i fitted it to the bike i had to turn the B-screw all the way in,i do think this rear mech is at its limit on a rear 28 cog,on a 32 rear cog there is not enough clearance really,have you played with this one at all cheers
Hi Mike,
I’ve run mid-cage Claris for years with a 34 T sprocket (RD-R-2000 GS cage).
With an optimal chain length, I’d be surprised to see the short cage version (SS) not work with a 32 T rear sprocket.
Regarding the clearance: in my experience, for as long as the upper pulley with a chain over it is not contacting the largest sprocket, the clearance is fine. In fact, I find the shifting to be better when the clearance is as small as possible (without causing interference).
Hello Relja, I have a friend that changed his 3×9 to a 1×10 setup in his 2010 Specialized Enduro bike, used to be an 11-36 cassette, and now he set it up with an 11-50, Shimano m-773 rear derailleur, and 10speed Shimano shifters, not sure which. model, sorry.. he is having shifting issues, he can upshift or downshift precisely but not both… I told him to check the alignment for the derailleur cogs and the cassette cogs but he claims they are all new…cables are new too. He did have to put in some cheap @ss hanger extender that came with the oversize cassette kit and we suspect this might be the culprit… do you have in mind any extender or hanger link like the “goat-link” from Wolf Tooth that may work with this RD and a 50T large cog? I am doing the research for him but have found nothing.
Hi Sergio,
Depending on the RD model and its mounting system – that could be the problem. For details on the mounting standards, see my article Rear derailleurs explained. Briefly put:
Standard mount RDs can’t be fitted on a direct mount hanger.
Direct mount RDs can be fitted on a standard mount hanger if a b-link is used.
Direct mount RDs are fitted to direct mount hangers without a b-link (i.e. directly).
That aside, RD hanger alignment could also be the culprit. Price doesn’t really matter – even an expensive hanger can be bent, and even a cheap one can be straightened at least once (wouldn’t recommend doing it for several times as the risk of it breaking increases). If straightening a RD hanger, do keep a close eye for cracks emerging over the following few months – and replace it if any cracks appear (before it breaks and causes more damage to the RD, wheel or the frame).
Finally, for Shimano 10-speed MTB shifters, one needs a Shimano 10-speed MTB rear derailleur. If those two don’t match, shifting will not be good. Do check the exact shifter and RD models (it’s either printed or stambed somewhere) to confirm they are both 10-speed MTB models (10-speed road won’t cut it).
Relja
P.S. I think that 1x systems create problems and consider them to be a fad – unless one is a competing, has problems using one hand, or rides in mud so bad that it frequently piles up against their front derailleur causing problems. The simplest solution I would suggest is to just go back to the 3×9 – it’s cheap, reliable and has a great gearing range. If that equipment is still in your friend’s possession that is.