In this post I’ll explain how to store a bicycle indoors (inside a house, flat, garage, on a balcony etc.). With some ideas on how to make this practical. I’ll also explain what to pay attention to.
Note: I’ll explain “perfect conditions”, as an aim to strive for when you have several options to choose from. It is understood that the bicycle serves you, not the other way round, so it often won’t be “perfectly stored” – depending on your storage room and other limiting factors.
I will be using Amazon affiliate links in this post (and, as an Amazon Associate, earn from qualifying purchases – see why Bike Gremlin uses Amazon affiliate).
1. What to pay attention to when storing a bicycle
In ancient times (when I was a kid 🙂 ), bicycles were simple and robust vehicles. You could just practically toss them aside, anywhere, pick them up later and ride. In time, they have become more and more sophisticated and sensitive (unlike my hands). Which is why I feel obliged to add this chapter – at the beginning. So, what to pay attention to:
1.1. Hydraulic mechanisms (brakes, shock absorbers…)
Hydraulic mechanisms, such as hydraulic disc brakes, dropper seatposts etc, don’t like air getting into the system.
Digression: I wrote already about the pros and cons of bicycle suspension, and about what affects a bicycle’s comfort.
Taking hydraulic brakes for example: as brake pads wear, brake calipers get pushed more out, thus increasing the total volume of the brake system. Very few people will add more brake fluid once brake pads are half worn. Some brake systems have a flexible rubber seal at the top of the brake lever, so they can compensate for this effect, preventing any air bubbles from appearing at the very top. But not all – and it’s not always perfect.
This is why long term bicycle storage upside down, or just vertically (as in hanging from the front, or rear wheel), can cause air bubbles to enter the brake system, causing brake lever to drop all the way to the bars when pulled, with a loss of braking power.
Shortly put: if your bicycle has any hydraulics, it’s safest to store it horizontally, as it “stands” while ridden.
1.2. Bicycles with disc brakes
A separate post explains the pros and cons of bicycle disc brakes (compared to rim brakes). In terms of bicycle storage (and handling), a thing to watch out for is that discs can easily be bent if hit against something. Space between brake discs and pads is very small (in order to provide high mechanical advantage, thus enabling sufficient braking force to be created by discs of relatively small diameter, compared to the wheel’s diameter).
So if a disc gets even slightly bent out of true, annoying disc brake rub can occur when riding.
1.3. Derailleurs and other sensitive parts
Rear derailleur cage, or hanger, can be bent if some force is used (either by being hit, or by some weight being leaned on the derailleur).
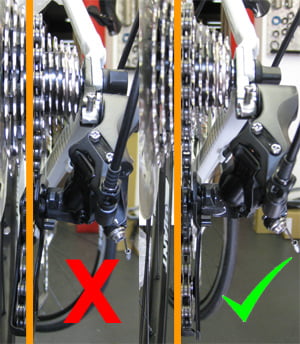
Picture 1
Same goes for other sensitive bicycle parts, like plastic shifter levers etc.
1.4. Bicycle’s frame
Expensive, lighter frames have tubes that are thinned down wherever possible (usually in the mid sections, to reduce mass, while keeping enough structural strength). This makes tubes sensitive to any blunt, or sharp object hitting them – getting relatively easily dented and thus loosing their structural strength.
Also, frames have protective coat of paint to preserve them from deterioration. Aluminium and steel frames “rust” (aluminium frame creates a protective surface oxide layer, but salty water will “eat” that). Carbon frames get damaged by sun and moisture, unless the fibres are protected with a coat of paint.
So be careful not to dent, or scratch your bike’s frame.
1.5. Tyres
Bicycle tyres should be inflated. If a bicycle is left with deflated tyres for long, they can become deformed over time.
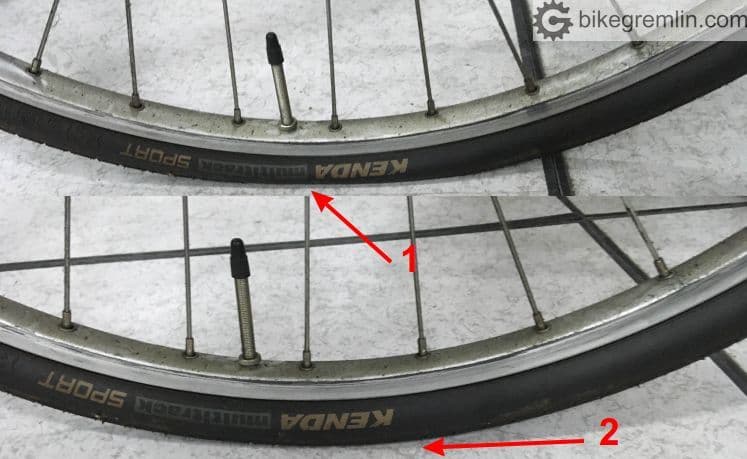
Deflated tyre gets visibly deformed by bicycle’s weight, at its ground contact point (1)
while an inflated one keeps its shape (2)
Picture 2
Tyre at the top of picture 2 is not completely deflated, but that is still enough for it to deform, at least slightly, if left like that for weeks, and especially for months.
Even if a bicycle is hung, i.e. not standing on its wheels, severely deflated tyres can become un-seated, no longer sitting properly on the rims.
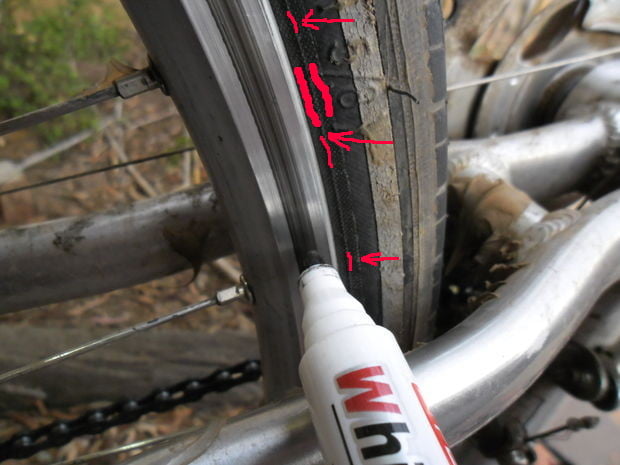
Picture 3
However, avoid inflating tyres too much. Especially if a bicycle is stored for longer periods of time (weeks, or months). Too high a pressure needlessly loads the fibers that hold the tyre together. Here I explained to what pressure should bicycle tyres be inflated. Note that’s the optimal pressure for riding. For longer term storage, you could easily go some 20% below that, just make sure to check and top-up every month – tyres loose pressure over time, whether they are left standing, or being ridden.
1.6. Sunshine and heat sources, and moisture
Direct sunlight damages all the plastic and rubber parts on a bicycle. It is also not very good for carbon parts (even though paint provides a decent protection from UV rays).
Likewise, if a bicycle is stored near radiators, or heaters, rubber and plastic parts will deteriorate faster.
Large temperature variations (especially if they range from around/below freezing, to warm) will cause condensation and rust on metal parts, especially steel.
High humidity is bad for steel and carbon parts. Some basements and garages can be quite humid.
2. Ways to store a bicycle indoors
There are two basic ways of bicycle storage: on the ground, and at height, by hanging a bicycle in one way or another. Note:
Hanging a bicycle at height, unless some sort of leverage mechanism is used, requires a certain strength to lift the bike and hang it. This can be problematic for some people, like elderly, injured, small children, or with some bikes, like electric bicycles that are generally heavier.
Water and mud can drip from the wheels, after a rainy ride, so keep that in mind if hanging a bicycle above a bed, or a table.
Bicycle hangers/hooks, as well as bolts anchoring them, must be sturdy and stable – to avoid any injury caused by things falling down unexpectedly.
2.1. Storing a bicycle on the ground
Storing a bicycle on the ground has a downside – the bicycle can take up some useful space. Yet, for many this is the most convenient way of storing and taking the bicycle from storage: the bike is just pushed, or even ridden right away.
In order to take the least amount of space, and to avoid any damage to the bike, or injury in case one trips over the bicycle, it is usually best to store the bicycle upright, on its wheels. Either using a kick-stand, or leaning it against a wall, or some other stable object.

Picture 4
Bicycle in the picture above is leaned and standing upright. What is wrong with this picture?
- Marked with number 1: access to the locker door is blocked. This is far from practical, or convenient.
- Number 2: untidiness – you don’t want to trip over something, or get something caught in the wheel’s spokes, getting damaged, or damaging spokes.
- Finally: both wheels are sticking out, partially blocking a passage by it – a wall that is at least as wide as the bicycle’s length would have been a far better choice.
While I was leaning the bike for taking the picture in the server room, I had spontaneously made all these errors – then decided to use that particular picture for educational purposes. “Don not try this at home, I am a trained professional!” 🙂
When leaning the bicycle against something, like a wall, pay attention that the bicycle doesn’t stain, or damage the wall, but also so that a rough wall doesn’t scratch the saddle’s side, or bar tape/grips.
If bicycle is stored on a concrete floor (usually in a garage, or a basement), place some cardboard, or old carpet under the wheels. Bare concrete draws moisture out of tyres’ rubber, making them rot and crack faster. This is especially important for long-term storage.
Pay attention to tyre pressure, as explained in chapter 1.5.
Finally, if the bicycle is put to lie, sideways (for whatever reason), make sure to keep the drive side (with the chain and rear derailleur) up… unless you have disc brakes – in which case laying it on either side is risky, because both the rear derailleur and brake discs can relatively easily get bent.
2.2. Hanging a bicycle by its wheels
I’ll mention a common worry when it comes to hanging bicycles: you can hang a bicycle on a wheel, it won’t get deformed – wheels are designed to carry the entire weight of the bicycle, with a rider on top. Just make sure the hook has some rubber coating, so that you don’t scratch the rim.
Bicycle can be hung on one wheel, which can often be a very practical solution, saving storage space, for example:
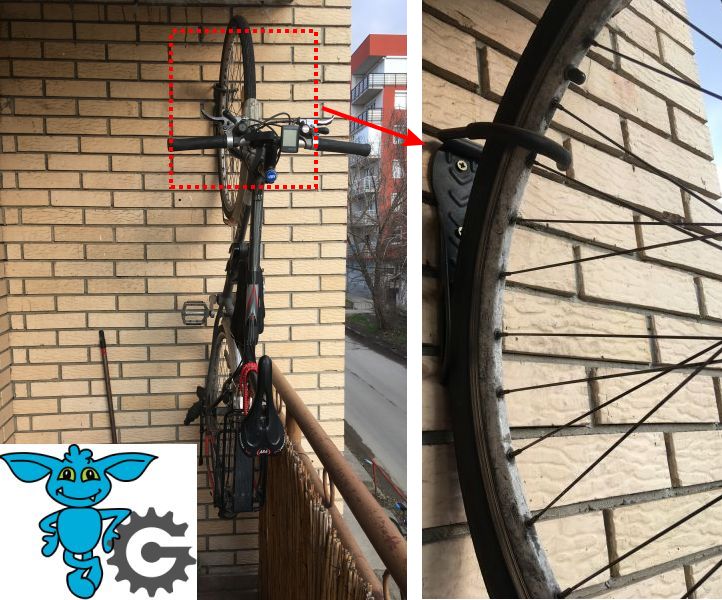
Picture 5
What is wrong with this picture?
- Bicycle is not well protected from rain, especially when it’s windy.
- If this is a sunny side of the building (south), the bike will be fried by the sun.
(Had the bicycle been moved all the way to the left, the two notes above would not be that problematic, but it would take a bit more useful space – so it is a tradeoff, as with most things) - If the balcony is not very high, the bicycle might be a thief magnet – could use getting locked for the balcony fence.
- Rear wheel can put dirt, or mud on the wall – there could be some protective pad, that is easily cleaned, bolted to the wall. This last item is especially to be considered when hanging a bike like this inside a room.
The hook is smooth, round, covered with hard rubber, to prevent any rim scratches/damage.
Picture 6
For those not very strong (or for heavier bicycles), alternative is to place the hook lower, so that the rear wheel stays on the ground when the bicycle is hung. Just be careful if the bike has a long rear mudguard – so you don’t scratch, or break it. Another option is a much more expensive patent like Parkis Bike Lift, that assists in bicycle’s lifting and bringing down:
Amazon affiliate shopping link
Picture 7
Hooks can be mounted on the ceiling, so that bicycle is hung upside down, by both wheels. But have this in mind: you need a really good and secure way of bolting the hooks to the ceiling, since bicycle’s weight is pulling them straight down/out. For wooden ceilings, or ones with plaster cast decorations, use long and strong screws for wood and screw them into the wooden beams. The limiting factor here is whether the beams are located where you want to hang the bicycle. If the ceiling is made of concrete, use special anchor bolts with steel.

Picture 8
Lifting a bicycle over one’s head, especially if the bike is heavier, requires some more strength. Try it first, before mounting hooks on the ceiling.
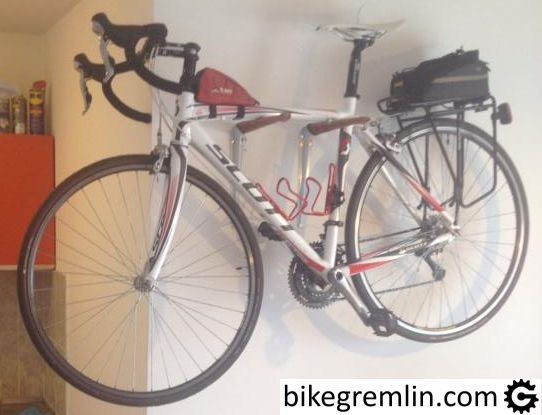
2.3. Hanging a bicycle on saddle rails
Rails that hold the saddle structure can be a good and stable way of hanging a bicycle. Just make sure not to hang it by the saddle material, make sure that all the weight lies on the saddle rails:
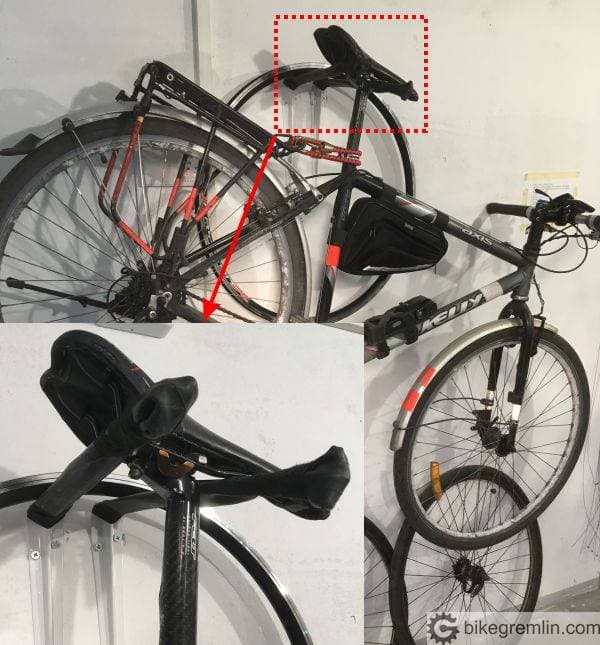
Picture 9
Ordinary, cheap L profiles for mounting shelves, coated with an old inner tube to prevent slipping and scratching.
This method works fine even for “women’s”, or kids bikes – that often don’t have a relatively straight top tube.
2.4. Hanging a bicycle by the frame
“Men’s bicycles”, with a horizontal top tube, are especially well suited for this type of hanging. Here’s one improvised, similar to picture 9, but with more widely spaced L profiles, so that bicycle stays more stable when hung from the top tube:
Picture 10
What’s wrong with this picture?
- The front wheel partially blocks the passage.
- Bicycle is stored too close to the wall, with no limiting brackets on the hanger, so pedal and the bars can scratch, or stain the wall – protective plate, or extra caution are required.
There are also more nicely looking, “fancy” hangers of this type, some even have a shelf installed on top. If such a hanger is mounted low enough for the shelf to be easily accessible, the bicycle will hang relatively low, taking almost as much space as if it were simply leaned against the wall, with the wheels on the floor.
Also, there are wall hangers for multiple bicycles:
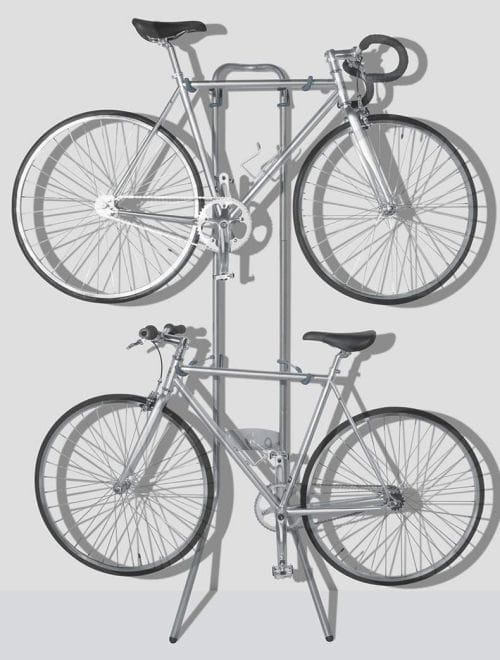
Picture 11
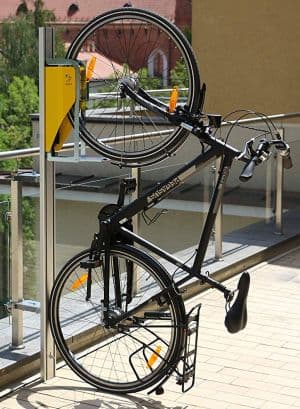
Another interesting solution (haven’t tried this) are special “elevators” that pull the bicycle upward, but placing it sideways, parallel to the ceiling, like this one:
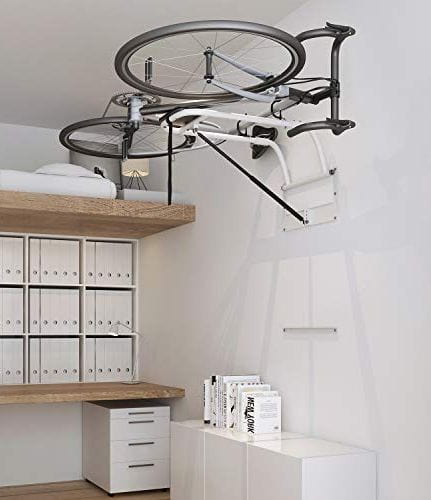
Picture 12
Hydraulic arm built in this system makes it easier to lift the bike up (and pull it down) – which can be handy for those that aren’t very strong.
A simpler patent, where bicycle is hung upright, is using a system of pulleys and cables, so that bicycle can be pulled up. This method can also be convenient for people with little strength:
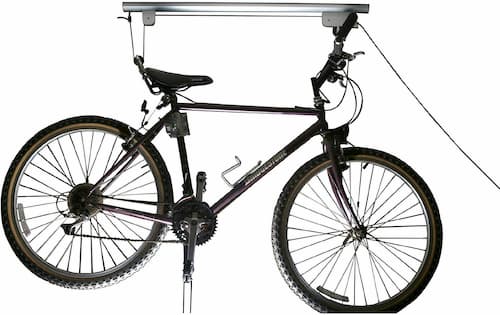
Picture 13
Those with high enough ceilings can use this patent to completely prevent bicycle from getting in the way.
3. Storing a bicycle outdoors
Not closely related to this post’s topic, but I think it’s worth mentioning. Different post explains how to securely lock a bicycle (outside). Here I’ll deal with the topic in terms of storage. And it’s fairly simple:
It’s great if the bicycle is beneath some sort of roof. It won’t melt in the rain, but all the steel and carbon parts will be happier if they are dry.
If, on top of this, the bicycle is protected from direct sunlight – perfect!
That’s about it as far as storing outside is concerned. I think that a bicycle should serve the rider, not the other way round. If you don’t have room to store it indoors, it can be outdoors – it won’t melt in the sun, nor get instantly all rusty in the rain. Sure: rubber and plastic parts will need more frequent replacing, bearings might need more frequent overhauling (like twice a year, roughly speaking), but a bicycle that gets regularly ridden won’t be destroyed just by being parked outside.
4. Conclusion
I hope I’ve explained well enough what needs to be taken into consideration when storing bicycles (both indoors and outdoors). I also hope I’ve given you enough different ideas and that you’ll find one that fits your space and circumstances best.
I’m sure there are a 1000 more ways to store a bicycle so that it doesn’t get in the way, while being easily accessible. If you have any good solutions and wish to share them on this page, send your setup pictures (and any explanations, especially if it’s a DIY setup) to my email:
my name (relja) @ this domain (bikegremlin.com).
I’d be happy to add and publish any good ideas – they might help someone.
5. Cycling community contributed bicycle indoor storage solutions
In this chapter I’ll share indoor bike storage solutions contributed by other cyclists. With my comments where I think it’s appropriate.
5.1. Exhibit “A” 🙂
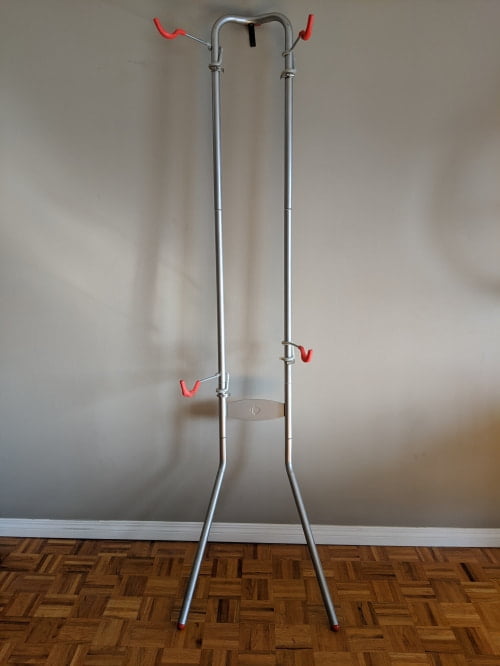
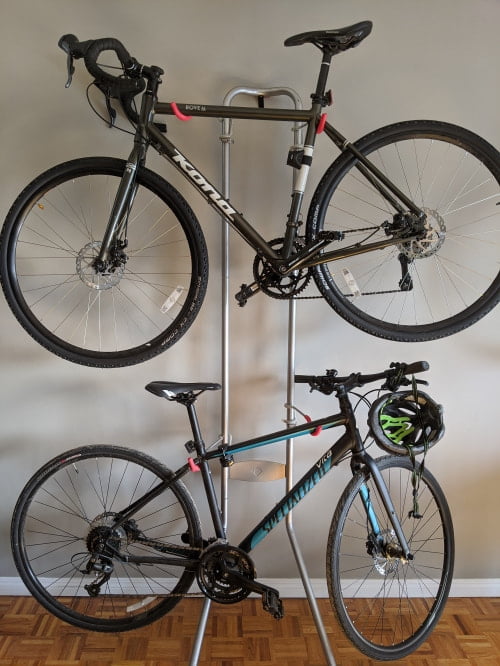
First one is a setup that I was delighted with when looking for “inspiration” to write this post. Asked the author if they would share the pictures and they agreed – asking to remain anonymous. Unlike the pictures from my own collection, these show how indoor bike storage can be both practical and nicely looking. 🙂 Here it is:
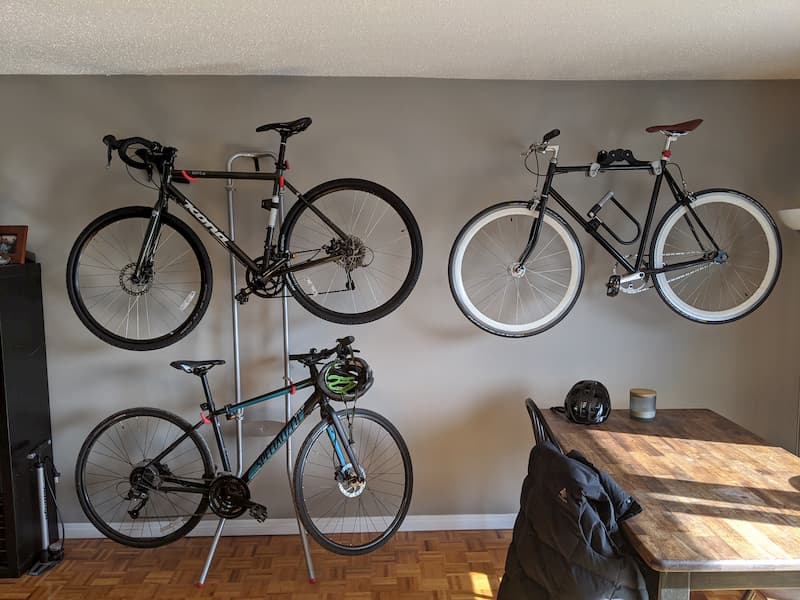
Picture 14
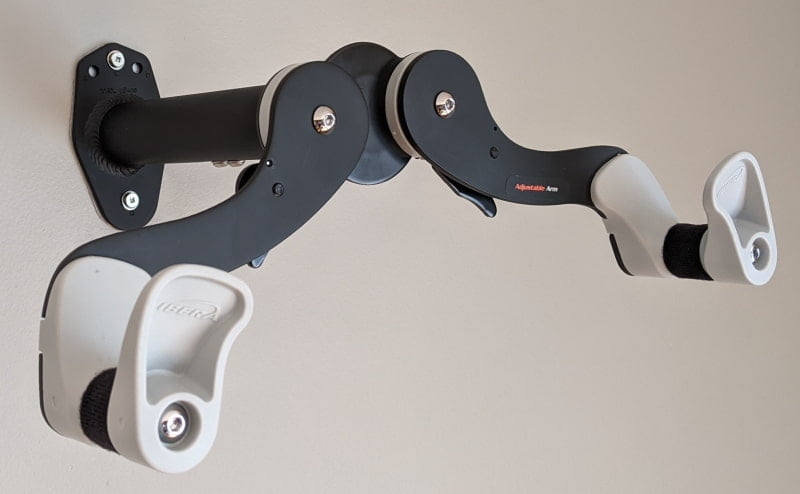
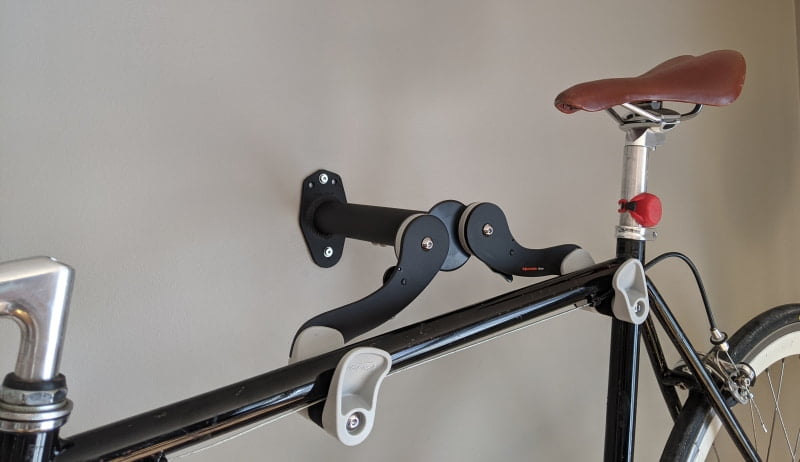
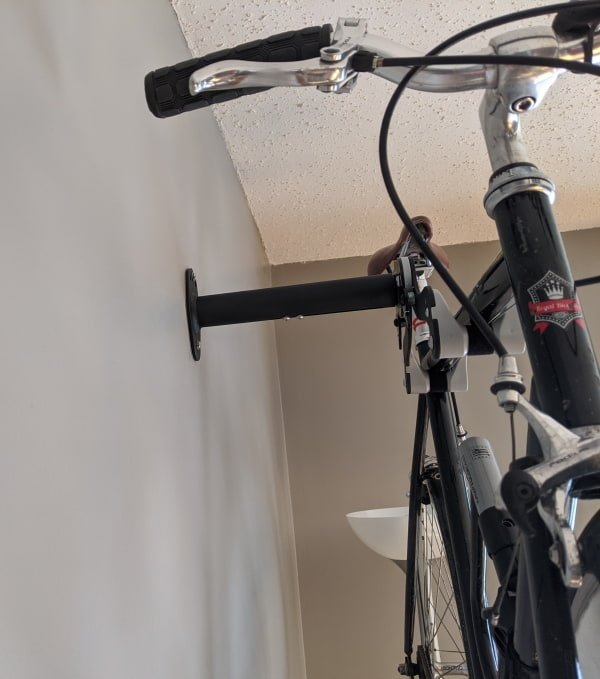
I love the way the space is used. With one bicycle placed higher, and closer to the wall – to allow easier passage by the table. The stands used are Michelangelo (carrying two bicycles) and Ibera (Amazon affiliate links). This is what they look like “live”:
Picture 15
Picture 16
Picture 17
Picture 18
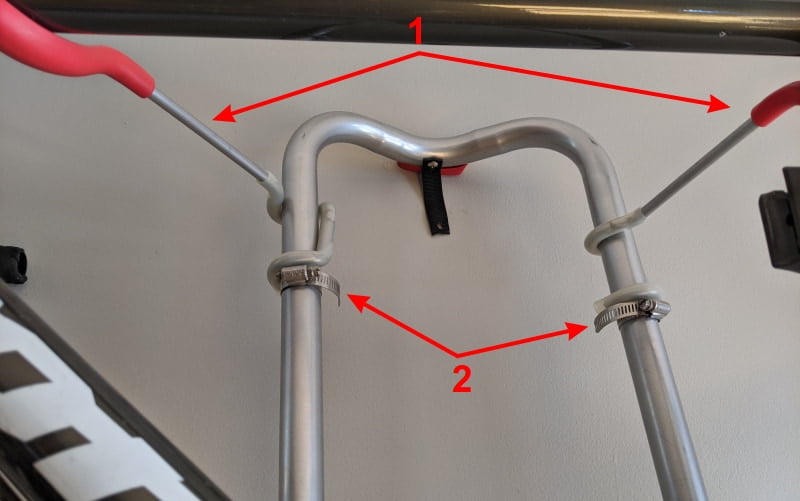
Picture 19
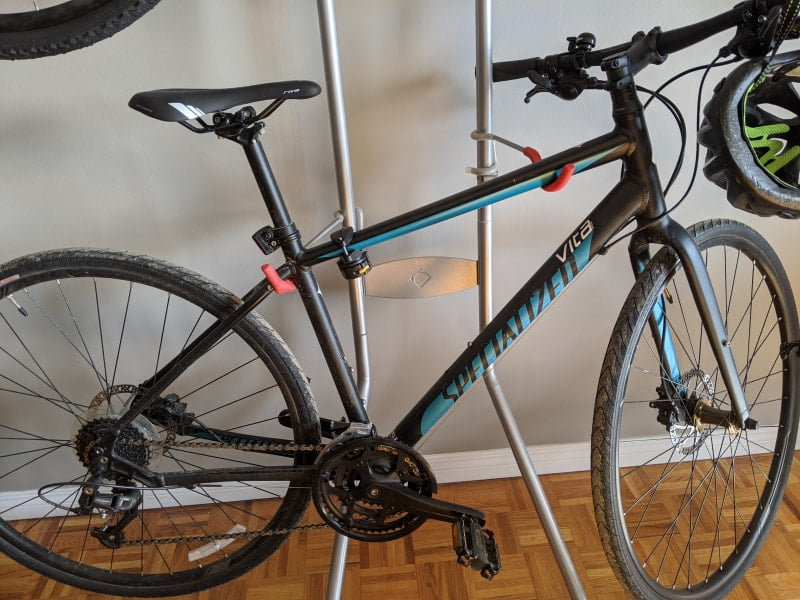
Picture 20
Picture 21
5.2. Exhibit “B”
Another anonymous contribution (cycling community is generally very positive and supportive in my experience).
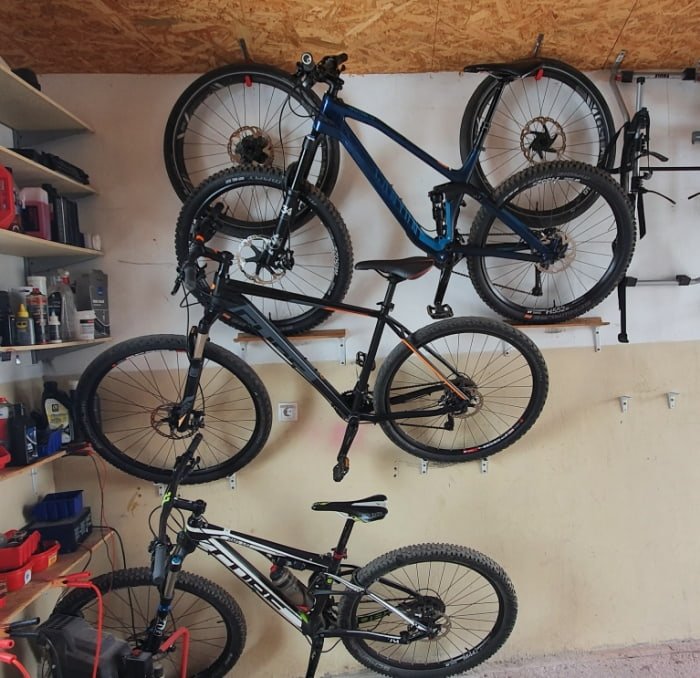
Picture 22
The beauty of this solution is that, by slightly overlapping bicycles, it offers extra space savings – allowing for more bicycles to be stored along one wall. Here is what the patent looks like close up:
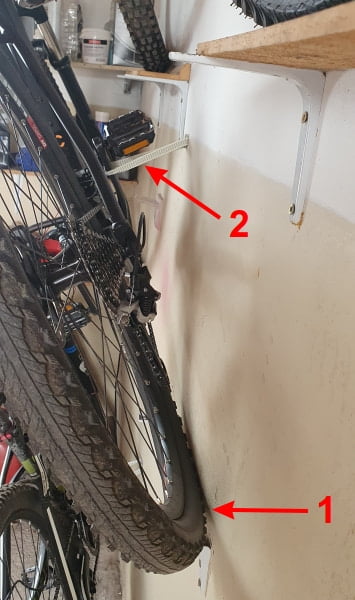
while a strap is fixed to the wall slightly higher, and put over a pedal placed at 12 o’clock (2)
Picture 23

Picture 24
Update 2026 – there is a commercial solution that mimics this system:
Borgen Bike Wall Mount Pedal Hook (Amazon affiliate link).
Here is what that looks like:

5.3. Video demo of a “sliding” solution
This is a video a crazy Spaniard showed me 🙂 – and I love the simplicity, and how smart the solution seems (haven’t tested it myself yet):

Last updated:
Originally published:
ANNOUNCEMENT – comments and registration:
Because of technical problems, I had to disable registrations, and comments on any pages – comments on posts are allowed and work fine.
Comments are still manually approved before being published, because of spam.
Comments can now be posted without registering on the website.