Disc brake rub can be annoying. I wrote a separate article explaining why rubbing is an inherent problem of disc brake technology. Also, a separate post deals with the problems of brakes squealing when braking. This post is in the form of step by step instructions, which should make it more convenient to follow and fix the problem. I’ll start with simpler and quicker methods, then going to the more complicated (in case that the former ones don’t help).
1. Checking for damage
Spin the wheel and see if the disc has any play (left-right movement – also referred to as “wobble”, and “out of trueness”, “disc warp” etc.). Check the disc for any burrs, dirt, or damage. Does the wheel bearing have any play? See if the brake lever(s) move smoothly when being pulled and released. Is there any damage (leaks) on the brake housing (and cables, for mechanical disc brakes)? Is the brake fluid clean, replaced in time (for hydraulic disc brakes) and is there any air left in the system?
All these things can cause brakes to rub and if they are not checked (and corrected), you could waste hours trying to set the brakes up, without results. Explaining how to fix them will take separate articles, when I find the time.
If that is all fine, go to step 2.
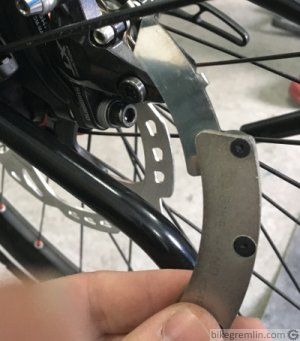
2. Wheel position in the dropouts
Loosen the bolts (or quick-release lever) holding the wheel in place and check whether it is seated properly, all the way down. Pressing on the bike from the top, while it’s “standing on its wheels” can help. After you’ve confirmed that it’s all seated properly, re-tighten the wheel in place.
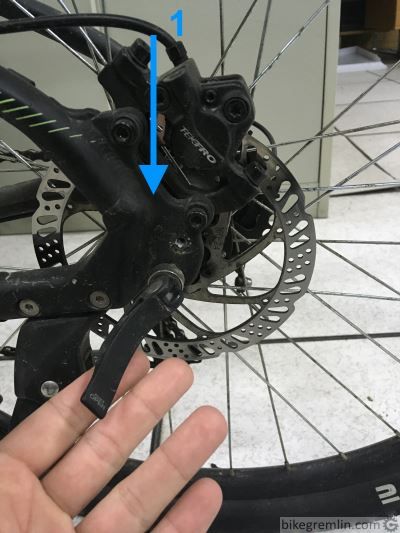
Picture 1
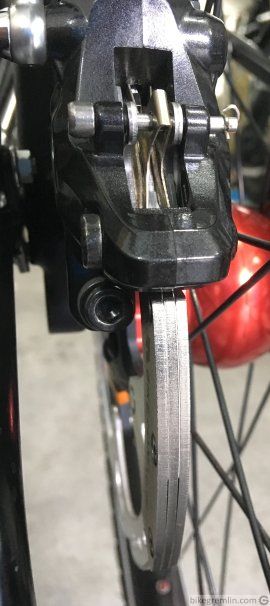
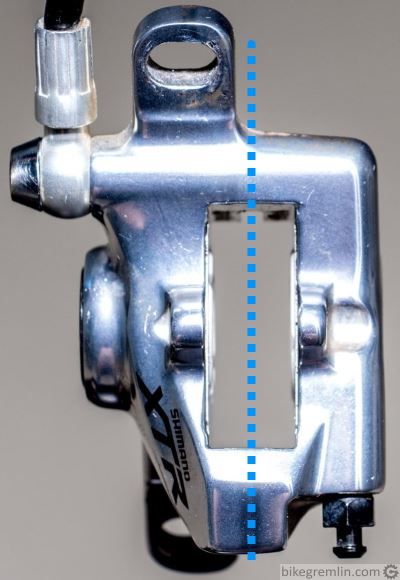
Check if the disc is aligned with the brake calipers. If not, “jump” to step 3.
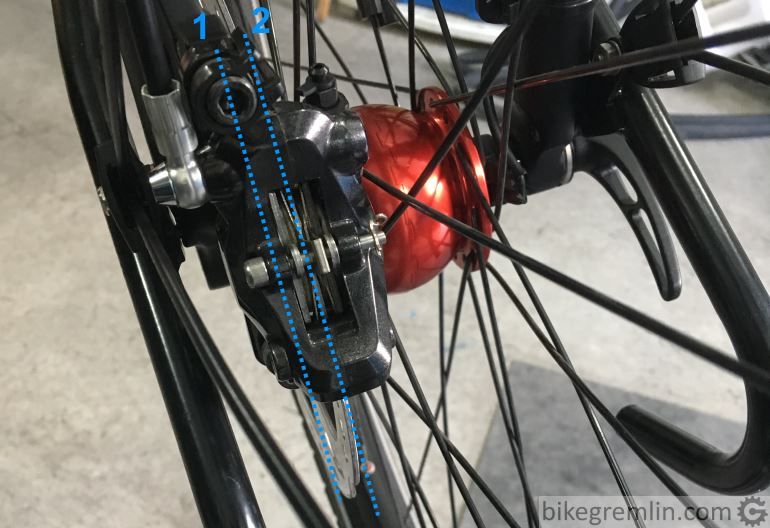
Picture 2
If it all seems OK, like in picture 2, spin the wheel, perhaps the rub was eliminated. If the rub is still present and the wheel is held by a quick-release lever (picture 1), try one more thing:
- Place the bike upright, on its wheels, on flat ground.
- Loosen the quick-release.
- Pull the brake lever tightly, so the brake is engaged – and hold it that way.
- Tighten the quick release (might need an extra hand with this for the rear wheel).
- Release the brake lever and check if the brake still rubs. If it does, read on.
3. Brake caliper alignment
Loosen the bolts holding the calipers in position (not those holding the caliper adapter). Loosen, don’t unscrew fully. Pictures 3 and 4:
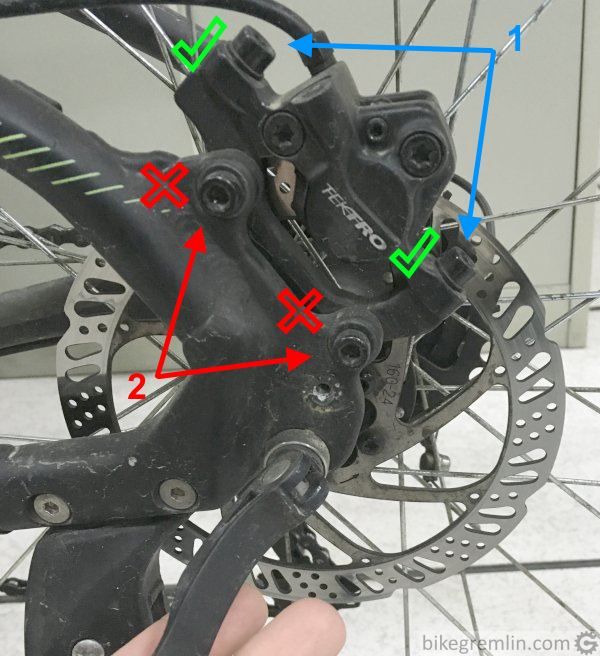
Picture 3
Picture 4
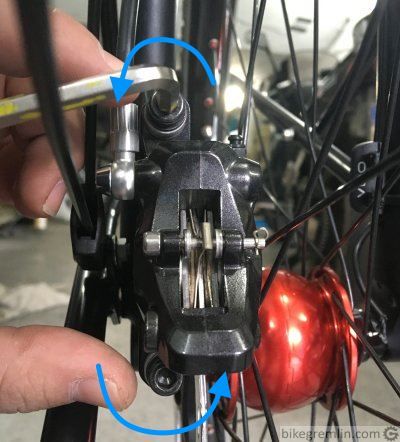
To be sure it is all seated properly, while the caliper bolts are loose, repeat the step 2. Yes, it can be tedious – disc brakes often are.
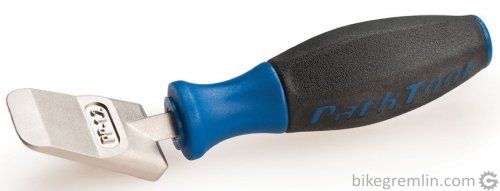
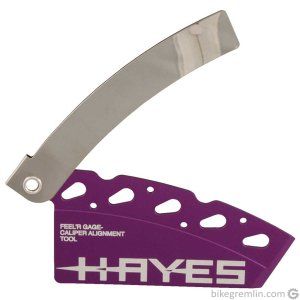
Now, if You have a brake alignment tool, use it. If not, do it all without it (sometimes it works that way too), or improvise it using some thin sheets of metal. Make sure there’s no oil, or grease on it, or you’ll risk contaminating the pads (and making them brake poorly and squeal when braking).
Picture 5

Once the tool is in place (or if trying without it), the procedure is:
- Pull the brake lever firmly and hold it.
- Tighten brake caliper bolts – tightening alternately one, then the other, by half a turn (as they become tighter, it will be 1/4 of a turn, or less), until they are both tight to the recommended torque.
- Release the brake lever and check if the rub has been eliminated.
If the rubbing is still present, read the next step for hydraulic brakes, or step 5 for mechanical ones.
4. Cleaning brake caliper pistons
Dirty brake calipers can get stuck, not retracting enough after the brake lever is released and cause the brake pads to rub on the disc. How to clean the brake caliper pistons?
Remove wheels and brake pads and place them somewhere safe, so they don’t get contaminated while the pistons are cleaned. Then work as explained, minding the order and without skipping any steps.
While you are working, mind the piston position. If you get them all the way out (and they pop out), you’re in trouble of spilt brake fluid, and a loose brake piston (perhaps damaged/burred upon hitting the ground) that needs to be put back in place, carefully.
Pictures were taken from bike-components.de and unior-bike.com and edited for better demonstration.
Let’s begin:
- Pull the brake lever to move the pistons out a bit. Be careful not to overdo it. If a piston pops out, or if left and right pistons press against each other, it will be hard to put them back in place. Neither piston should beyond the half of the caliper width.

Picture 7
- Take an old tooth brush and spray some brake cleaner (can be bought in most auto shops), or some brake fluid – the one that brake uses, don’t mix it (see if it’s DOT and which one, or hydraulic fluid, i.e. “mineral oil”). Both on the calipers and the tooth brush. Rub the calipers nice and clean, without pressing too hard so they don’t get damaged. It will spray all around when cleaning. Getting the piston sides clean is important, not the front part (facing outwards).
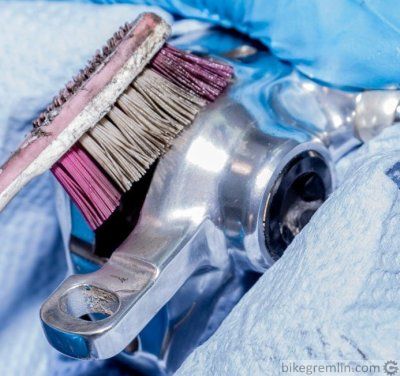
Picture 8
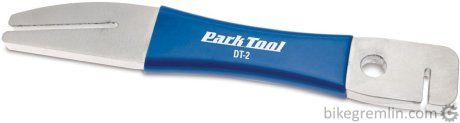
- Get a microfiber cloth (that doesn’t leave any threads), or a paper towel and wipe any dirt off. Smear some brake fluid all around the piston side walls and push them back into place. Tool for doing that easily is shown in picture 9:
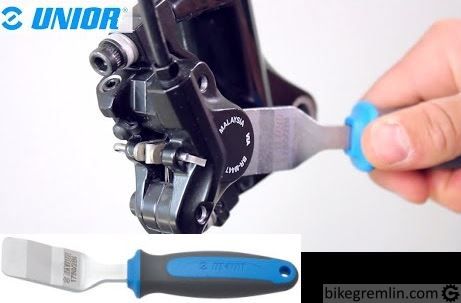
Picture 9
Picture 10
- Previous procedure was important in order not to push dirt inside the brake calipers, along with the pistons. For “proper” cleaning: now hold one piston in place (using the tool from picture 9, or an improvised one), while pumping the brake lever slowly and carefully to push the other side piston out almost half way.
- Brush the caliper clean with a toothbrush, clean any dirt using a cloth, smear some brake fluid on the sides and then push it all the way back.
- Repeat the process on the other side, for the opposite piston. If calipers have more than one piston at each side, holding them all in place and cleaning only one piston at a time can be a bit more complicated. You can use bleed blocks to help with this.

Picture 11
After you have finished cleaning all the pistons, push them all the way back (picture 10), clean any oil/cleaner residue, mount pads, calipers and wheels back into place and see if it has helped.
If it still doesn’t work, the problem could be worn/too old O-ring seals around brake pistons, or a bad brake cylinder inside the brake lever. In that case, I’d first try replacing the cyclinder (or the whole lever), then the calipers, if that doesn’t help. Even better, I’d probably put good old rim-brakes, so I don’t mess with hydraulics. 🙂
4.1. VIDEO: Cleaning caliper pistons of a stuck hydraulic disc brake
My video demonstrating the repair of a stuck disc brake caliper piston:
![Fixing a stuck bicycle disc brake piston [1019]](https://bike.bikegremlin.com/wp-content/plugins/wp-youtube-lyte/lyteCache.php?origThumbUrl=https%3A%2F%2Fi.ytimg.com%2Fvi%2FK6mG6UjBh0Q%2F0.jpg)
5. Mechanical disc brakes
With mechanical disc brakes, calipers are not retracted by piston rubber seals, like hydraulic ones are. Most often, only one piston moves, while the other one is fixed – depending on caliper construction.
Fine tuning of brake pad position, so that they don’t “grab” too late (when the brake lever is pulled almost all the way to the handlebars), but also don’t stay too close to rub, also depends on particular brake model.
I made a video that shows some “tricks” for setup (again, do read manufacturer’s instructions), that are more or less universal: centering brake calipers (video).
That’s it. I hope this will help someone to solve a brake problem. 🙂
Amazon affiliate links:
Last updated:
Originally published: