This post explains when to replace a bicycle chain. For a detailed explanation of what exactly happens when a chain gets used and worn, look at this post: Bicycle chain wear (elongation)
1. Chain design
The bicycle chain transfers pedalling force to the rear wheel. Compared to alternative systems for drive force transfer (like universal joint (cardan), belt etc.), it has very small mechanical losses – it is efficient. This is an intersection of a chain with bushings, the predecessor of the modern chain:
Chain plates are connected with pins. Over the pins, there are rollers – used to make sliding over chainring teeth easier. The “obsolete” versions of chains had bushings over pins – between pins and rollers. Modern chains, however, don’t have these bushings – they are bushingless chains.
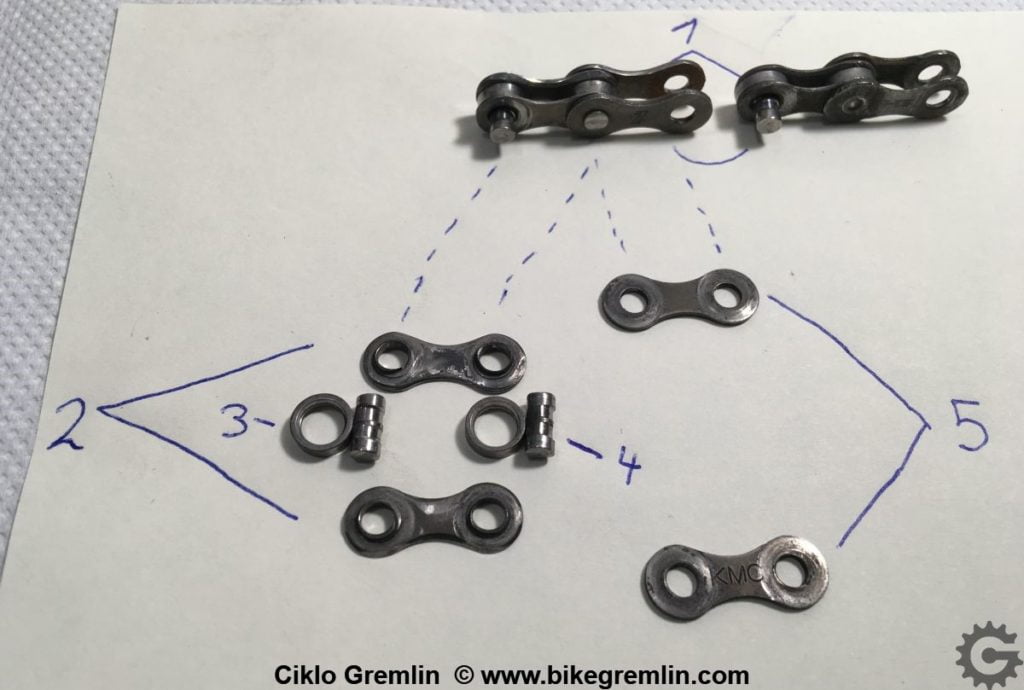
1. chain link; 2. inner plate: 3. roller; 4. pin; 5. outer plate
Picture 2
Advantages of modern chains compared to the old bushing chain design:
- Cheaper to produce (this should also mean cheaper for the buyer, but is not always the case)
- Less likely to brake if changing gears under load
- Provides better lubricant flow inside the rollers
- It has more lateral flexibility, which enables more cross chaining on bicycles with lots of sprockets
Disadvantages of modern chains compared to old bushing chain design:
- Slightly worse mechanical efficiency (for a few per cent)
- Lubricant is quickly washed out of the area between the rollers and pins. So while they are more quickly lubricated, they lose lubricant (and allow the dirt to enter the space between rollers and pins) just as fast. This openness of rollers and pins is the Achilles heel of modern chains. Unless rigorously cleaned and re-lubed, they wear out rather quickly.
2. Chain wear – elongation
A chain gets worn through use. Wear is mainly affected by dirt and lack of lubrication. Grinding pastes are made with a combination of sand and oil – these are also present on a dirty chain. A perfectly clean and lubricated chain inside a car engine often lasts for tens of thousands of kilometres, taking a load of over 100 horsepower. So to have the chain last long – it has to be clean and lubricated. Still, even with good maintenance, a chain gets worn sooner or later.
How to tell that the chain is worn?
Chain wear is determined by its elongation.
This is often, technically inaccurately, called “stretch”. Chain elongation does not occur because of any material stretch, but because of pin wear.
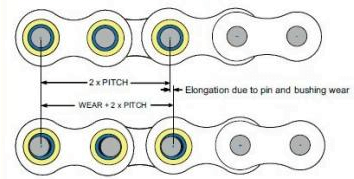
The length of one link of a new chain is exactly one inch (2.54 cm). One chain link includes one pair of inner and one pair of outer plates. In the picture above, that is marked as “2 x PITCH”. As the pins wear, the distance between adjacent pins increases – making the chain effectively longer.
Chainring teeth are optimized for a chain with 1/2″ (1.27 cm) step. An elongated chain will not mash with the chainrings properly. Because of a longer step between pins, a worn chain will not put similar load on all the chainring teeth and will tend to “climb” on the teeth. This further increases chain wear, and it also increases the rear chainring wear significantly.

Skipping chain:
when the chain gets too worn, it can climb too high, and when pedalling hard, it can slip off the chainring teeth. This results in a pedal suddenly dropping as if the rear wheel has slipped suddenly.
Rear sprockets wear: if a bicycle is ridden with an elongated chain, the rear sprockets will quickly get worn so the chain skipping will occur with a new chain – due to worn rear sprockets.
Rear sprocket wear (except an extreme one) is impossible to determine by looking. Even a fraction of a millimetre wear is enough to cause the skipping of a new chain. One of the reasons I’d never advise the purchase of a used (second-hand) cassette.
Front chainring wear: if the bike is ridden longer with a very worn chain, even the front chainrings will wear out faster.
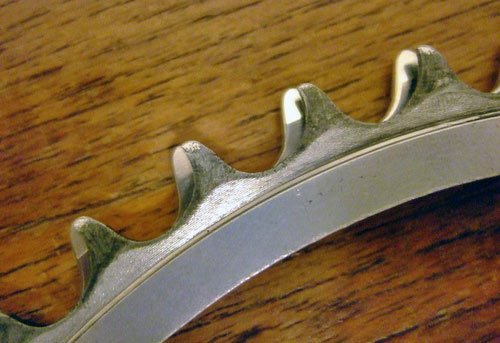
Here a chain slipping is the least likely to occur, but since the sprocket teeth get worn, the chain will have noisy disconnection at the bottom of the chainring, or it will get stuck (this is called “chain suck”).
The chain is sucked upwards
Chain suck effect shown on video:
![Chain suck - worn chainring and a new one [0015]](https://bike.bikegremlin.com/wp-content/plugins/wp-youtube-lyte/lyteCache.php?origThumbUrl=https%3A%2F%2Fi.ytimg.com%2Fvi%2FLlZ1zvVVgcE%2F0.jpg)
3. When is the time to replace the chain on a bicycle?
1) When the chain gets elongated for about 0.5% of its length, it is time for a new chain.
If the chain is changed at this mark, the life of chainrings and sprockets will be longer. Rear sprockets will last from 2 to 4 chain changes this way, before they too get worn and need a change. Sprockets must be changed only when they start skipping with a new chain. The front chainrings will last many times longer than the rear ones, especially with regular chain replacement.
2) If the chain is not changed at 0.5% elongation but stays used until it reaches 1% elongation:
Rear sprockets will need to be replaced along with the chain – they will definitely be worn. Gear changing on bicycles with a rear derailleur will be slower, and it will worsen as the chain wears past the 0.5% elongation point.
3) If the chain is not changed past the 1% elongation:
Even the front chainrings will get worn more quickly. So when the chain is eventually replaced, both the rear and the front chainrings will need replacing. Changing gears on bikes with derailleurs will be noticeably worse, and there is a higher risk of a too-worn chain snapping.
4. How to measure chain wear?
4.1. Method A – ruler
With a ruler, simply. The chain is measured when it is straight and tensioned, best directly on the bicycle.
Inch ruler: since one link is exactly 1″, measure 12 links. It is easiest to measure from the middle, to the middle of the pins.
If the 12th link pin aligns with about 12″ and 1/16″, then the chain is about 0.5% elongated.
If it aligns with about 12″ and 1/8″, then the chain is elongated for about 1%.
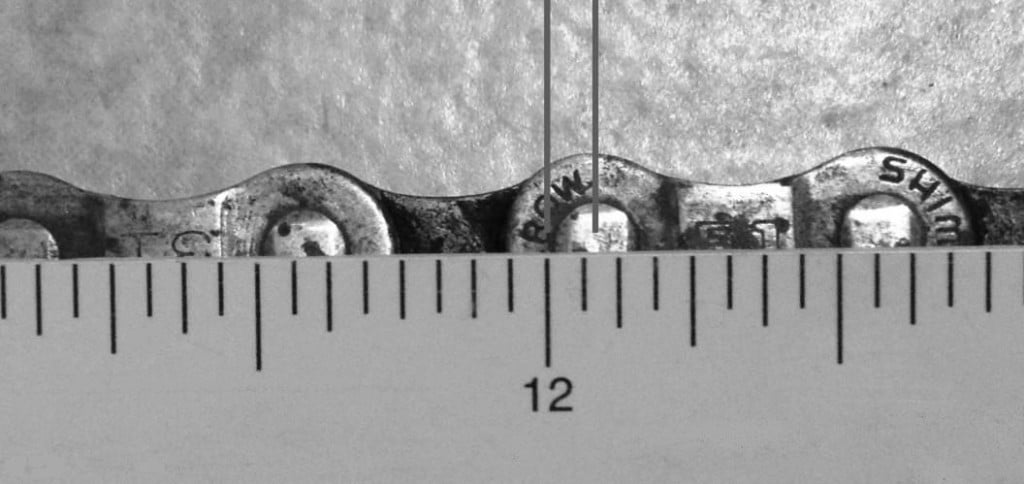
This chain is between 1/16″ and 1/8″ of elongation
So it is time for a new chain, or the rear sprockets could get prematurely worn
Centimetre and millimetre ruler: 10 links are measured. Zero is aligned with the middle of the first pin, and it is then checked where the 10th link pin is aligned. If it aligns with 25.4 cm, the chain is new.
If the middle of the 10th link aligns with just over 25.5 cm (more precisely, 25.53 cm), the chain is about 0.5% elongated.
If it aligns with almost 25.7 cm (more precisely, 25.65 cm), then the chain is about 1% elongated.
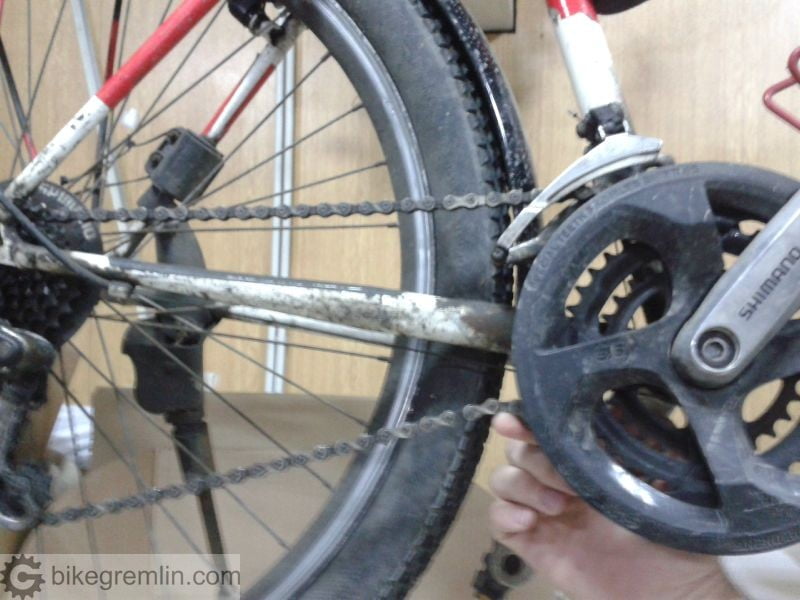
4.2. Method B – pulling the chain off the front chainring
At the front chainring, towards the front part of the bike (at “3 o’clock”), one should try to lift the chain off the chainring.

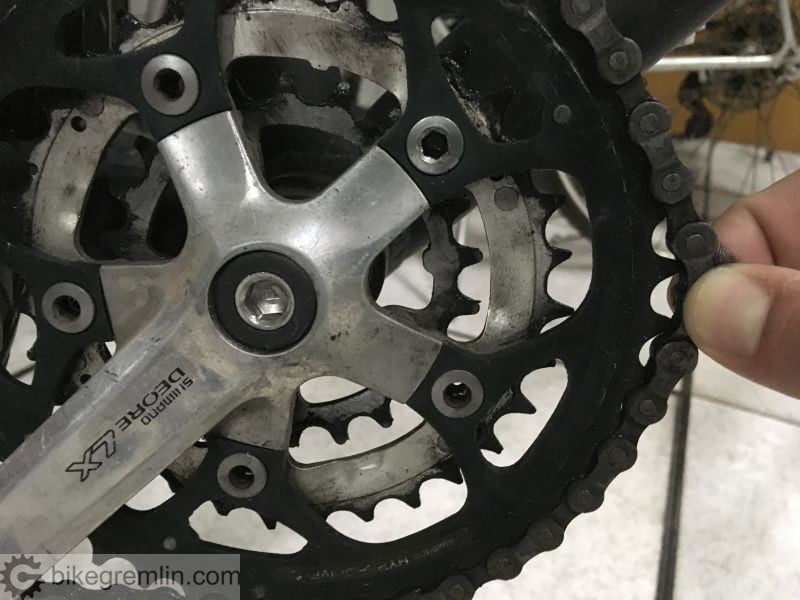
This method is not too precise but is good for a quick check.
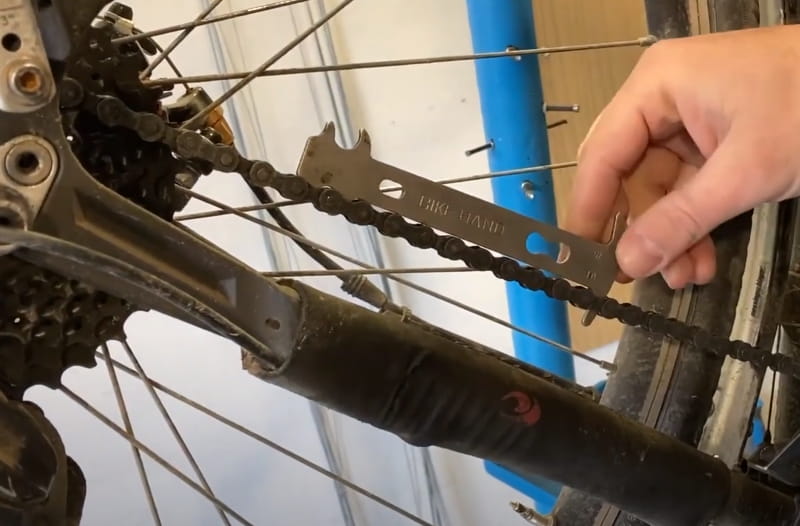
4.3. Method C – using a chain checker tool
There are simple tools for checking chain wear. They are just leaned on the top of the chain. If they drop in, the chain is worn, and it’s time to replace it.
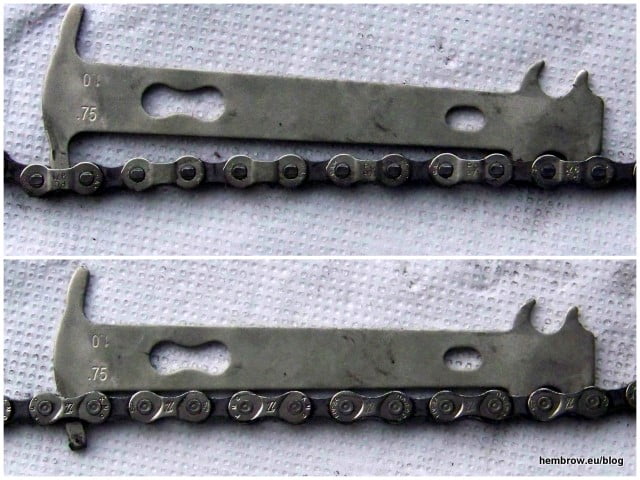
Lower picture – worn chain
There are labels on the left side of the tool: 0.75 and 1.0. The 0.75 measures approximately 0.5% of chain elongation, while the 1.0 is a 1% elongation mark (though this depends on the tool and even the chain model).
Measuring using such a tool is quick and easy. The flaw of such tools is that they often give a “false alarm”. They add roller wear into the results – not just the pin wear that affects stretch. When such a tool shows it is time for a new chain, measuring with a ruler might show less than 0.5% elongation. This is often the case with chains that have a bit softer rollers or a bit smaller rollers (sometimes even new chains show wear with this tool). I’ve done an experiment to show that roller wear does not affect chain-to-chainring engagement.
That is why such tools are mostly good as a quick check – so you know when to start measuring with the ruler (for the more accurate but also more time-consuming measurements).
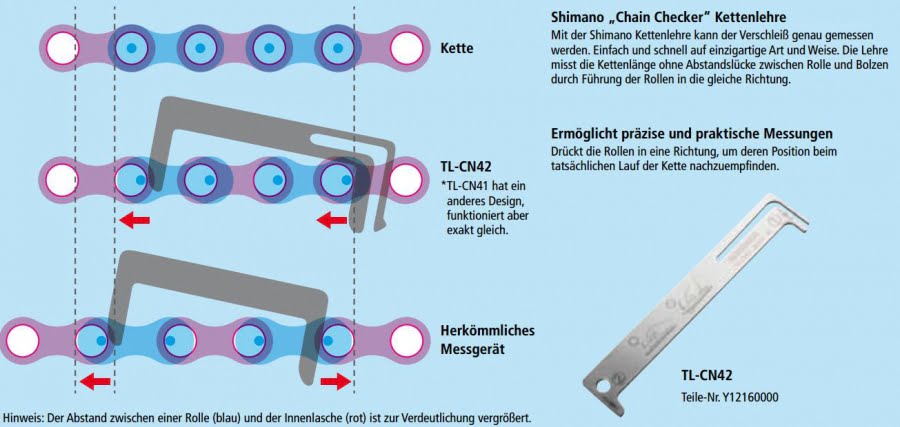
The exceptions are Shimano tools (links point to product pictures and prices at Amazon.com – as an Amazon Associate I earn from qualifying purchases.) TL-CN40, TL-CN41 and TL-CN42. The picture shows the difference between an “ordinary” and a Shimano chain measurement tool:
Update, November 2023
A list of accurate and precise chain wear checker tools that are still manufactured and sold:
- Shimano TL-CN40
No longer made. - Shimano TL-CN41
No longer made. - Shimano TL-CN42 (Amazon affiliate link that shows the price and what the tool looks like)
- Park Tool CC-4 (Amazon affiliate link)
An obvious copy of the Shimano TL-CN41 design, made relatively recently. Older Park Tool chain checkers are not precise. - Pedro’s Chain Checker Plus II (Amazon affiliate link)
Another copy of the Shimano TL-CN41, with some additional functions – bulkier, but looks practical, though I haven’t tested it yet.
For what it’s worth – if I were shopping today, I’d probably buy the Pedro’s chain checker.
The problem of ordinary chain checkers can be partially eliminated by moving the right-hand side roller to the left manually with a screwdriver, but this usually requires a “third hand”. 🙂 However, even using this technique, the “ordinary” tool still measures the distance between the two roller sides facing each other. So roller thickness still affects the measurement results.
It is an interesting fact that a worn chain is much more flexible to the side than a new one. No way it is a precise method to measure for wear, but it can be informative when checking out a used chain quickly (not that I’d recommend buying second-hand chains):
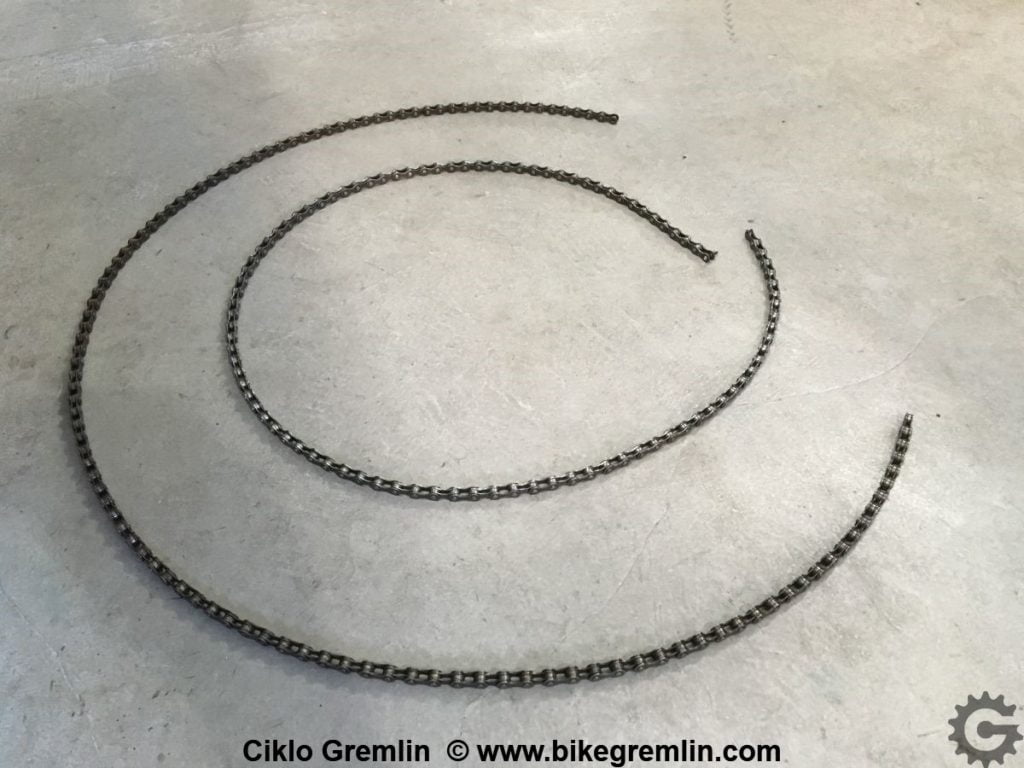
The worn chain is bent into a circle of a smaller diameter, since it has more sideways play.
Related article – Chain length sizing for bicycles with derailleurs:

A simple, accurate and precise tool for chain elongation measurement (link to Amazon.com with the tool pictures and prices – as an Amazon Associate I earn from qualifying purchases.): Park Tool SBC-1.

Last updated:
Originally published:
Informative and very helpful!
Really useful info