How to determine an optimal single speed chain length? Why is it important? When explaining this, it is important to note that it goes for all the bicycles with only one chainring at the front and at the back, including bicycles with gear hubs (that have multiple gears built inside the rear hub mechanism). For bicycles with derailleurs, see: Chain length sizing for bicycles with derailleurs.
1. Bicycle drive chain length
A new bicycle chain usually comes with 116 links. This is long enough for the biggest chainrings and for most distances of the rear wheel from the front chainring. So for optimal length, a new chain is usually shortened from the 116 links that come in the box. In rare occasions – touring frames for example, with extremely long chainstays, 116 links might not be long enough, so a few links off another new chain need to be added to reach an optimal chain length.
2. Why is it important to determine correct chain length
Too long chain will increase risk of chain dropping, while too short chain puts too much stress on the drivetrain, or can damage it, if it can be put and closed over the chainrings in the first place.
3. Determining optimal single speed chain length
For bicycles without derailleurs and without a chain tensioner, the chain length should be such that the chain has some slack, but not too much. Such bikes usually have only one speed, sometimes even “fixed gear”. Some might have a rear hub that allows for different gear ratios, with speeds built inside the hub. However, with or without hub speeds, the chain measuring method is the same, like this picture explains:
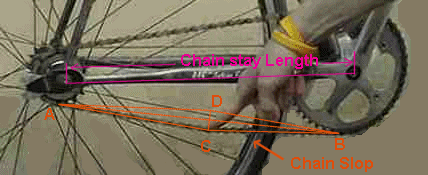
Chain slack is about 1 cm to each side (up and down).
So there are about 2 cm between C and D
So the chain should be tight, but not too tight. Halfway between chainrings, the chain should move about 2 cm (1 cm up-down). Frames for single speed bikes, if no chain tensioner is used, usually have rear dropouts that allow moving rear wheel back and forth – so that correct chain tension can be achieved once the chain is cut to size. One chain link is exactly one inch long. So the minimal step for shortening a chain is that (2.54 cm, i.e. 1 inch).
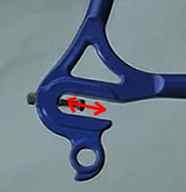
Allows moving the wheel back and forth.
Chain tension should be checked throughout the pedal turn because chainrings are not always completely round. If the chain gets too tight at some point, it should be loosened a bit (by moving the rear wheel slightly forward). At the tightest point, there should be about 1 cm of play up and down.
In case the frame has vertical dropouts that don’t allow for setting chain tension by moving the rear wheel, special chain tensioners can be used, or improvised from an old rear derailleur. Also, there are rear hubs with an oval shape that allow for setting chain tension by rotating hubs, but such parts are exotic.
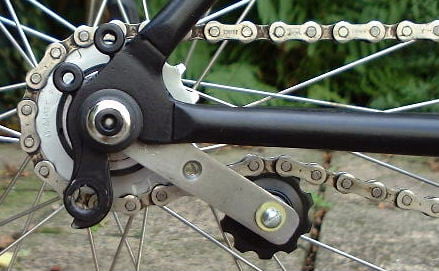
On a frame with vertical dropouts.
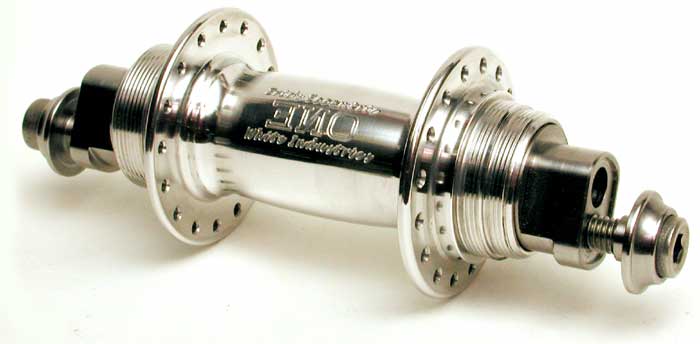
This model has threads for screwing two sprockets – one on each side. This allows for two different speeds, but in order to use the other, chain needs to be taken off and the wheel turned.
This one also has offset mounting bolts, so that chain can be tensioned even on frames with vertical dropouts.
4. Jockeying wheel in the horizontal dropouts
Some people have problems with setting an optimal chain tension on bicycles with horizontal rear dropout. They find it hard to move the wheel just a little, enough to make it right. This is because they don’t use the jockeying technique to move the wheel back and forth in the dropouts. Use the following procedure:
- Insert the wheel in the dropouts with loose wheel bolts. Put the chain over the chainrings, it should be loose as well.
- The wheel is then moved to the left – away from the chain. Non-drive side bolt is therefore put slightly to the back. Then the non-drive side bolt is tightened.
- Now the drive side bolt can be moved back and forth using the same method, to achieve desired chain tightness. Then it is fastened.
- When the optimal chain tension is achieved, by moving the drive-side bolt to the exact desired spot, after several small iterations of the points 1 through 3, it is time to wrap it up:
loosen the non-drive side bolt. The wheel should now align itself if proper chain tension was set up. If it doesn’t align 100%, align it by hand. Then tighten the non-drive side bolt and you’re good to go. 🙂
Last updated:
Originally published:
Related post – Bicycle chainline:


There’s a third case that’s not covered by either of your articles — how to determine the chain length on a fixie with a two-speed hub, such as White Industries Double Freewheel with two cogwheels. I’d be appreciative of pointing out any differences between this article and the steps for setting the chain length for a double freewheel, as I’m about to try it soon!
Hi Bryster,
That’s a good question. The freewheel you mentioned comes with two sprockets that differ by two teeth in size between each other.
What I’d do is size the chain so that I can make it optimally tight for either sprocket option, without exceeding the amount of adjustment provided by the rear dropouts (or the excentric bottom bracket shell some bikes come with). It would require some trial and error.
I think a good place to start is to size it on the smaller sprocket, making sure there is still room left for further chain tightening as the chain wears and elongates. However, I’d make sure to put the chain over the larger sprocket and double check if the wheel does not end to near the front side of the bike, i.e. making sure that there is some room left in the dropouts to tighten the wheel.
With a single rear sprocket, one can start at the front side of the dropouts, at the middle, or even at the rear 1/3 (depending on how long the dropouts are, i.e. there must be some room for moving the wheel further to the rear as the chain wears and elongates). With two sprockets, however, I’d aim for as close to the front side on the larger sprocket as the chain sizing allows (unless you go with a half-link chain that lets you size it in half-inch increments, instead of whole inch only), since when you swap to the small sprocket, the wheel will need to move further back.
It shouldn’t be a huge difference, as we are dealing with only 2 tooth difference, but as the local saying goes: “measure three times, cut once.”
Hope I’ve explained it clearly enough. A more common scenario I come across are the hubs that have a sprocket on each side, one being a freewheel, the other being fixed drive (people often opt for sprockets of different sizes with such hubs, at least in my experience). It would probably be a good idea to make a video demonstration as it does make the chain sizing a bit more complicated – though the basic principle is the same.
P.S. In case you can’t get the optimal chain length, and wish to avoid using a half-link chain (they aren’t bad, just more difficult to source, at least in my city), you could also try a chain tensioner to solve the problem. That should give you a lot more “play room” in terms of chain length.
Relja
Hi Relja,
Thank you for the quick, helpful reply! I have screws on each rear dropout (don’t know the formal term for those) that I’ve read is used to fine tune the longitudinal position of the wheel, so I anticipate that will allow me to achieve sufficient granularity on chain tension adjustment. Your article is a great reference.
-B
Hey
No guidance on how much longer to make it if you have a tensioner.. ?!
Thanks
Hi Adam,
One pair of inner & outer links (i.e. 1”, or three pins) should suffice.
Now, it is often not an exact fit. You can only size chains in 1” increments (except the half-step exotic chains). But anywhere between one and two extra inches is fine.
Depending on the tensioner’s cage length, three (or more) extra inches may be too much for it to handle.
Relja