This post explains what bicycle gear ratios are (often expressed in gear inches), how they work, what are the needed gear ratio ranges etc.
TL/DR
Here, I’ve explained bicycle gears: “harder” gears (more gear-inches), and “easier,” lower gears (fewer gear-inches).
How it works, why it matters (to be in the optimal gear), and how to shift properly?
I’ve also explained why “redundant” (“overlapping“) gears are often a good thing.
In a separate article, I’ve explained the pros and cons of 1-X drivetrains (they aren’t perfect for every user).
1. How do bicycle gear ratios function?
Bicycle is driven by transferring pedaling force to the rear wheel. When pedals are turned, front chainring draws the chain, which goes over the rear sprocket, turning it along with the rear wheel. Depending on the gear ratio, one turn of pedals can make the rear wheel turn less than one full circle (“low gearing”), or more than four full circles (high gearing).
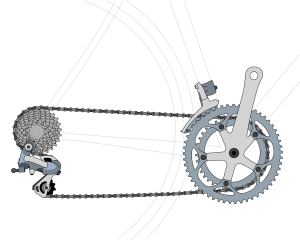
Cranks with (front) chainrings, chain and (rear) cassette with chainrings.
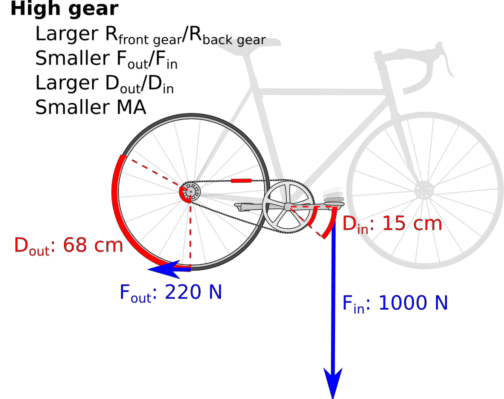
The lower the gearing, the higher force (torque) can be applied to the rear wheel, but the speed is lower, and vice versa. As it is shown in the picture below, when pedals are turned for the same angle, with the same force, depending on the gear ratio, rear wheel can travel a shorter distance, with greater output force (good for steep climbs), or it can travel a longer distance, but with less force (good for riding fast).
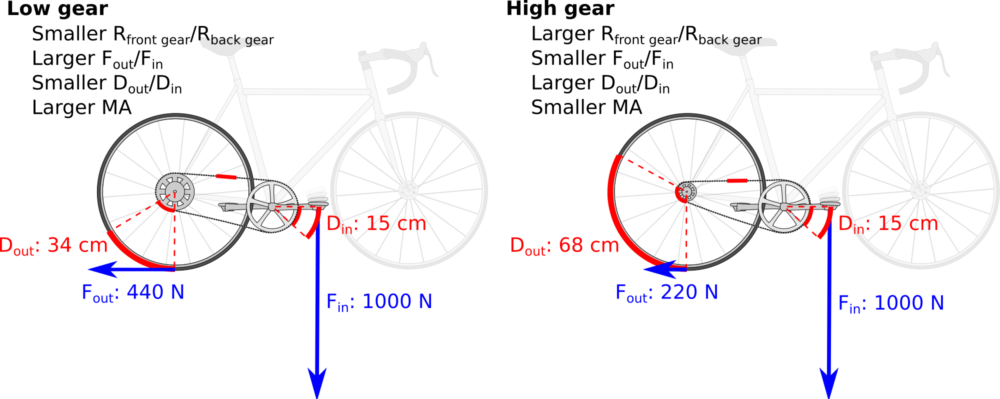
(CLICK on the image to enlarge it)
2. Gear ratio – “gear inches”
Gear ratio is usually expressed in “gear inches“, i.e. the distance in inches covered by the rear wheel for one full turn of the pedals (roughly speaking, for a detailed explanation click on the link from at the beginning of this sentence). This depends on the ratio between the number of teeth of the front and rear chainrings, as well as the diameter (size) of the rear wheel.
For example: if the front chainring has 42 teeth, for one turn of the pedals, chain will move for those 42 teeth. Rear sprocket will move for the same number of teeth, of course. If the (rear) sprocket has 14 teeth, when 42 teeth of chain movement pull it, it will turn for full 3 circles (42/14). If, however, it has 21 teeth, it will turn for only 2 circles (42/21). That is one factor. Now, for exact gearing the wheel diameter needs to be taken into consideration. 26″ mountain bike wheel will travel smaller distance for one turn, compared to a 28″ road bike wheel. So with the same chainrings ratio, gearing on a road bike will be higher than on a MTB.
With bicycle gearing it is important to have two things:
- wide range between the lowest and highest gear ratios (low enough for the steepest climbs and high enough for the fastest downhill descents).
- Tight gear spacing – lots of gears with 10 to 15% of gear ratio difference, so that appropriate gear can be selected depending on riding conditions.
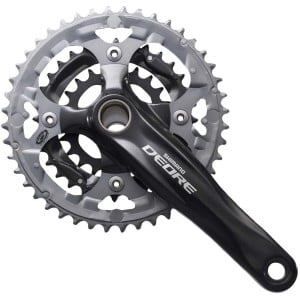
Bicycles usually have from one to three front chainrings, with relatively large gap of teeth number between them.
Rear sprockets are either single, or multiple (called “cassette”) – ranging from 5 to 11 or more sprockets. They have smaller gaps in teeth number between adjacent sprockets.
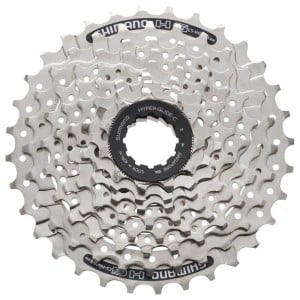
11-13-15-18-21-24-28-32
Large gear ratio changes are made with the front chainrings, while fine tuning of the desired gear ratio is then made with cassette sprocket selection. Gear ratio is best selected so that with 80 to 100 pedal turns per minute, it is not too hard to push pedals, but also not too easy (as if there’s no resistance at all). The only exception are steep climbs, where it is often not possible to achieve more than 50 crank turns per minute.
3. Calculating the needed gearing
Basic reference gear inch points are:
- 20 gear inches for really low gearing needed for climbing steep off-road ascents. E.g. MTB cranks with 22 teeth small chainring and cassette with largest 34 teeth sprocket, with 26″ wheels gives about 17 gear inches.
- Above 100 gear inches is good for flat paved roads with strong wind at the back.
- Range from 25 to 100 gear inches is enough for 90% of riding in 90% of conditions, except for some extreme extremes 🙂 or for racing (where gearing is customized to riding conditions of each race).
Apart from the total gearing range, it is good to have lots of gears between the two extremes, so that for each moment the correct gearing can match current speed and riding conditions. Like it was mentioned before, this is accomplished by narrow gaps at the cassette chainrings.
How it is calculated:
Gear inch = (Wheel diameter in inches) x (number of front chainring teeth) /
number of rear sprocket teeth.
To get the distance travelled per one pedal turn, multiply gear inches by 3.14 (number Pi).
Programme great for easy calculation of gearing:
https://www.gear-calculator.com/
4. Human body limitations
When pedals are turned slowly with lots of force, muscles tire quickly – not getting enough oxygen and blood to maintain the effort for long. Riding with a too high gear ratio, turning pedals slowly is similar to jumping from standing still – with both legs: lots of power in a short time, but quickly exhausting.
Turning pedals quickly, in a lower gear ratio is similar to walking fast, or running: heart and lungs work harder, but the effort can be maintained for a lot longer. And it quickly improves with training.
Optimal number of revolutions per minute is between 80 and 100 – depending on individual body and the level of training. The main function of changing gear ratios is remaining in that optimal range. Steep climbs are exception and revolutions often drop below 50 rpm, but on long climbs it helps having gearing “slow” enough to enable over 60 rpm.
5. Chain line and cross chaining
A certain gear ratio, on the same drivetrain, can be achieved with various chainring combinations. Let us take for an example a drivetrain with front chainrings 48-38-28 combination, and a 6 speed 14-16-19-21-24-28 cassette.
The exact same gear ratio can be achieved with a 48-24 combination, as well as with 28-14. Still, in both those combinations, the chain is completely crossed, twisted, like shown in the picture below:
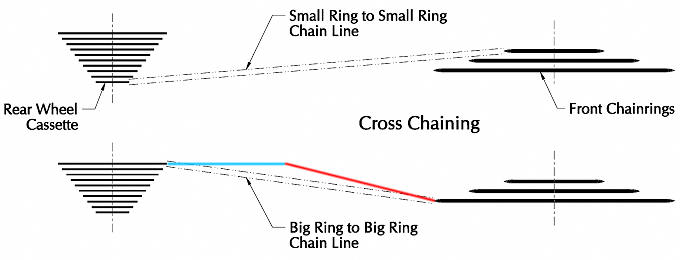
Combination of inner and outer chainrings should be avoided at all costs.
Chain crossing puts a lot of stress on the chain as well as the chainrings, drastically accelerating wear, as well as increasing the possibility of chain breaking, or falling off the chainrings.
Similar gear ratio can be achieved with a 38-19 combination, where the middle drive chainring will pair with a cassette sprocket that is also in the middle of the cassette – forming an almost perfect, straight chain line.
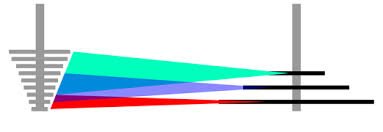
This should be kept in mind when selecting gears. Inner chainring should be combined with the inner 2/3 of the cassette (closer to the bicycle). Outer chainring should be combined with the outer 2/3 of the cassette. The middle chainring (if there are 3) should be combined with the middle cassette chainrings, avoiding the outer 1/6 at both ends of the cassette.
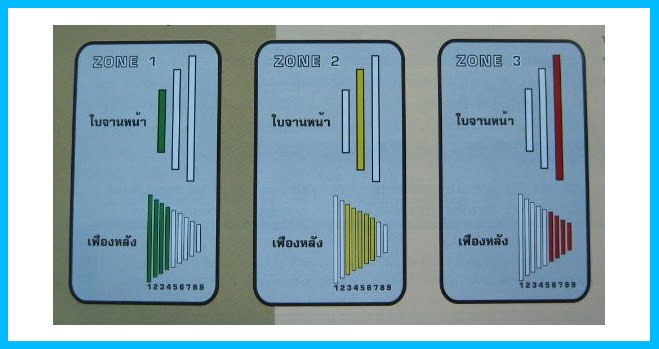
In coloured combinations, the chain is never extremely crosschained.
Another picture showing it in a different way:
6. “Redundant” (overlapping) gears
With bicycles that have more than one front chainrings that don’t have a very large difference in numbers of teeth, same gear ratios can be achieved using various chainring and rear sprocket combos. This is usually encountered with “triples” (three front chainrings) – where tooth count difference is usually around 10 teeth (e.g. 44-32-22, or 50-39-30 etc.).
People often get a sense of being “cheated”. They buy a 3×9 geared bicycle, but instead of 27 different gears, they get “only” about 14 noticeably different gear ratios. Why is this useful?
First it needs to be noted that shifting from one front chainring to another requires a bit more time and is harder to achieve if a chain is under pedalling load. Also, one front shift results in a great(er) change of gear ratio than a rear shift.
It can in fact be said that front chainrings provide a wider gear ratio range, while rear sprockets provide differences in gear ratios of adjacent gears.
Imagine riding on a flat, approaching a hill. Say the chainrings on the bike are 48-38-28 and the cassette is a 9 speed one: 12-13-15-17-19-21-24-28-32. For a decent pace on the flat, one could use a 48-19, or a 38-15 combination. They both give almost identical gear ratio, without much cross chaining. However, once a climb starts, a lower gear ratio will be necessary. If one chooses to ride in 48-19 combination, that would require more cross chained riding, and, later on, a big “jump” in gear ratio caused by a front shift to a smaller, 38 chainring. However, if one approaches the hill with a 38-15 combination, lots of gear range change is achieved by gradual and easier rear shifting.
Situation is similar with classic road “double” chainrings – 53-39. They don’t provide as great span of gear ratios as “triples”, but they too have a sufficient amount of “overlapped” gears.
Modern “compact” chainrings are an attempt to achieve a wide span of gear ratios, similar to that of a triple, by using only two chainrings (in stead of three). That is why they have a large difference in number of teeth between the small and the large chainring – usually 16 teeth – which is a maximum “gap” that front derailleur can handle. Thanks to this, they have a very small number of “overlapped” gears. Why can this be awkward?
Let’s take a typical road compact crankset: 50-34, with a 9 speed cassette from the previous example. Small chainring is “too slow” for riding on flat ground, so even when approaching a climb, one must stay in the big ring. Then, as one starts to climb, a (large) front shift is necessary. Gear ratio change after shifting from big to the small chainring is so large, that it requires at least two more shifts on the rear to achieve a similar (a bit shorter) gear ratio. In practise it looks like this:
After 50-24 combination, shifting to 34-19, or even 34-17 is required in order to not make a gear ratio change too large. This can be useful on terrain that has lots of (short) steep climbs and downhills (i.e. rolling hills), but not on every terrain. It also results in more cross chaining when riding on flat land. The last sentence may not be correct if one mounts a (exotic, a lot more expensive and not widely available) cassette that starts with 14 teeth, like 14-28, or similar road cassettes.
7. Proper shifting demonstration – video
In this video, I’ve visually explained the shifting patterns, overlapping gears, and shown how to shift properly:
These are the basics. One should make sure to choose the right gear range and mind that chain is kept as straight as possible (relative to the bicycle’s axis). Discussion on how many speeds is optimal (needed) is given in the post: Bicycle – how many speeds:


Gear changing should be performed without much force on the pedals. I.e. not in the middle of a steep climb. Especially when shifting from a smaller, to a larger chainring (or sprocket).
Last updated:
Originally published:
The existing comments posted under this article (questions and answers) have been moved to this BikeGremlin forum thread:
https://www.bikegremlin.net/threads/bicycle-gear-ratios-gear-inches-article-comments.139/

The perfect solution for all kinds of bikes is a continuously variable transmission instead of using step changes variations.
The problem with that is how to make it – without having relatively high mechanical losses, and/or being too heavy.
Things tried so far have one, or both of those downsides.
While human body is quite capable of producing decent torque at a relatively wide range of RPMs, unlike most internal combustion engines.
I think here is a mistake: “Riding with a too [high] gear ratio, turning pedals slowly is similar to jumping from standing still – with both legs: lots of power in a short time, but quickly exhausting.”
The “high” in the bracket should be “low”. As you said in the following that 20 gear inches is suitable for gradient, 100 gear inches is for flat paved road.
Why do you not mention crank length in these calculations, as far as torque and the human body? It has been my experience that a longer crank arm, (180 mm), which, apparantly is no longer available, or, I’m assuming, even made, makes higher gear ranges more accessable, and therefore higher speeds attainable, and maintainable with less effort on the rider’s part, even while ascending a fairly steep hill. They’ve also, all but, stopped producing 9 tooth rear sprockets, which were widely available during the 1980’s and 90’s. Did people’s legs just suddenly get shorter and weaker, sometime over the past 3 decades? Or, is the reason, that most bicycle parts are now made in China, and, the Chinese riders have trouble reaching more than 175mm?
Hi Rick,
I’ve explained the reasons for removing the crank arm length from the calculations in the 3rd chaper of the article explaining gear inches:
https://bike.bikegremlin.com/6199/gear-inches-explained/#3
If you want to make custom calculations (not just about bikes), you might like DockCalc visual calculator. Here is an article about bike gears: https://dockcalc.com/WP/index.php/en/2023/02/05/bicycle-gears-and-air-drag-calculation/
Thanks for this education!
I need help for casual riding in a roly poly hilly City environment. I just bought a “simplified” Bianchi 7-speed with (obviously) single gear in front. I understood the sales pitch to be “easier operation, same range low to high, just fewer steps in between.” Really thought it would work for me, LOVE everything else about the bike, but I’m dying on the hills. Feels hard on my knees and breaking a sweat just to go get takeout wasn’t in the plan 🙂
My front chainrin is 41 teeth (maybe 42); largest rear is a 32. Am I just a wimp who needs to build some strength, or is that setup just not going to work for someone faced with a 3-4% grade around every corner (East Nashville TN).
My local shop offered to change out the rear cassette for one with a 34 as largest. So 2 teeth larger. Would that make any noticeable difference?
Alternately I’m considering trading her in for the 24-speed version with the very small front gear, but will be heartbroken to give up this otherwise-perfect bike.
Thanks for any thoughts!
Hi Emily,
Before I answer, this tool is very useful (and simple to use) to give you the info about different drivetrain combinations:
gear-calculator.com (the link should open with a setup of 42T cranks and a 7-speed cassette)
That is best to see by yourself, for yourself, how different drivetrain setups should perform (kudos to mister Dirk Feeken for making the tool 🙂 ).
To answer the question: 2 teeth on the rear can make a noticeable difference. But it may not be enough.
From my experience:
My old road bike had 53-42 cranks, and 34 teeth at the rear (so a 42 – 34 combination) was not low enough for me on long steep climbs as I went past 40 years of age (before that, it was OK).
So I swapped my cranks for 50-34. 34 front chainring gives me low enough gearing even with a 32T cassette. If I shift to 13T at the rear, it is fast (high) enough gearing for riding on flats (I avoid that combination to avoid cross-chaining, and use 50 – 18 instead which is close to that).
Based on that, you might give it a try with a 34 or a 36T front chainring, at least until you build up strenght and endurance. 34T at the front paired with a 34T cassette will give you a one-to-one gear ratio, which is often low enough for most climbs on paved roads. It would definitely be easier than pushing 42 – 32, or even 42 – 34 combo.
Relja