
This article answers the questions:
What is tightening torque and why is it important?
What are torque wrenches and what kinds of them exist?
How to properly use and take care of your torque wrenches?
In a separate post, I wrote a torque wrench buying guide.
1. What is torque?
Torque definition:
In physics and mechanics, torque is the rotational analogue of linear force. It is also referred to as the moment of force (also abbreviated to moment). It describes the rate of change of angular momentum that would be imparted to an isolated body.
In plain English:
Torque is how strongly you are turning something (for example: screwing it in or out). It depends on the force you apply, and the length of the lever you are applying the force with.
- We’ll note the force with the letter “F” and express it in Newtons (N).
- We’ll note the lever’s length with the letter “r” and express it in metres (m).
- And we’ll note the torque with the “τ” sign and express it in Newton-metres (Nm).
τ = [Nm] F [N] x r [m]
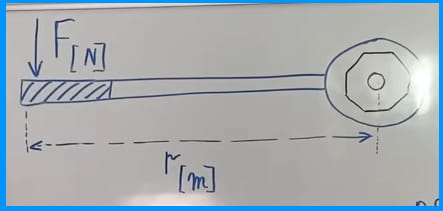
Picture 1
A digression about pound-foot (or “foot-pounds” as the Americans say):
One Newton is the force it takes to move the mass of one kilogram with an acceleration of 1 m/s2.
Earth’s gravity draws everything with an acceleration of about 9.81 m/s2.
We could say that, when we place a weight of 1 kg in our lap, it presses us with a force of 9.81 N, or 1 kg.
So, we could use mass to describe force. Hence, we could use kilograms or pounds to describe force.
Likewise, we could express the lever’s length in either metres or feet or inches.
That is how we get the “American” “foot-pounds” and “inch-pounds” (easier to pronounce than the more correct, but also more awkward “pound-feet” or “pound-inches”).
For those who prefer video demonstrations and listening to explanations, watch my video:
What are torque and power?
2. Why is measuring the tightening torque important?
Simply put, we measure the tightening torque so we don’t mess anything up. 🙂
In a bit more detail, tightening torque measuring is important for the following reasons:
- To avoid a loose connection (and have bolts come undone).
- To avoid over-tightening (so we strip the threads or crush the parts we are tightening).
- To prevent parts and bolts from material fatigue breakage.
We use torque wrenches to measure tightening torque of bolts and nuts.
That’s all you really need to know and you can skip to the section 3, but if you’d like to know the technical definition and explanation:
An optimal bolted connection preload ensures a secure connection, while minimising the risk of material fatigue.
Now, it’s very inconvenient to measure, for example, how much force our stem clamp exerts on our steerer tube.
What we can easily measure is how much torque we apply to the stem’s clamping bolts. We can also easily calculate which bolt tightening torque results in the optimal stem-to-fork pressing force (manufacturers calculate this when they design the stem – and they usually print it on the stem, expressed in Nm).
It is important to understand that the bolt tightening torque is not the same as the connection’s preload force, but by measuring the tightening torque, we can (indirectly) calculate the connection’s preload (with a margin of error, because the conditions are never ideal).
There are other ways to measure tightening torque, and connection preload, but they are beyond the scope of this article (and generally not applicable to bicycle mechanics). If you are curious, you can start with the excellent NASA Fastener Design Course.
For a more detailed explanation of how bolted connections “work” and why low tension actually increases the probability of bolts breaking, see my video:
Bolted connections’ working principle and the importance of tightening torque.
3. Torque wrench types
If you’re read the section 2, you understand that we use torque wrenches to measure the bolt (or nut) tightening torque. In this section, I’ll explain the most commonly used types of torque wrenches, with their pros and cons. Just keep in mind that they all serve the same purpose: to let us tighten nuts or bolts with a desired torque. That’s all they do. 🙂
3.1. Beam type torque wrenches
Using the “Park Tool TW-1.2” (Amazon affiliate link) as an example, I’ll explain this type of torque wrenches:
Picture 2
As you can see in the picture, the socket/bit holder is fixed, and has a rod with a “needle” (like an hour hand) attached, along with a rod with a handle for applying the torque. The rod with the handle has a scale attached. As you apply the torque, the handle-rod bends, and the “needle” rod points the applied torque on the scale.
These wrenches have their pros and cons.
Beam torque wrench advantages:
- They show the tightening torque all the time as you are using them.
– You can watch the torque value reading rise as you are pushing the lever. - Very easily calibrated even at home.
– You just move/set the “needle” to zero with your hand when the wrench is not loaded (i.e. when you aren’t applying any torque via its handle). - They’re simple, cheap, and there’s basically nothing to break! 🙂
Beam torque wrench downsides:
- You must be able to clearly see the scale while working.
– Getting your eyes in line with the scale can be physically impossible in some cases. Even if you are looking at the scale, but at an angle, that introduces an error (because the “needle” is above the scale). - They are slow to work with.
– The head is fixed. It doesn’t have a ratcheting system, so you must take it off the bolt for re-positioning about every 1/3 of the turn (awkward, and even impossible if you are working in some tight space).
Ratchet system wrenches, on the other hand, let you work them left-right in 10, even 5-degree range, with their teeth re-engaging and allowing you to apply the torque.
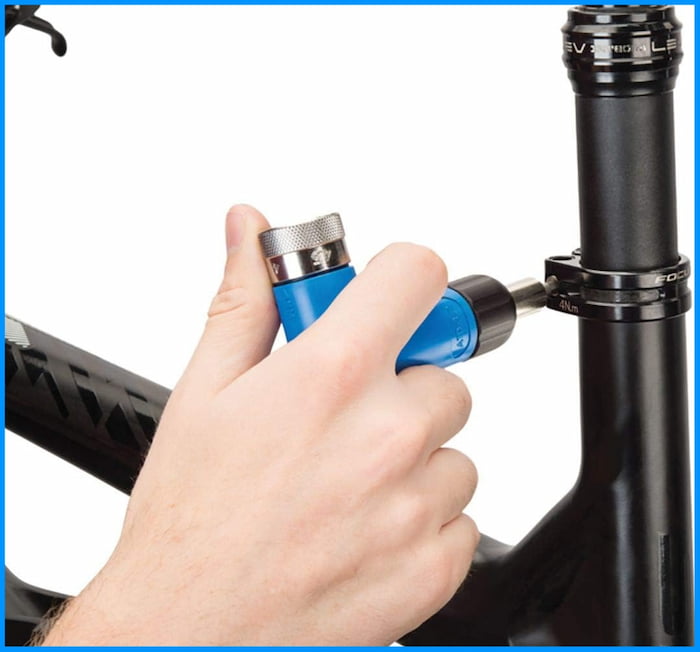
3.2. Click type torque wrenches
These wrenches make a “click!” when you reach the set torque. You can both hear and feel the click. They usually have a bit/socket mount with a ratcheting system, and most of them allow you to set the desired torque within a provided range.
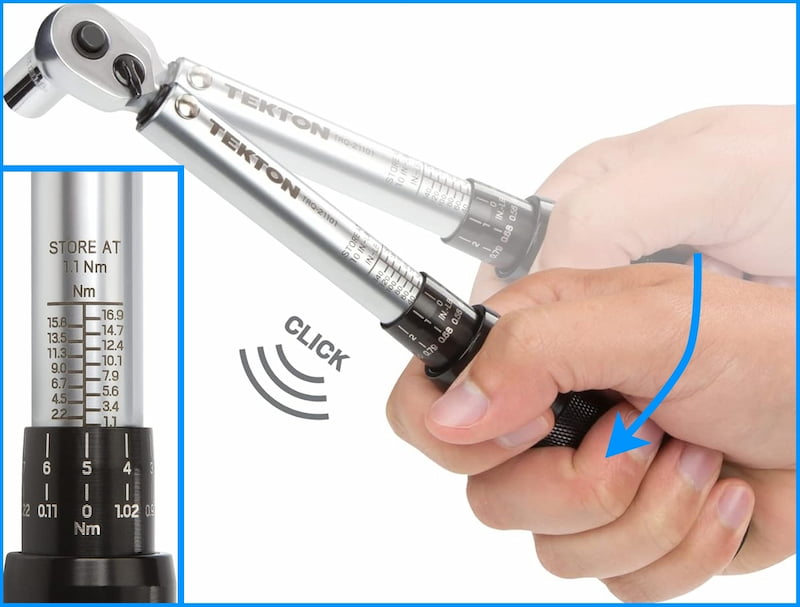
Depicted: “TEKTON 1/4 Inch Drive Dual-Direction Click Torque Wrench” (Amazon affiliate link)
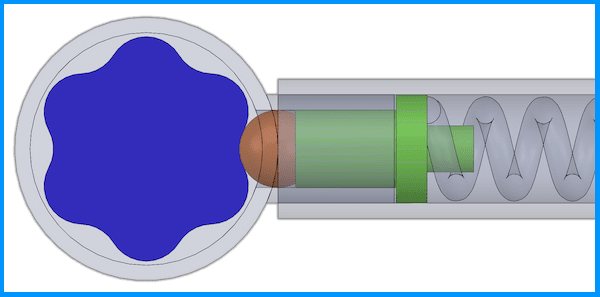
Picture 3
There are different designs, and some come with just one pre-set torque. The working principle is that a spring-loaded rod with a bearing on its end is held in place by a preloaded spring. Once the applied torque exceeds the spring’s preload, the rod’s bearing will slip and the rod will click against the tool’s sidewall. Turning the handle lets you adjust the spring preload, which effectivelly sets the desired torque.
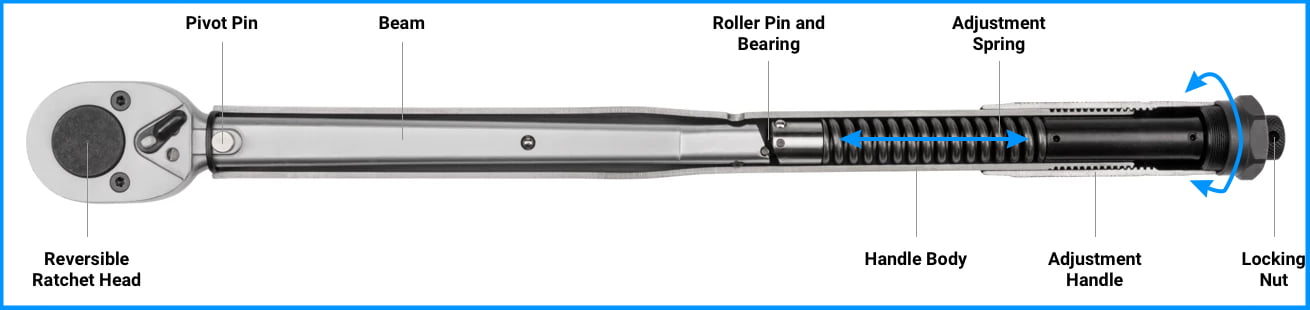
Image source: tekton.com
Picture 4 (click on the image to enlarge it)
Of course, even after the wrench has clicked, you can “continue pushing” (applying the torque), and strip the bolt.
Click type torque wrench advantages:
- They’re fast to work with (at least the vast majority of models with a ratcheting system).
- No need to keep looking at them, you can hear and feel the “click” once you’re reached the set torque.
- All that makes them suitable for working in tight and hard to reach spots.
Click type torque wrench downsides:
- They require regular calibration, which is not cheap, and must be done annually or at a couple of thousands of uses.
- They are relatively sensitive (you shouldn’t drop them, hit them or similar).
- The prices are a lot higher compared to similar quality beam type wrenches.
3.3. Cam-over (“slipper”) and Break-over torque wrenches
Cam-over (“slipper”) torque wrenches are like click type wrenches, but with one key difference: they slip (cam-over) once the set torque is reached. A good example is the wrench designed like a T-handle: Park Tool ATD-1.2 (Amazon affiliate link).
Picture 5
This wrench type is also made in a more “traditional” design looking a lot more like the Tekton from picture 3. Working principle is based on a sort of a clutch, which starts slipping once its spring preload is exceeded (the desired torque is set by adjusting the spring’s preload, usually achieved by spinning the handle).
Drawing source: Wikipedia
Picture 6
Break-over (Breakback) torque wrenches will fold (instead of slipping, like the cam-over wrenches), once the set torque is reached. They are less popular for bicycle servicing. They are more popular with heavy machinery service, where high torques are required.
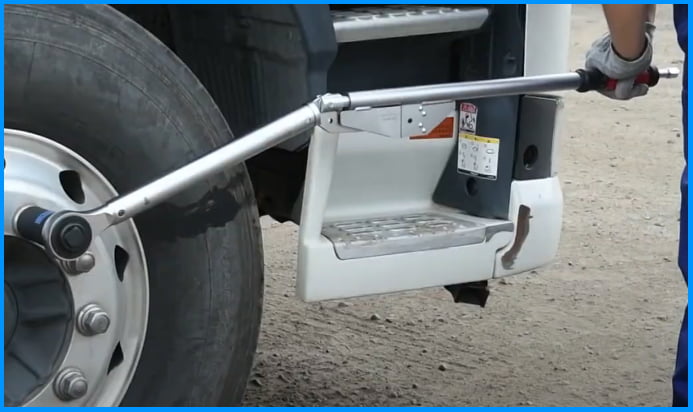
Picture 7
When you push hard on the tool, a “click” is not enough for you to stop right away and avoid over-tightening. Many cam-over mechanisms, on the other hand, don’t handle high torques without getting worn quickly. That is why break-over wrenches are handy, as they fold to 15 to 90 degrees (depending on the model), giving you enough time to stop pushing. 🙂
Can you see where a dog “marked” the tyre in picture 7? 🙂
When it comes to pros and cons, these wrenches are very similar to the above-described click type torque wrenches, except they are more expensive.
3.4. Electronic (“digital”) torque wrenches
These tools use an electronic strain gauge (attached to a torsion rod) to measure the applied force (and thus the torque). They beep or flash once you’ve reached the set torque. Most come with a digital display that lets you set the desired torque, see the current one, choose the units (metric or imperial), and some even have a display backlight. 🙂

Picture 8 (click on the image to enlarge it)
Cheap electronic torque wrenches are rubbish. The good ones cost an arm and a leg, and this pros and cons list refers to them:
Electronic (“digital”) torque wrench advantages:
- They are highly accurate and ambient temperature variations affect them the least.
- The desired torque can be easily and quickly set (some can even store several pre-set values).
- They can show the current torque on the display.
- In practice, they stay calibrated for a very long time (you often needn’t “touch” anything at annual checkups).
- They can be connected to a computer so that you can save or print the measurement results (for keeping track, quality control etc.).
Electronic (“digital”) torque wrench downsides:
- The good ones are expensive (often over $500).
- You have batteries to think about.
- Most only beep and/or blink once you reach the desired torque, without giving any tactile feedback. This can be a problem in noisy work environments.
3. 5. Honourable mentions 🙂
There are torque wrench models that I will not discuss in detail, to keep this article shorter. Here’s a brief overview:
- Deflecting beam torque wrenches
A sort of a hybrid of click and beam type torque wrenches. I’ve never seen these in “real life.” They look bulky and impractical for bicycle (or motorcycle) service – but I’d have to try one to confirm that. - Dial torque wrenches
Extraordinarily precise, and very expensive, with a dial gauge. - Hydraulic torque wrenches
Mostly for industrial use, primarily for higher torques in hard-to-reach (and tigh) spots. Expensive, accurate, and can be used both for tightening, and for loosening nuts & bolts. - Mechatronic torque wrenches
They work like the click type wrenches, but also provide digital readings (and can also beep when the set torque is reached). - Programmable electronic angle and torque wrenches
These wrenches can measure torque, and once the set torque is reached, they’ll start measuring the angle over which you continue with tightening. Good for applications that require say 69 Nm, and then 96 degrees of further tightening. - Digital torque adapter
A cube with a display. On one end it is attached to a ratchet, and on its other end you attach bits or sockets. They can be pretty accurate, but their bulk can make it hard to reach a bolt in some tight spots. “YouTubers” sometimes use these when testing and measuring how much torque a tool can deliver. 🙂
I will end the story about types here. If you think I’ve missed to mention something important (or made some mistake), please leave a comment on the BikeGremlin forum.
4. Accuracy and precision
In a separate article, I explained what accuracy and precision are (and how they differ). Here, I’ll give some general guides about torque wrench accuracy and precision, but in the interest of brevity (and readability), I’ll be using the term “accuracy” even when I also mean “precision.”
I’ll start with a brief statement, follow it with a “definition” (to call it that 🙂 ), and then explain it with an example.
Short statement (which many people don’t understand correctly, so I gave two practical examples below):
Torque wrenches should be used, and are most accurate, in the range from 20% to 90% of the maximum torque they can measure.
Definition:
- For higher accuracy, and to reduce the risk of damaging the tool, torque wrenches should not be used to measure values that are over 90% of the maximum torque they can measure (unless they are pre-set for only one torque value, of course).
- For higher accuracy, avoid measuring values below 20% of the tool’s maximum torque.
A practical example will explain this better:
- My Birzman BM18-TW-10-60NM (Amazon affiliate link) torque wrench has a measuring range of 10 to 60 Nm.
- In other words, its maximum measuring torque is 60 Nm.
- 90% of 60 Nm is 54 Nm (0.9 x 60).
So, I should not measure over 54 Nm with that wrench. - 20% of 60 Nm is 12 Nm (0.2 x 60).
So, my wrench is not super accurate for values below 12 Nm.
As you can see, my “10 to 60 Nm” torque wrench is best used in a range from 12 to 54 Nm. I.e. between 20% and 90% of the maximum torque it can measure.
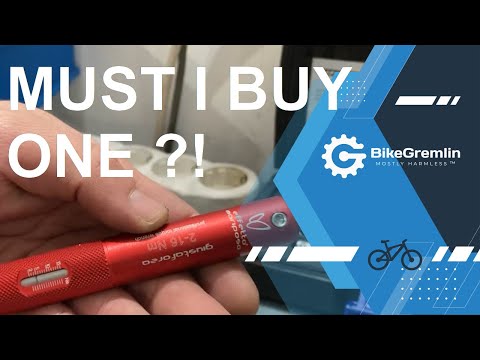
Could we make one more example, just in case? 🙂
- My Effetto Mariposa Giustaforza II 2-16 Pro (Amazon affiliate link) wrench has a range of 2 to 16 Nm.
- 90% of 16 Nm is 14.4 Nm.
- 20% of 16 Nm is 3.2 Nm.
This is a rather expensive and high-quality torque wrench, but even with it, it is reasonable to expect accurate results “only” in the range from 3.2 to 14.4 Nm – even though it says 2 to 16 Nm on the package and has a scale for that range of torques.
Additional information for the curious:
Despite the common misconception, as far as I know, most torque wrenches are pretty accurate up to the 100% of their measuring range.
However, I recommend not exceeding the 90% of the max. torque is for two reasons:
1) Safety margin. If you exceed the wrench’s max. torque, it needs to be re-calibrated.
2) Mechanic’s hands’ precision. Torque wrench handles are usually long enough for you to easily apply their max. designed measuring torque. Alas, some models are “on the short side.” If you need to push hard, you will not easily stop pushing when the wrench clicks (or when you reach the desired torque if the wrench has no clicks).
That is why it is smart to stay below 90% (or even 80%) of the wrench’s maximum measuring torque.
In separate articles, I’ve explained:
- How mounting pastes (and greases) affect the recommended tightening torques.
- Recommended bicycle parts tightening torques.
5. Calibration, maintenance, and taking care of your torque wrenches
These are precision instruments. I’ll repeat: torque wrenches are precision instruments. Treat them as such.
5.1. Maintenance and taking care
- Don’t use them to loosen (stuck) bolts & nuts (very few models allow bolt loosening, and their user manual usually states that explicitly).
- Never use them for torques that exceed their maximum measurement torque.
- Preferably, use ordinary wrenches or ratchets to get the bolts snug, then use a torque wrench for the final tensioning.
- Keep them away from the sources of heat, moisture, extreme cold, high vibrations and similar adverse conditions.
- Set them to the minimum torque setting (or to zero – depending on the manufacturer’s instructions) when not in use. Otherwise, they will go out of calibration quickly.
- Keep them clean (this goes for all the tools).
- Keep the moving parts adequately lubricated (following the manufacturer’s recommendations).
How to clean and lubricate a ratcheting tool mechanism (YouTube link) - Don’t use them as a hammer (I’ve seen folks use ratchets in that way).
- If you drop ’em, and they hit the floor, they can lose calibration, or get permanently damaged.

Picture 9
I’ll mention this just in case:
Of course, the picture above is a joke. Avoid getting injured. Even the most expensive tool is not worth more than your health. Take care of your tools, but if they fall, let them drop. It happens.
5.2. Calibration
Calibration is getting a wrench’s scale to match the real torque as closely as possible. Simply put: when you set the wrench to say 10 Nm, you want it to click at 10 Nm – not at 9 or 11 Nm.
Calibration is usually done once a year or after 5,000 measurements – whichever comes first. Of course, if the manufacturer recommends otherwise, follow their recommendations.
An uncalibrated torque wrench is dangerous. It may leave you with a connection that is loose or overtightened.
Section 2: Why is measuring the tightening torque important?
Besides that, if you are working professionally, a torque wrench with a calibration certificate could help you avoid liability in case of any problems.
Torque wrench calibration laboratory in Serbia (in Belgrade – if you happen to know of a good one in Novi Sad, please let me know 🙂 ):
https://www.hahn-kolb.rs/sr/hahn_kolb_rs/servis/laboratorija.php
I would argue that beam type torque wrenches are an exception to this rule, because you can easily see if their scale is zeroed. However, it certainly doesn’t hurt to check their calibration too at least every few years or so.
6. How to use torque wrenches correctly?
Even the best tools in the world are useless if they aren’t used properly.
Personally, I like to set a torque wrench to about 20% ~ 30% of its maximum torque and click it once or twice before its first use on a given work day. Just as a rudimentary, rough way of confirming that it actually clicks and that nothing is stuck or broken. This is by no means an “officially acepted” or recommended procedure, so take it for what it is.
Because I think this is better shown (demonstrated) than explained in words, I made a whole video on the topic (like my articles, the video too has sections, so you can easily “skip” to the parts of interest):
How to correctly use a torque wrench and do you really need it?
Briefly:
- Make sure the threads are clean and apply some mounting paste, threadlocker (YouTube link), or mount dry (depending on the manufacturer’s instructions for the assembly).
- Set the desired torque (if the wrench is adjustable).
Bicycle parts tightening torque (N⋅m) specifications - Hold the wrench by its handle when you are applying the torque. If you need to keep it stable, use your other hand to hold its “head.” Most torque wrenches are innacurate if you hold them “short” (i.e. not with your hand on their handle when you’re applying torque).
- Apply torque in a smooth sweep (not too fast, not too slow).
- Don’t forget to account for how lubrication (greases, oils, and mounting pastes) affects the tightening torque.
- When you are done, set the wrench to its minimum torque (or to zero, depending on the manufacturer’s instructions).
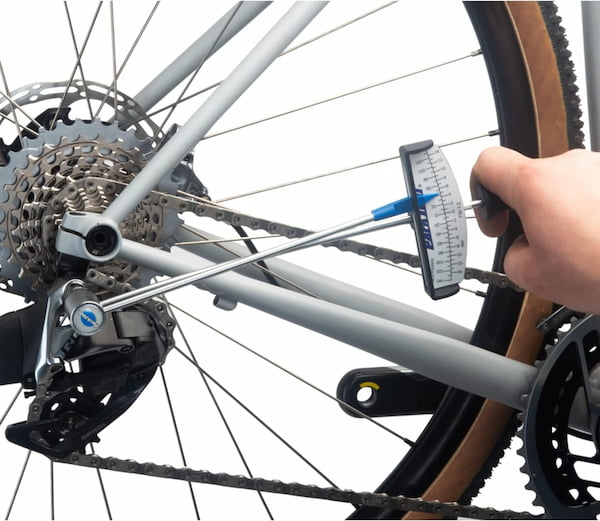
- If you have an assembly with several bolts/nuts, tighten them gradually, across, untill you reach the final desired torque. This is shown in the picture below:
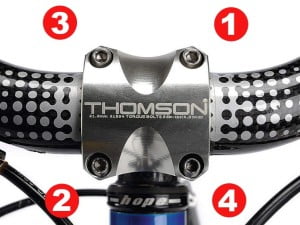
1, 2, 3, then 4.
Afterwards repeat in the same order – until they are all tight.
Picture 10
7. Conclusion
I get a lot of questions about torque wrench buying recommendations. To sleep better at night, I felt the need to write this “encyclopedic” article with all the relevant information, before giving any recommendations.
This article sums up my current knowledge and experience with these kinds of tools. As with most other articles, I plan to keep it up-to-date with fresh information (but without making it much longer if at all possible 🙂 ).
Why I love and think it’s a good idea to write such articles.
Last updated:
Originally published: