In this article, I will briefly explain the correct procedure for installing square taper cranks. Then, I will explain the working principle of that system and why the described procedure is the best, despite the popular belief that it should be done differently (I’ll discuss the “general consensus” as well).
Theory is when everything is known, but nothing works.
Practice is when everything works, but no one knows why.
In the Bike Gremlin garage, we combine theory and practice: nothing works, and no one knows why! 🙂
1. How to install square taper cranks
Note:
The general consensus is that you should not lubricate anything. In this article, after explaining the procedure I use and recommend, I’ve explained why, based on my knowledge and experience, I think you should lubricate, and how you can put that theory to the test.
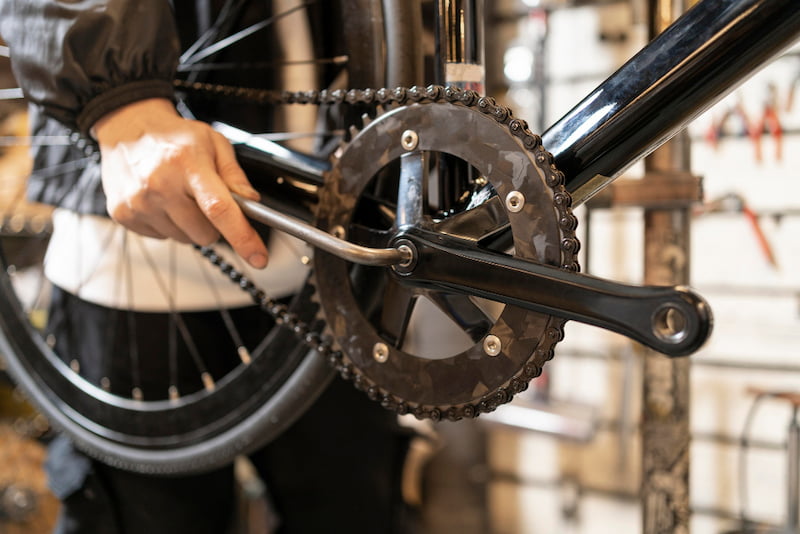
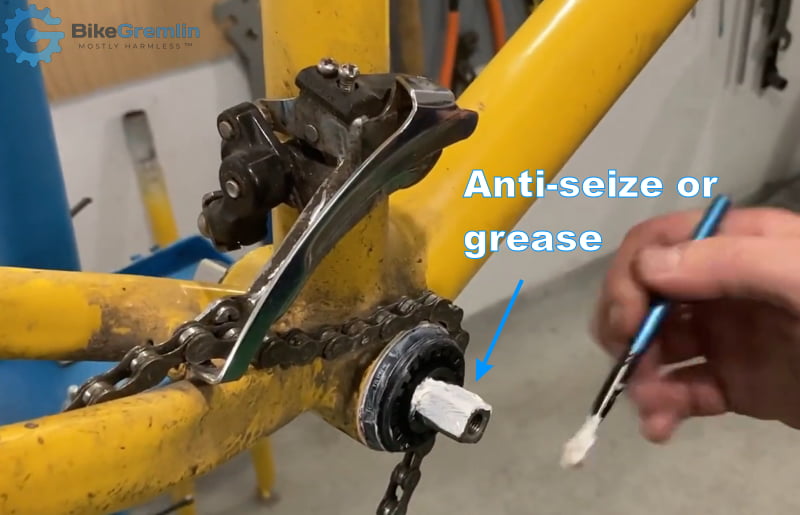
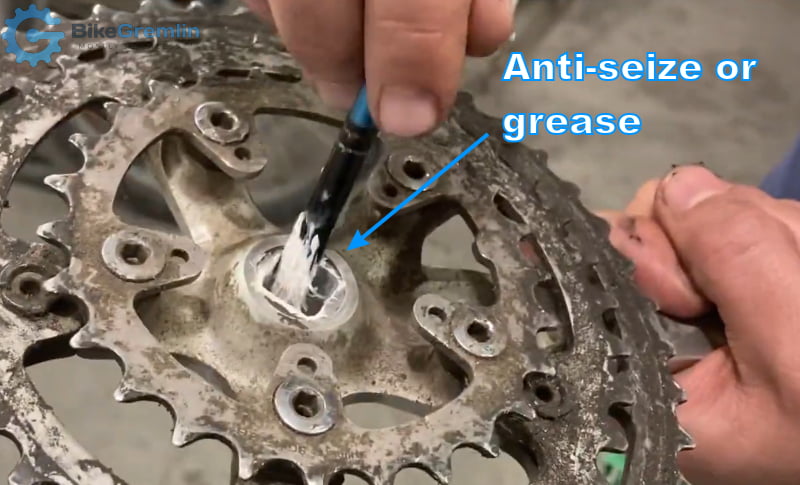
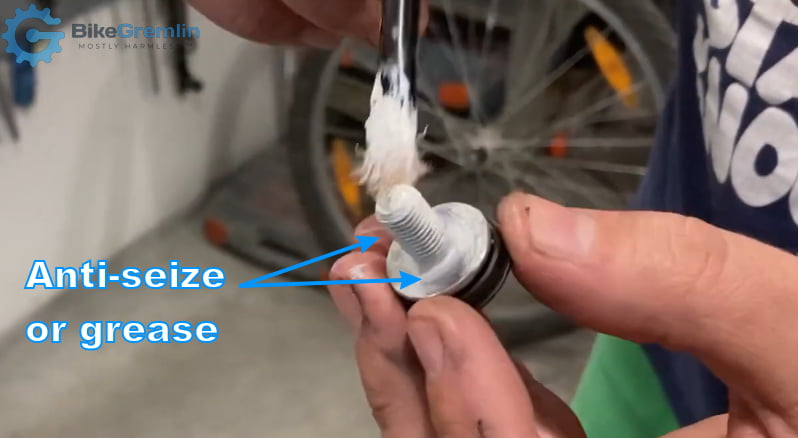
Pictures with descriptions speak louder than words:
Picture 1
Picture 2
Picture 3
Picture 4
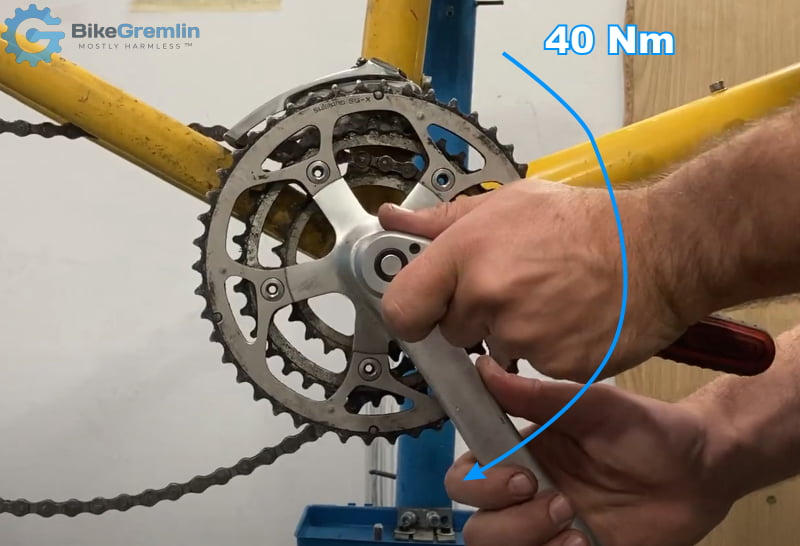
40 Nm of torque is good for most Shimano and similar cranks. In case you are using an exotic crank, double-check the manufacturer’s specification (article about bicycle parts’ tightening torques).
2. Square taper system’s design
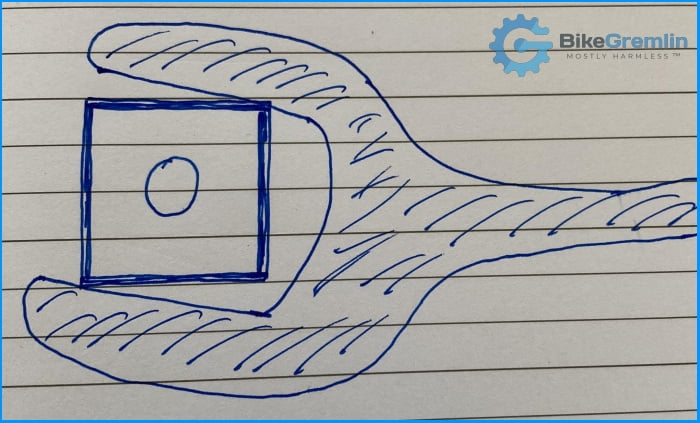
The square taper spindle, as its name says, has a square profile that gets widened as you go towards the middle (it widens at about a 2-degree angle).
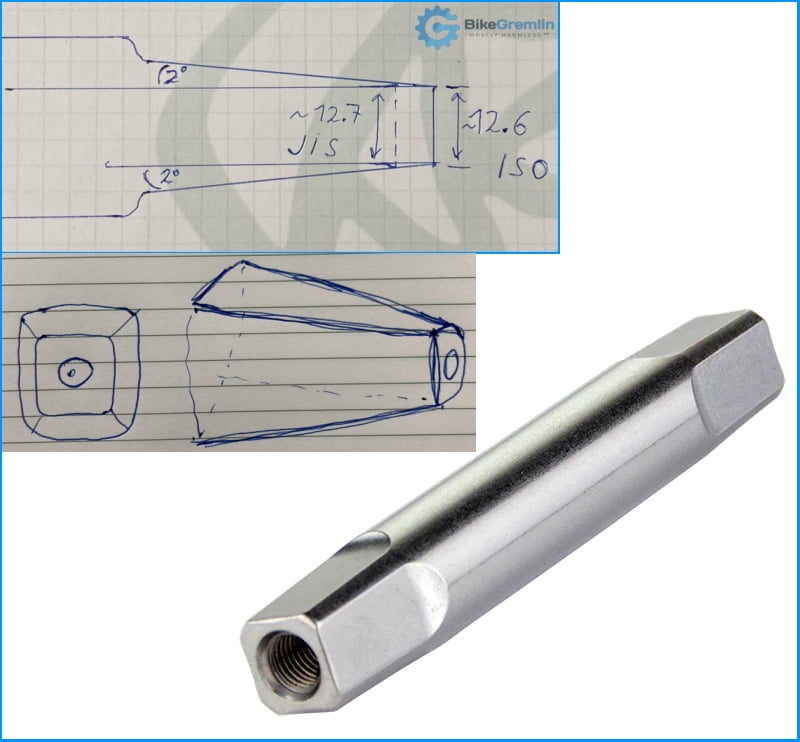
JIS vs ISO square taper profile explained
Picture 5
Yes, I draw like a three-year-old. 🙂
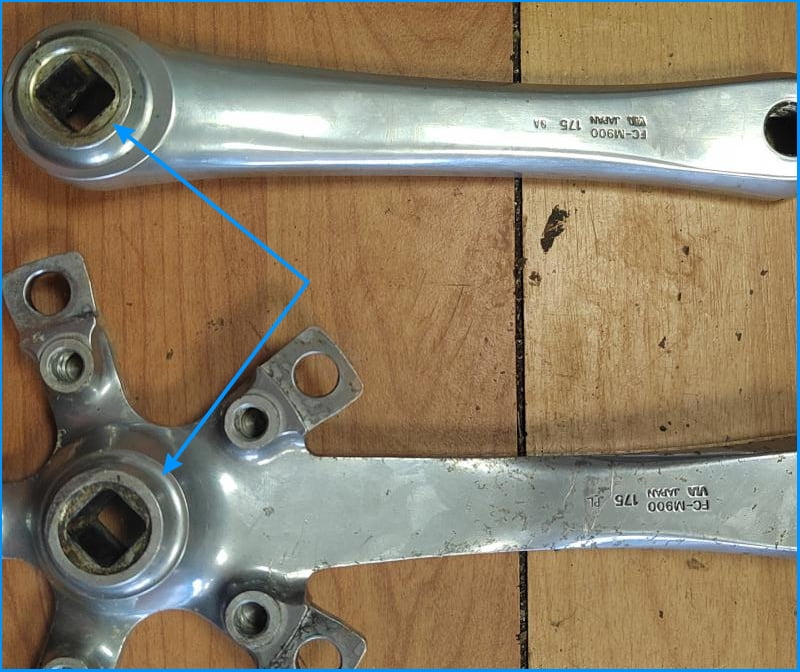
Square taper cranks have a matching profile, wide enough at the end towards the bike so they can slide on but narrow enough on the opposite end to prevent the cranks from sliding all the way up the spindle (i.e. to prevent the spindle from protruding out).
Picture 6
In order to fit the cranks on tightly, with enough preload, we use a mounting bolt. It is screwed into the spindle, and while it is being screwed in, it uses its “face” to push the crank further up the spindle’s spline.
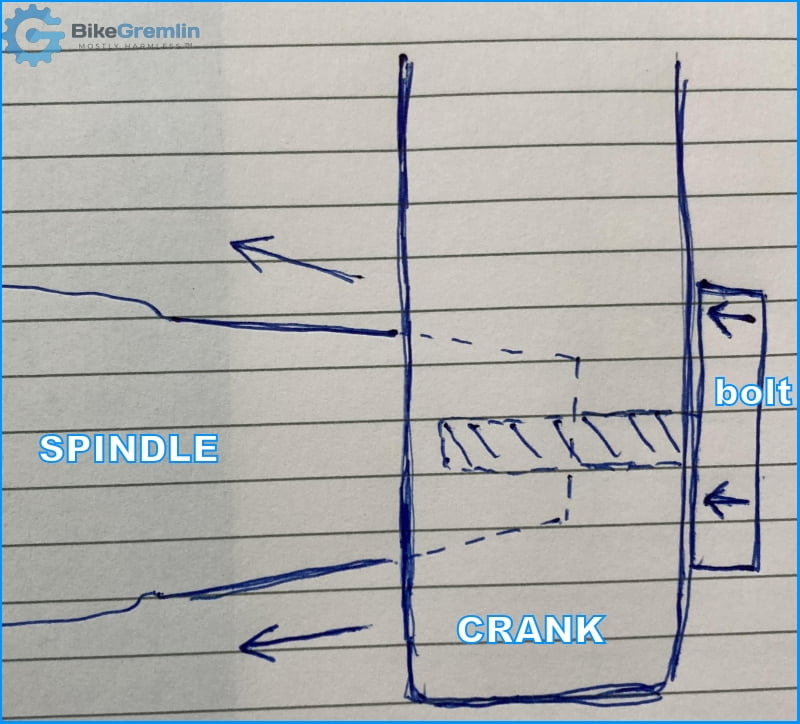
Picture 7
3. The working principle of the square taper system
When cranks are mounted, there is a lot of preload on the crank-spindle interface. This ensures that, even when you put a lot of load on the cranks, they remain firmly connected with the spindle without any wobbling or play as the spindle and cranks elastically deform under load.
Front chainrings are directly attached to the right crank, so the right crank usually doesn’t use the spindle to transfer torque (except when we are standing on pedals with cranks horizontal, at 3 and 9 o’clock). The left crank, on the other hand, transfers all the pedalling torque through the spindle.
When a crank is properly installed, the mounting bolt is tightened with a lot of torque (about 40 Nm). When the tightening is done, the bolt has pushed the crank as far as it would go up the spindle’s tapered spline, but it still keeps exerting pressure trying to push the crank further. However, at that moment (once you tighten it to 40 Nm and stop), there is an equilibrium between the bolt’s pushing of the crank and the resistance of the splines to the crank’s further movement towards the bike’s centre.
Once you’ve tightened the mounting bolt to 40 Nm, for as long as you don’t start riding the bicycle, you could come in a week or in a year, set a torque wrench to 40 Nm, and try – the bolt won’t move, it won’t turn.
How to use a torque wrench and do you really need it? – video
Update 2024:
Article: What is torque, what are torque wrenches, and how to use them properly?
Now, what happens when we start pedalling? The crank and the spindle start twisting and bending (elastic deformation). At the same time, the mounting bolt keeps pushing the crank strongly up the spindle’s taper towards the bike’s centre. With enough back-and-forth bending, the crank will move up the spline and away from the bolt by a fraction of a millimetre!
This will effectively reduce the bolt’s preload. If the crank was properly installed, the preload loss will not be big enough for the bolt to become loose and unscrew. But the bolt will be less tight than before the first ride. You could take a 40 Nm torque wrench and further tighten the bolt (but you must not do that!). If you do that, continue riding, then tighten the bolt to 40 Nm again – you will eventually split the crank.
The square taper crank mounting bolt with its M8x1 mm thread is not strong enough to split a crank by itself. If you tighten it as much as possible, its threads will strip long before you could do any damage to the crank. But, if you use your own strength and weight to twist and work the cranks up the spline while the bolt is providing the preload and pushing the cranks as you are twisting them, and you keep re-tightening the bolt from time to time to provide the needed preload further on, rinse-repeat – you will manage to split a crank eventually. That is why it’s important to NOT re-tighten the mounting bolt after the cranks have been properly installed.
4. Why you should lubricate the spindle and the bolt
The spindle, cranks, bolt face and threads are not perfectly smooth. They have micro-irregularities and imperfections.
Picture 8
When you are tightening a dry fit, your tightening torque could be used up against a crank or a bolt stuck on a surface irregularity, and you may end up with not enough movement of the crank up the spindle’s tapered surface.
Later, when you start riding and loading the cranks, they will more easily climb higher up the spindle’s taper, leaving the bolt without enough tension. The bolt can then get unscrewed all by itself, and the cranks will fall off.
With enough preload, on the other hand, the cranks will not be able to “climb” high enough under your force for the bolt to become so loose that it starts unscrewing.
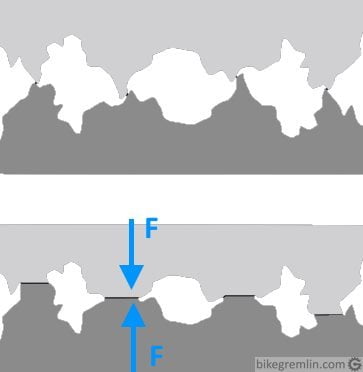
Even before that happens, there is another problem. Without enough preload, when you apply some torque, the connection behaves as if there is play! You can more easily visualize this if you imagine it is all made of rubber; very flexible. Because steel is very hard but also relatively flexible, and even a fraction of a millimetre of clearance creates a huge difference in preload and load distribution.
So, when you load a crank that hasn’t got enough preload on the square taper spindle, it is as if you are trying to unscrew a bolt using a spanner that is a size or two larger than ideal:
Picture 9
This problem is made worse by the fact that cranks are usually made of aluminium, which is softer than the steel spindle, so it gets damaged easily when this kind of “lift-off” occurs. Then, even reinstalling the cranks properly won’t help because the preload is not strong enough to fix the material irregularities that were created, and the cranks with such damage will no longer fit well on spindles and will always work themselves loose.
Again: it is the preload, not friction against the spindle, that keeps the cranks securely in place. The mounting bolt assures the cranks don’t gradually slide down (and thus reduce the preload) when you apply the pedalling torque, and the cranks start elastically deforming.
I would also add that aluminium cranks can get “scratched” and have their mounting hole enlarged if they are mounted dry over and over again. At least in theory. I have not yet conducted an experiment to challenge this (maybe during this winter, I might sacrifice an old crank for science 🙂 ). Though, with cartridge bottom brackets (unlike with old cup-and-cone ones), frequent, annual service and crank dismounting is no longer a thing.
4.1. Must you replace both the cranks and the spindle in case of any play?
Sometimes, aluminium cranks that got loose may not severely damage the spindle if it’s made of hard steel. However, sometimes spindle gets damaged too. The risk of a damaged spindle then not holding new cranks properly in place and the assembly developing play again is too much for my taste – and that is why I always replace both the spindle and the cranks if there was play during riding (i.e. it got loose).
5. “But… but…” and myth busting
In the previous chapters, I’ve explained the proper mounting procedure, the interface’s design, the working principle, and why you should not do it differently. In this chapter, I’ll deal with the common questions, worries and “objections” to the procedure I use and recommend. Let’s get on with it.
5.1. “That may be so in theory, but…”
Square taper cranks are by far the most popular in my city, and I’ve removed, installed and reinstalled over a thousand. Even for strong and heavy riders who often ride on the nearby Fruška Gora mountain.
It works. In practice. Otherwise, my bicycles (and motorcycles, for that matter) would have had parts falling off all over the place.
5.2. “If I lubricate the spindle, will the crank go too far up and crack when I tighten it?”
Mounting pastes (and greases) reduce friction but don’t make it zero. If a manufacturer recommends 50 Nm of tightening torque for a dry fit, just reduce that by some 20% if using anti-seize (or grease) – so go with some 10 Nm less torque in that example.
Also, the M8x1 mm bolt for mounting square taper cranks can’t provide enough load to crack a crank – its threads would be stripped long before that. See Chapters 3 and 4 above for more details on that and the explanation of how exactly you could split the cranks if you wanted to.
5.3. “If I lubricate the spindle and the mounting bolt, will the cranks fall off easily?”
No, they won’t fall off. By lubricating, you will ensure that the cranks climb high enough on the spindle during installation and avoid the problems described in Chapter 4. Anti-seize paste or grease will reduce friction, but not enough for the mounting bolt to become loose.
If you don’t lubricate, then you might end up with not enough preload because of friction during the mounting, and that will later on cause problems, as explained in Chapter 4.
5.4. “Grease is OK, but mounting-anti-seize paste is bad”
This is a relatively new “jewel” that I read on bikeforums.net by some experienced, competent mechanics whose advice is otherwise very good and correct. The basic claim is that anti-seize will prevent the parts from seizing together or create some magic soft layer that will allow for too much play.
Alas, as I tried to explain in chapters three and four, cranks are held on thanks to preload, not friction or seizing. Otherwise, they would fall off during the first week of riding because they didn’t have enough time to seize.
Regarding the “harmful layer:” all the excess paste (or grease, for that matter) gets pushed out when you are mounting cranks and tightening the mounting bolt.
Considering that, when it comes to square taper cranks, the only practical difference between grease, and anti-seize paste, is that anti-seize paste provides long-term protection from rust and, well, seizing (as its name says).
Yes, both grease and anti-seize paste reduce friction, but not nearly enough for the mounting bolt to work itself loose (if you installed the cranks properly and tightened the bolt to some 40 Nm).
5.5. “I always mount it dry, and I’ve never had problems”
Spindles come with a protective greasy layer from the factory. If you didn’t thoroughly degrease the spindle, cranks, and bolts, then you did not do a dry mount. But you did have luck. I prefer to ensure there is enough lubrication and not rely on luck.
Cranks are usually removed when the bottom bracket needs replacing, and the new bottom bracket comes with a greased spindle again. That’s often enough – though not always.
Also, riders who are light or not very strong may not load the cranks enough for them to climb on the spindle, even without enough preload.
5.6. “I did as you recommended, and my crank fell off!”
- Was the spindle long enough for the cranks you installed?
- Did you lubricate both the spindle and the tightening bolt’s threads and face?
- Did you use an accurate torque wrench, did you use it properly, and did you set it to 40 Nm?
(How to properly use a torque wrench – video, and torque wrenches article) - Were the cranks and the spindle used before without proper installation (so they were already damaged)?
- Did you mount JIS (Shimano etc.) cranks on an (old?) ISO spindle?
(ISO vs JIS square taper profile)
People make mistakes. That’s normal. I’ve been working with people for decades (both mechanics and computer-related, among other stuff). On countless occasions, I’ve seen people honestly believing and claiming they “did everything by the book,” only to confirm later that it wasn’t so. Not exactly. It happens.
Also, we should not exclude the possibility of faulty parts. If it happens once, it could be down to that. If it happens regularly, then it is most probably due to handling, i.e. the installation procedure.
6. Don’t take my word for it – test it
I’ve explained the procedure thoroughly, clearly and without any ambiguity. So you can put it to the test. A couple of experiments:
Experiment 1
- Thoroughly degrease cranks, spindle and bolts. First, use some diesel or mineral spirits, then use some over-90%-pure alcohol or a similar “thorough” degreaser.
- Munt the cranks, and tighten the mounting bolts to 40 Nm (properly using an accurate torque wrench).
- Unscrew the mounting bolts and measure how far is the crank’s face (the part that the bolt presses against) from the end of the spindle.
Note that the cranks will not slide off when you unscrew the bolts (unless you start riding the bike and applying torque to the cranks). In fact, you will have to use a crank puller to remove them.
Now repeat the procedure but with everything lubricated (spindle, cranks, bolt’s threads and “face”). See if the cranks have climbed any further on the axle with a lubricated installation procedure.
Experiment 2
For this, you will need two left cranks and two bottom brackets (identical, new).
- Install it all dry (degreasing, as I’ve explained in the first experiment).
- Let a strong, heavy rider climb a hill – and make about 100 kilometres (unless the crank falls off before that). Be careful and check if the crank is getting loose or if the bolt is getting unscrewed to avoid any injury.
Repeat the experiment using the procedure with lubrication, with a new set of cranks and a new bottom bracket.
7. What do the authorities and experts say?
Well, opinions are divided: everyone thinks you should use a dry fit, and I think you should lubricate. 🙂
OK, now jokes aside, let us see:
Shimano
Shimano’s square taper installation manual (Shimano’s website link, a pdf file, page 17) doesn’t state that you should lubricate – but Shimano bottom brackets are greasy from the factory, and without degreasing, the fit is effectively lubricated (greased). Shimano manuals don’t mention degreasing.
Campagnolo
If memory serves me, Campagnolo insists on a dry fit in their service manual. I’ll try to find that book in my workshop and post a photo of the instructions here. For reasons explained in Chapter 5.6, take this with a grain of salt until I find the book and confirm it.
Update – I found the manual, and yes, they do recommend degreasing:
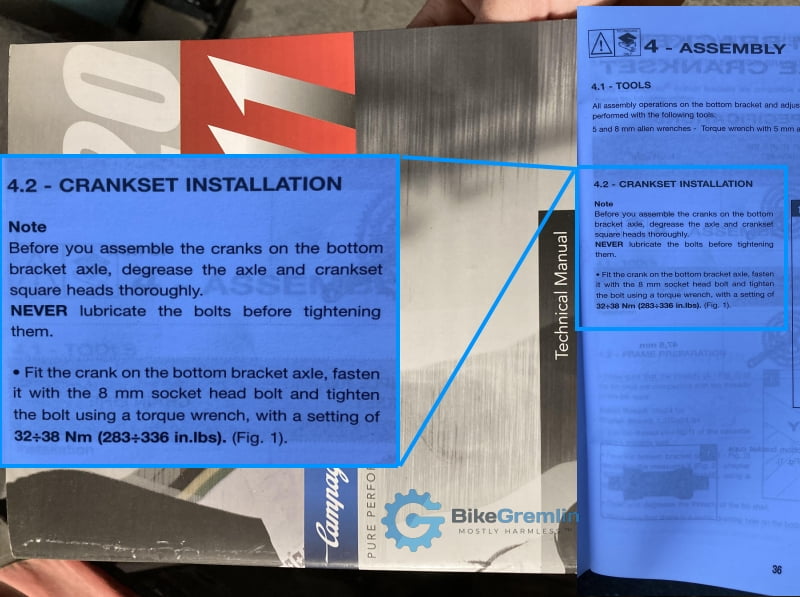
Picture 10
Park Tool
In their tutorial (Park Tool website link), they explicitly say to lube the bolts but to “leave spindle clean of grease.” But then they also say, on the same page:
“Square tapered spindles are made with a slight slope or taper. This shape creates a wedge as it is driven into the square hole of the crank. Adequate torque from the crank bolt is typically enough to keep arms from creaking. If a crank creaks even at full torque, remove and grease the pressed surfaces.”
Go figure…
BikeForums.net experts
Respectable bikeforums.net forum experts (link to the relevant discussion) say that you should by no means lubricate the interface, or that you should by no means use anti-seize even if you lubricate (depending on who you ask).
Jobst Brandt on Sheldon Brown’s website
In the article “Installing cranks” (sheldonbrown.com link), the late Jobst Brandt explained why it’s a very good idea to lubricate it all when installing (though he doesn’t mention anti-seize).
Based on all this, I’d say that the consensus is that you should not lubricate, and definitely not with anti-seize. In this article, I’ve explained why I lubricate with anti-seize and why I think that is best. I’ve also explained how you can put that theory to the test.
Why do things that make no sense get so easily accepted in the cycling industry and how do they remain for so long? I plan to write a separate article about that.
Update, December 2023:
I wrote on the topic in the article “Nonsense in the cycling industry.”
For those interested, in the article: “Freedom of speech and science,” I explained why different opinions and questioning things are good and how consensus is not always correct.
7.1. Common logical fallacies when criticizing
Common logical fallacies when criticizing, explained and discussed:
https://www.bikegremlin.net/threads/how-to-install-square-taper-cranks.493/#-logical-fallacies-discussed-example
Related articles and videos
- Installing square taper bottom bracket, cranks, and pedals – video.
- Above-mentioned forum thread/discussion about “How to install square taper cranks” (with logical fallacies of some criticism discussed).
- I also made a video about bolted connections and tightening torque basics that touches upon this topic (preload and torques).
Last updated:
Originally published: