This post will explain how to quickly and smoothly ride through (tight) corners on a bicycle. This is especially important when riding fast downhill, but it is also useful for improving riding skills in any other situation. First, instinctive survival reactions and (their effect on) bicycle controlling will be explained, followed by explanations of judging a curve “sharpness”, apex, braking, body positioning and steering. The technique of fast off-road riding differs slightly (although the principle is the same) – so it requires a separate post.
For an explanation of how to effectively steer a bicycle, read this article: Countersteering.
1. Dangerous survival reactions (SR)
Before explaining riding and cornering techniques, a few words about bicycle control. As was explained in the post about countersteering, bicycle is not statically stable, but it is constructed to dynamically keep the ballance – i.e. active ballance.
Watching motorcycle grand prix races, it can be seen how a motorcycle drops a rider off, while twisting and turning, then straightens up, and continues straight (usually to the first fence). How come?
Thanks to the fork angle (to put it plainly), (motor)cycles will self stabilize, as long as they are moving (i.e. not stopped in place). If it start leaning to the left, for example, gravity will turn the bars (and the front wheel) to the left, straightening the bike back up, thanks to the effect of countersteering. This is shown in the video below:
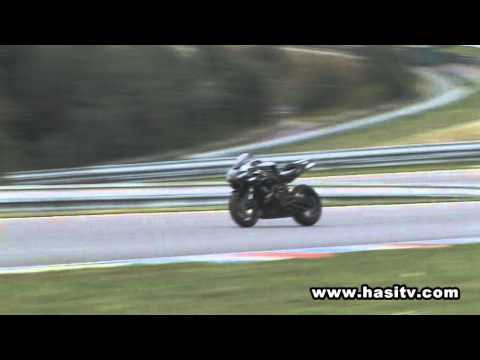
As soon as it got rid of the bad rider’s inputs, motorcycle has straightened up and steadied. Why the rider had made the wrong inputs will now be explained.
What happens when a rider sits on a bike? Human body is made for speeds up to 40 km/h, running. Instinctive survival reactions (SR in the rest of the post) that have helped our ancestors for thousands of years, are counterproductive on a bicycle. SRs and their effect will be explained with an example:
Hypothetical situation – a cyclist approaches a right hand bend on a fast downhill descent. During the turn, while in the bend, a rider concludes that the entrance speed was too high, that they won’t make it. The bend tightens, becoming sharper, and it seems that they are going too fast to not run off the road. If the SRs take control of the rider, they will make the following mistakes:
- SR 1: holding the bars tightly (“dead grip”). This increases vibrations and destabilizes the whole bike, making steering more difficult.
- SR 2: narrowing field of view, panicking and looking for an “exit”. Narrow field of view makes it hard to correctly assess the situation and find a good solution.
- SR 3: fixing the view on the danger (trees by the road). Apart from missing important information on the actual road (debris, other vehicles etc.), it leads to the SR 4.
- SR 4: unconsciously steering where the look is focused – towards the trees by the road. Body will unconsciously steer the bike where the rider’s eyes are focused (unless the rider makes a conscious effort to prevent that). “Bike goes where you look“.
- SR 5: too slow, or panicky too fast steering. Being too late with a needed reaction, or reacting in panic by abruptly moving the bars and destabilizing the bike are both bad.
- SR 6: braking errors (too hard, or too little braking). Too little braking doesn’t reduce the speed enough, while braking too hard can lock up a wheel, making it slide.
Noted errors and SRs are natural. In a “natural” habitat, they have helped humans survive. On a bicycle, they can be dangerous! How to overcome them? By practice and conscious effort. What would be a better reaction (BR) in the explained hypothetical situation?
- BR 1: hands relaxed, “loose” on the bars – for effortless, precise and quick steering.
- BR 2: wide field of view, assessing the situation. Are there potholes, or debris, oncoming vehicles etc.
- BR 3: view is focused on where one wants to go: a turn’s exit, using peripheral vision to screen the surroundings for dangers and obstacles. Amount of effort needed to move focus from a danger, to an “exit” is similar to the effort needed to detach a velcro – not much force, but a conscious effort is needed. “Look where you want to go“.
- BR 4: consciously steering where one wants to go – with appropriate body positioning (leaning into the corner, while holding the head straight, weighing the outer pedal at 6 o’clock position).
- BR 5: precise (counter)steering. Quick, but not abrupt.
- BR 6: using appropriate amount of braking force and proper braking technique (explained here: braking technique).
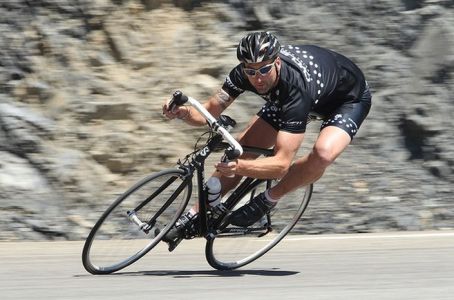
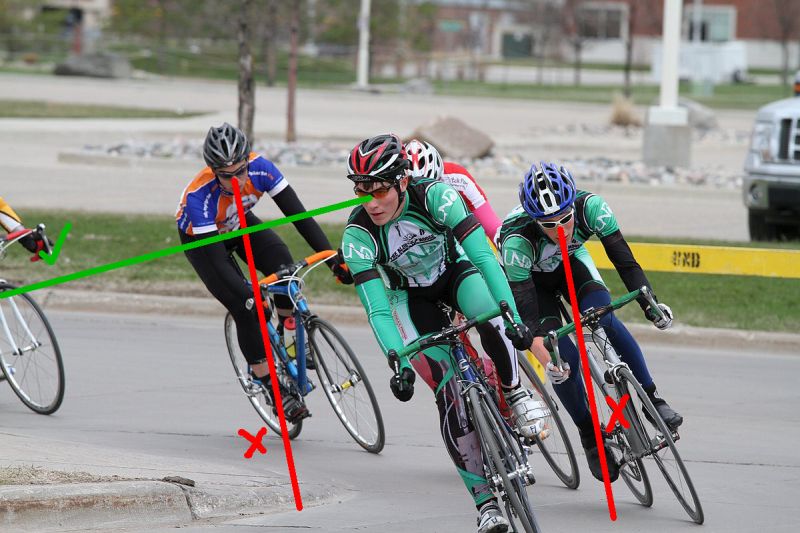
2. Body positioning in a turn
For effective turning, especially at higher speeds, proper body positioning is important. How to properly position body in a turn?
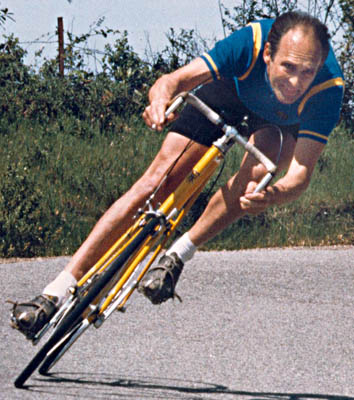
Outer pedal is down and weighed.
Elbows are bent and arms relaxed.
Body is slightly leaned into the corner.
Head is straight, with eyes level – looking where one wants to go.
Picture 1
- Outer pedal should be down, at 6 o’clock. Weighing the outer pedal to take some weight off the saddle. This way the weight centre is lowered and the rider’s ankle functions as a shock absorber, damping shocks and vibrations. Lower weight centre and a “shock absorber” make for a more stable bicycle. Inner pedal stays high up, so it can’t hit the ground when leaning the bicycle – allowing for more clearance and a steeper leaning angle.
- If a road is very bumpy, pedals should be parallel, and rider will lift a bit off the saddle on their bent knees – bent knees work as a longer travel shock absorber, compared to using just an ankle. How high? Enough not to hit the saddle when going over bumps – legs should have enough room to do all the needed shock absorbtion by flexing at the knees. Amortization of rider’s body weight allows the tyres to have a more even load (and grip better) and also helps rider’s vision – strong road vibrations can make the vision blurry.
- For paved road riding – lean into the corner, with the bike. Even a little (not too much) further into the turn (for off road, stay straighter up, in case the tyres slip on the dust/mud). Head should be held straight, with the eyes level, for easier orientation in space.
- Lower the body forward, lowering the torso and if the bike has road handlebars, hold them in the drops. Bicycle weight distribution is such that over 60% of the weight is on the rear wheel. Leaning forward, putting weight on the bars (with hands not stiff or gripping too hard – as explained right below), gives the front wheel more traction. Road handlebars with drop position are ideal for this.
- Bent elbows, arms relaxed, so they can absorb shocks and vibrations and steer effectively. Hold hands ready at the brake levers. Death grip on the bars exaggerates all the vibrations, giving a feeling of moving much faster than it is. It destabilizes the bike and makes steering harder.
- Look where you want to go – not directly in the pavement near the front wheel. Looking far ahead allows better judgement of a corner and gives an impression of moving slower, so no panic or SRs can overcome the rider. Of course, peripheral vision should be used to assess the pavement – are there any potholes, oil stains, debris etc. It is also important not to overdo it – looking so far to loose the feeling of where one is on the road, or miss to see an oncoming corner isn’t helpful.
3. Characteristics of a corner
There is a countless variety of different kinds of corners. Tighter, angled etc. Important characteristics of each turn are the following:
- Radius – corner “sharpness”. There are corners with greater (wider) and smaller (tighter) radius. Regardless of a corner “wideness”, it’s radius can be constant, decreasing, or increasing (picture 2).

Picture 2
Decreasing radius corners become tighter further in, while decreasing radius corners open up after the initial tight part. It is logical that decreasing radius corners are tricky and require more skill and experience to be ridden fast. More about it in the following chapters.
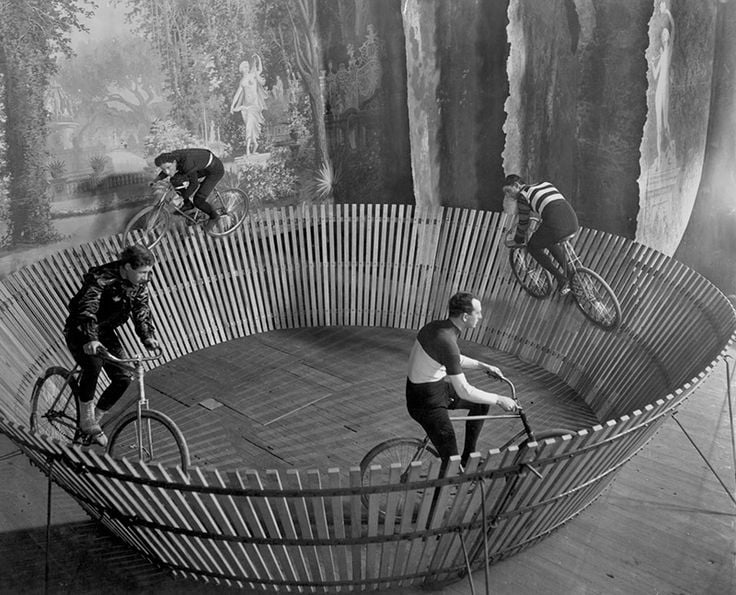
- Camber – corners can have positive (to the inside), normal, or negative (to the outside, “off camber”) camber (picture 3).

Picture 3
A negative camber corner is harder to pass than the same radius corner with a normal camber. It effectively behaves (to simplify it) as a normal camber corner of a smaller radius (tighter).
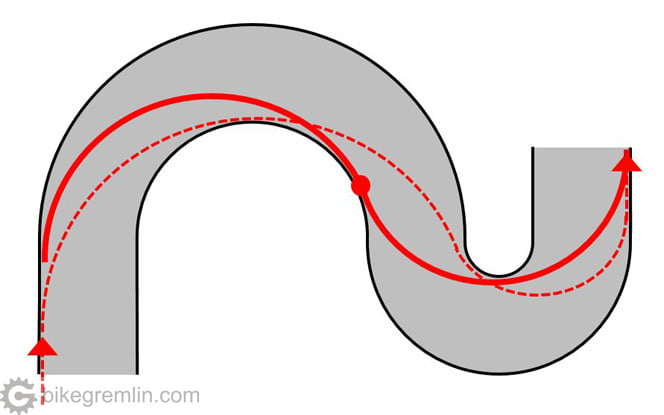
There is an unlimited variety of corners that have different combinations of the two noted characteristics. Corners that have a full 180, or more degrees turn (“hairpin corners”), series of consecutive corners, corners of varying camber and/or radius within one corner, corners where the uphill road turns to downhill (and vice-versa) halfway through the corner and so on.
Another interesting fact is that, for example, a constant radius corner that turns from normal camber to negative camber when halfway through the corner, effectively behaves like a decreasing radius corner!
4. Important corner points
Besides non-changeable characteristics of each corner – radius and camber, there are important points of each corner that vary – depending on the (desired) speed, road conditions and visibility. Those important points are shown in picture 4.
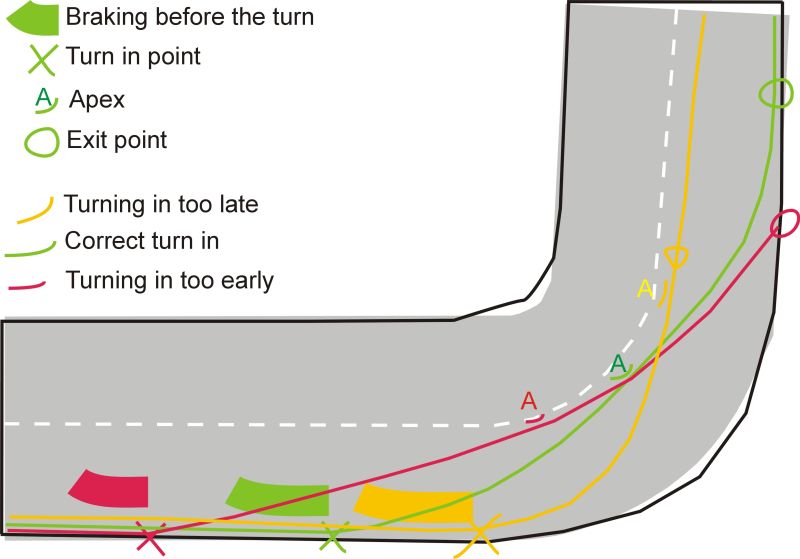
Picture 4
- Braking before the turn – part of the road where the most of the needed braking and slowing down is done.
- Turn in point – point where countersteering (turn of the bars to one side in order to lean the bike in the opposite side, explained in detail here: countersteering) is done, and the bike is leaned into the corner.
- Apex – point where a bicycle passes nearest to the inner side of a corner. Maximum lean angle is usually achieved (right) before this point.
- Exit point – point at which a corner is exited – bicycle is straightened up and turning is practically finished.
5. Assessing a corner
When approaching a corner, especially on an unknown road, one needs to assess the corner’s radius and camber, in order to choose the appropriate speed (needed braking), turn in point and apex. How to assess a corner?
If a corner has good visibility, it is easy to judge it’s configuration. If it doesn’t then indirect indicators can be used – watching how a tree line (or a fence) by the road “turns”, or reading traffic signs that signal tight corners, or landslide prone areas.

Corners with poor visibility can often hide a danger – parked lorry, or debris, right behind the last visible point. The faster one goes, the more time it takes to stop and the longer is the stopping distance. That is why the speed must be low enough to stop in case of such unpleasant surprise – so maximum speed is dictated by visibility and stopping distance. This can not be stressed enough: never ride faster than you can see!
A common mistake when assessing corners, even with experienced riders, is focusing on radius (i.e. corner “sharpness”) only, disregarding the camber. Camber is of just as great importance as the radius!
Opposite goes for negative camber – even a wide corner can turn out tricky if it has a lot of negative camber.
Picture 6
Another important factor, less obvious, is the pavement quality. Is it rough and grippy, or (too) smooth and slippery? Are there potholes, oil stains, or patches of debris?
Picture 7
Good assessment of a corner (camber and radius), with consideration of (un)expected risks, is important for making the right decisions about things explained in the next chapter.
6. Possible line choices
Terms explained in chapters 3 (Characteristics of a corner) and 4 (Important corner points) are like explaining to someone how many and what kind of squares (i.e. fields) are there on a chessboard. Chapter 5 (Assessing a corner) explains how to evaluate them and see exactly with what kind of “board” one is dealing with. Things that will be explained in this and the 7th chapter are analogous to explaining how the chess pieces (figures) are moved. What makes a difference between a good and a poor chess player is how those pieces are moved on the chessboard. That will be explained in the 8th chapter.
Choosing a line through a corner makes the difference between a fast and a slow pass. It also makes a difference between a safe and a risky pass (or even sliding off the road). What exactly does choosing a line mean?
Apart from given corner characteristics (camber and radius), other things are up to the rider. What those are and how they are “chosen” will be explained now.
6.1. Braking before the turn (corner)
The point where one starts braking and the length of braking depend on the current and the corner entry desired speed. On long twisty fast descends, it is better to brake as hard and as short as possible (within one’s “comfort zone”, not losing control of the bike, or causing the tyres to skid) – because brakes will be less likely to overheat, than with pulling the brakes for long periods, doing slight braking.
The proper braking technique is explained here: Bicycle braking technique. On downhills, as soon as the braking is stopped, bicycle begins to accelerate. This should be kept in mind – on a downhill, brake practically works like a throttle pedal as well – once it is released. If it is necessary to control the speed through a long, tight corner, it is best done using both the front and the rear brake, slightly and gently. Even then, the hard braking should be started and finished before the turn-in point.
Edit: after some reader e-mails and comments, the part about braking during cornering requires further explanation I believe. Here it is:
When riding downhill, brakes work as a sort of gas-throttle as was mentioned previously – when released, the bike accelerates. So, for skilled cyclists, it can be very beneficial to brake while cornering as well. This allows one to retain more speed before reaching the apex and maximum lean angle. If the road grip is good (and the lean angle higher), it is best to brake with both wheels, but in a controlled, moderate way. Moderate braking does not transfer much weight to the front, so the rear wheel is left with some traction for braking, plus there is less chance of a front wheel slipping, since it doesn’t have to handle both braking hard(er), and holding the leaned bike from slipping sideways.
In poor traction conditions, lean angle is usually not as great, and since there is more risk of a front wheel sliding, it is better to use the rear brake only (also moderately). This reduces the chances of a front wheel slide. In case the rear wheel starts to slide, it can often be “recovered” (the bike prevented from going down), while a front wheel slide, in a corner, usually results in sudden and immediate fall.
As was explained in the post about countersteering and balance, if speed is reduced, same turn radius can be achieved with less lean angle. So braking in a corner allows the bike to keep turning while leaned over less, which, once the bike is more upright, allows for even more braking! Of course, the “main”, hard braking for a corner needs to be done before the corner, while the bike is still upright.
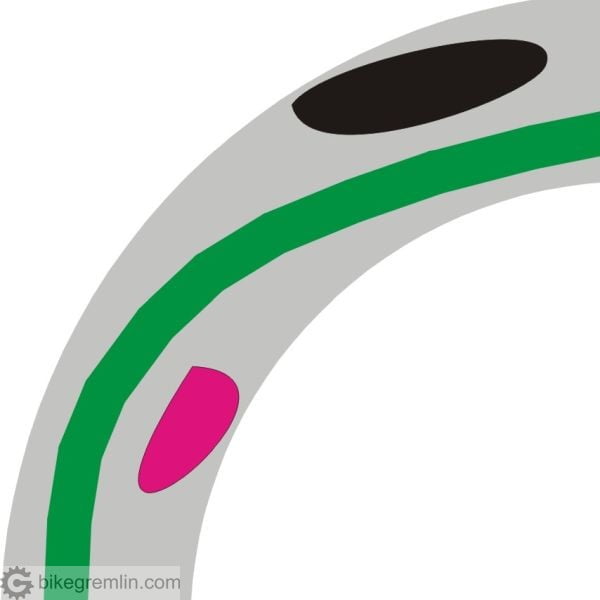
Part where the braking is started and finished should be well chosen, so that “major” braking is done in time, not using up the concentration needed for the next step – turning.
Red marker – braking started (too) late – leaving little time to concentrate on steering.
X – turn in point
Picture 8
The more skilled a rider is, the later they can start braking and the quicker can they finish it (braking harder), but it should always be started and finished in time, according to one’s skill and comfort level. If a rider brakes too hard, scaring themselves and loosing control over the bike, they will not have enough concentration left for steering properly and exiting the corner (SR). Also, if hard braking end is almost “overlapped” with the turn in point, it is harder to concentrate on the turning.
6.2. Turn in point
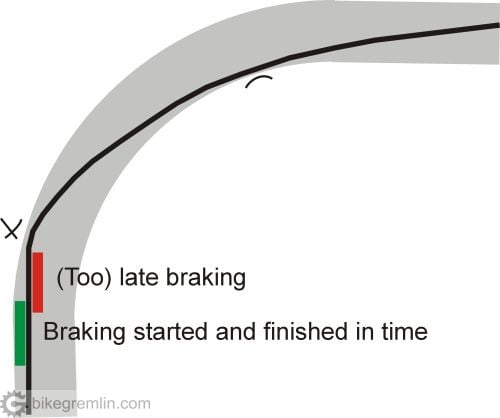
Turn in point is where the major (counter)steering input is done. At this point, bars are turned relatively quickly and the bike is leaned into the corner. Countersteering should be done as quickly as possible (again, within one’s “comfort zone”). Why is it important to lean the bike as quickly as possible (and comfortable)?
The moment a bike gets leaned is when the turning is practically started. One can veer the bike slightly to a side without leaning, but sharp turning can only be done while leaned. If leaning is done relatively slowly and gradually, then a lot of space is lost in preparation – and the corner effectively becomes sharper!
Slow turn in (red) requires an early turn in point and still requires lower speed (or more leaning) in order to stay in the corner.
Picture 9
As the picture 9 shows, a quick turn in (with a fast, strong and decisive countersteering input) practically “bites” into the turn, allowing a higher speed per given corner radius, compared to slowly leaning the bike. The more skilled a rider becomes at quickly leaning the bike, the later turn in point they can choose, passing a corner both faster and safer.
Thing to pay attention to is the front wheel grip. On slippery pavement, it is harder to lean the bike quickly. Overdoing countersteering could cause the front wheel to slip, resulting in an instant fall. That is why it is important to practice gradually, starting with lower speeds and more gradual leaning.
A common mistake of less experienced riders is turning too early in a corner, with less sharp turn in (similar to the red line in the picture 9). For a faster and safer pass through a corner, it is usually better to choose a later turn in point with a sharper turn in.
Once a bike is leaned into the turn, there is no need to steer and hold tightly onto the bars – it will only upset the balance. After a strong steering input is given and the bike is leaned, it takes little (if none) effort to keep it that way. Hands should be relaxed, so the bike stays stable and fine steering corrections can be made (with gentle countersteering).
6.3. Apex and exit point
Apex is part in a turn where a rider gets closest to the inner side of a corner. In case of a left turn, make sure not to cross the line to the opposite direction lane, whether with wheels, or by leaning the body into the opposite lane! In most cases (except for very late apexes), bicycle will reach it’s maximal lean angle (for the given corner) just before, or at the apex point.
Exit point is where one (wants to) exit after a corner – on the inside of the lane, in the middle, or at the outside, near the end of the pavement (or near the opposite lane dividing line in case of a right hand corner on public roads).
Choosing one’s apex depends on two things: turn in point and (desired) exit point.
- Later desired apex point requires a later turn in point (and later turn in point results in a later apex point) – and vice versa – earlier turn in point results in earlier apex point.
- Similar goes for exit point. The closer to the inside of a corner one wants to exit, the later apex point should be chosen – and vice versa.
Maximal cornering speed (for a given rider’s skill and comfort zone) is one where apex isn’t too early, nor too late.
Choosing a (too) early apex will require a lower entry speed into the corner, to avoid running too wide – out of the road/lane on exit.
A (too) late apex also requires lower entry speed, but here the critical part is the turn in point – a late apex requires a very sharp turn in, so in case of too much entry speed with a late apex (and a late turn in point), running off the road happens at the turn in point, usually due to front wheel slide.
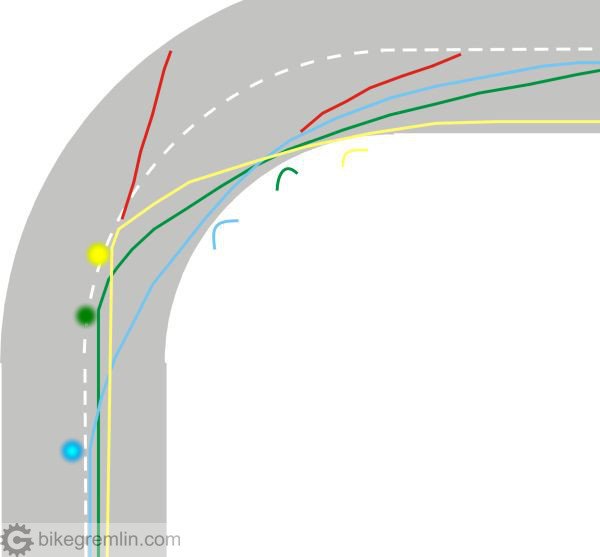
Green line – “normal” apex.
Blue line – early apex.
Yellow line – late apex.
Red lines – running off the road in case of high entry speeds.
Picture 10
Left red line in picture 10 shows slide off the road during turn in because of a front wheel slide, in case of a too high entry speed. Right red line shows running out of the lane because the corner entry speed was too high to maintain a (required) sharper turn radius.
Choosing an earlier apex always requires a sharper turning arc through a corner, than choosing a later apex at the same entrance speed. Choosing a later apex, makes for less sharp turning arc, but requires a sharper turn in than a later apex would require (again, at the same entry speed).
7. Tyre traction and concentration
Tyre traction. On a given pavement a given tyre has a given traction. 🙂 A bad tyre on a slippery pavement will have less available traction than a good tyre on a grippy pavement, but available traction is always limited! In a turn, available traction is used for two things:
- holding the bike in a corner while it is pulled to the outside by centrifugal force
- and for braking.
When a bike is leaned as much as possible in a turn, tyres are using almost 100% of available traction to keep the bike in turn and then it is not wise to try braking.
When a bike is “standing” straight (i.e. not turning), 100% of the tyre traction is available for braking.
It is also important to know that the more a tyre is loaded, the more traction it gets, up to a point where rubber starts to shred and a tyre leaves black skid mark of slipping over pavement. Braking causes weight transfer to the front, loading the front tyre, offering it more traction, or causing it to slip if the rubber has reached it’s limit.
That is why, if it is needed to slow down in the middle of a turn, it is often better to straighten the bike up for a short period, brake hard, then lean it quickly back. This takes practise, but can be mastered and can help.
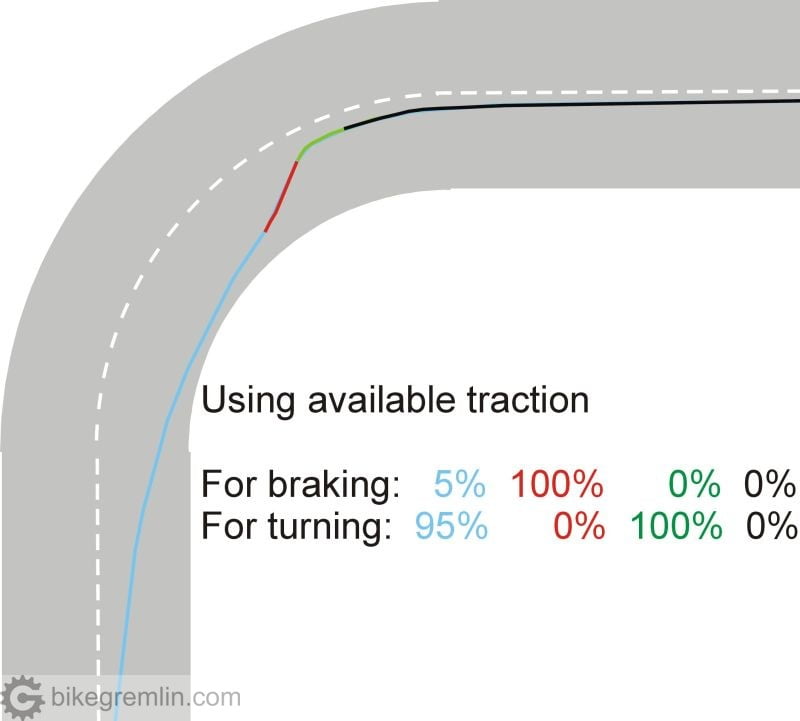
Picture 11
Situation shown in picture 11: a rider realizes they are going to fast into the corner, slightly braking while leaned (blue line), then straightening the bike up and braking very hard, during which time the bike goes further out of the corner (red line), then, having slowed down significantly, is able tu turn a lot more sharply (green line) and safely exit the corner (black line).
On very steep downhills where it is needed to slow the bike down during a turn, a bike shouldn’t be leaned to the maximum, nor should the speed be maximal possible, since some tyre traction needs to be “saved” for braking.
Braking in a corner is often useful and needed, but should be done “gently” and with caution – not to upset the bike’s balance or cause tyres to slip. Best done with both brakes, paying attention not to overdo it, especially the front brake, since a front wheel slide results in instant fall. Braking before the corner is, of course, done primarily with the front brake, since the front wheel gets better traction when braking.
Concentration. Similar to tyre traction, each rider has a limited amount of concentration. When a rider is tired, concentration is lower than when a rider is well rested, but the available concentration is always limited. Available concentration is used for assessing corners, braking, (counter)steering, keeping the bike steady and watching objects and obstacles on and by the road…
A rider who, for example, starts braking too late (for their skill level and “comfort zone”), will have to brake harder then they are used to. They will use up all the available concentration to keep the tyres from sliding and keep the bike under control, leaving very little concentration and attention available for proper and precise steering.
That is why it is important to ride within one’s limits – both tyre traction and level of concentration.
8. Putting it all together
Riding fast and well through corners is a product of putting all the information (pieces) explained in previous chapters together. It will be called a “plan“.
First thing of importance for good riding through corners and improvement of skills is to never ride above, roughly speaking, 70% of one’s abilities. Riding on the edge often makes one panic and/or tense, triggering SRs and not allowing the time and concentration to improve. Getting scared and not (fully) realizing what is going on is not a good recipe for success, nor improvement. Start slow and easy and see how the “slow and easy” gradually become faster and faster. One should remain calm, concentrated and “observe oneself” (explained in chapter 8.2.): what is being done and why.
It is worth repeating, when choosing a plan according to the points in this chapter, always leave some 30% reserve, never making a plan so it requires using maximal possible braking, turning, or leaning skills.
8.1. Making a plan for going through a corner
Assesing a corner. When approaching a corner rider should assess it as best as possible – trying to determine it’s camber and radius. On an unknown road, it is safe to always assume the worst behind the last visible point – negative camber, decreasing radius and a lorry parked over the whole lane! Never riding faster than visibility allows.
Start of braking should be chosen based on current speed, corner sharpness and rider’s braking skill. Start braking in time, so that required slowing down can be done without panic braking. As one’s braking skills improve, braking point will be chosen later and later towards the corner, but should never be over the rider’s comfortable braking limits. Changing gears and selecting the appropriate one for corner exit should be done right before, or during the braking (depending on road configuration and rider’s skill).
Chosen turn in point should match desired apex, exit point and rider’s steering and leaning skills. Riders that can lean the bike quickly into a turn will often choose a later turn in point. Riders that are less skilful will choose an earlier turn in point and a lower corner entrance speed.
8.2. Evaluating and improving a plan
While a plan for passing a corner is being executed, one should, like it was said, “observe” and analyse themselves:
Was the braking point chosen correctly? If braking was too easy for one’s skill level, next time in the same (similar) corner, a braking point a bit closer to the corner entrance can be chosen and then tested what it looks like. And vice versa if the required braking was too hard.
Braking too hard for one’s skill and comfort level will not improve one’s braking and cornering skills. Quite the contrary – it will take most of the available concentration, preventing one from assessing and improving other aspects of their plan.
Similar goes to turn in point. If a countersteering and leaning the bike was too easy, then a later turn in point can be chosen, resulting in a later apex, allowing a corner to be passed at a greater speed, with the same maximal bicycle lean angle. And vice versa if steering was too hard.
Apex and exit point should also be evaluated. Was the exit point too much to the outside, so there wasn’t enough time and space to set the bike up for a successive corner to the opposite side? In that case a later apex should be chosen. In order to achieve a later apex, one needs either a sharper turn in (at a later turn in point), slower entry speed, or both – depending on rider’s skill.
Picture 12
In the picture 12: full line plan has a later apex and a closer exit point for the first turn.
A few words on leaning the bike. The further a bike is leaned (again, within one’s comfort zone and available tyre traction), the sharper it can turn at a given speed. With practice, lean angles will improve – as long as one doesn’t try too hard, activating SRs.
Back to plan evaluation – a common mistake when trying to ride faster is “I will go faster” plan “improvement”. This idea often forces riders to ride above their skill level, scaring themselves and even achieving slower times! “I will go faster” is not a plan. Plan should be something that can be evaluated and changed.
Valid plan improvements are changing the plan’s points. For example, if a rider has improved their steering speed, a valid change of plan would be choosing a later turn in point, with a quicker turn in and a later apex. Or, if they have improved their maximum comfortable lean angle, choosing a later turn in, even with the same turn in speed, because more lean angle will allow sharper turning (i.e. smaller turn radius). This plan change would also result in a later apex as well.
8.3. The eyes
Human eyes can not track a scenery in motion. They can follow a moving object, but when watching a scenery, the view is made of increment small “jumps”, switching focus from one point to the next. In order to avoid blurry vision at higher speeds, a small trick should be used.
When approaching a corner, judge it’s radius and camber. Pick braking, turn in, apex and exit points. Then focus the vision to the start of the braking point. Once it is close, quickly focus the vision to the next – turn in point. Use peripheral vision as much as possible to track the road conditions and the surroundings. As the turn in point is near, turn the eyes towards the apex. When nearing the apex, the look goes towards the next important point – the exit. Always look at the next important thing that is coming, always look where you want to go!
Picture 13.
Apart from better concentration when focusing on the next important corner point, body will also unconsciously steer to where the rider is looking.
One of the first things that happen when a rider is tired is “slowness” of the eyes – the look changes focus less quickly and gets “stuck” on one object for longer. When riding at high speeds, this can be dangerous!
One more thing, with all the previously said – when riding fast, it is good to look far out ahead, for two reasons:
- Road shape, hazards and other vehicles will be spotted sooner, giving one more time to prepare.
- Speed seems slower, so one is less likely to trigger their SRs. This can easily be tested: at a relatively slow speed, try looking right in front of the front wheel – a meter, or two. Does it seem like the speed is much faster? Then, at the same speed, try looking further ahead – some 100 to 200 metres. Does it seem almost as if the speed is static, no movement? See? 🙂
8.4. The eyes 2 – riding behind other riders and vehicles
Riding behind other, more skilled riders can help improve one’s riding skills – if done properly. Observing and learning is a good thing. On the other hand, simply following another rider and trying to track their lines through corners can quickly put a rider in a lot of trouble. How?
For one thing, as it was explained, the bike goes where the rider looks. “Blindly” following another rider, in case they run off the road, the rider following will also run off the road. This has happened many times in practice. Another thing – blindly following another rider, a cyclist misses a valuable opportunity to observe, analyse and learn.
When riding behind a good rider, one should try, not to copy their lines, but to figure out their cornering plan. What turn in points and apexes are they using? What are they better at and why? Analysing other rider’s plans can help learn many new things, then see how they fit into one’s own riding skills and cornering plans.
Following distance should be small enough so that most things can be seen, but big enough to leave the time for concentrating on one’s own braking and turning.
Overtaking. When one wants to overtake another cyclist, the eyes shouldn’t be focused on the slower bike. That will cause copying of slower rider’s mistakes, or cornering lines. Bike that is being overtaken should be kept in peripheral vision. To keep track of where they are, but focus should be on one’s own plan – braking, turn in point, apex. Always looking at where one wants to go – in front of the slower rider.
Picture 14
Avoiding another vehicle (a car for example) that is coming towards the rider from the opposite direction, “cutting” a corner. Eyes should be focused on where one wants to turn, avoiding a collision. The other vehicle should be in peripheral vision. Peripheral vision is very good at noticing movement and judging it’s direction, but very bad at giving a sharp image. Since the make of the car is not important (nor is the colour), eyes should be focused on where one wants to go, that is important.
8.5. Falling down
During practising and improving, one will push themselves beyond the limits or make a mistake from time to time. Falls are a part of riding a bicycle. One does not want them but should be prepared and ready for them. Once a bike starts sliding beyond control, it is often the best option to just let it go and try to land as softly and as relaxed as possible. Tuck and roll. Sticking a straight arm out and trying to prevent the fall often results in broken collar bones. The author of this text was often saved by judo falls. Practising falling along with riding is a smart thing – falls will happen.
If a rider in front falls down, never focus on the fallen rider and/or the bike, focus the eyes on where to avoid them, then use countersteering to manoeuvre towards the “exit”. If a rider falls in a corner, they (and the bike) will most probably roll/slide towards the outer side of the corner – due to inertia. This should be kept in mind when overtaking too!
That sums it up. This is far from being all that can be said about cornering and riding fast, but the attempt was made to cover the basics and give the reader some “tools” to start practising and improving themselves. Keep calm, relaxed, concentrated, practise, practise, practise – and enjoy riding fast through corners – it is a blast! 🙂
Related post – Braking on long descends:

Last updated:
Originally published:
Where camber allows and for the same velocity and wheel path, would you find that putting the inner pedal at 6 o’clock position is the fastest and safest cornering technique? Centripetal force = mass x velocity squared divided by radius. Accordingly, if you’re hanging off the bike to put your mass towards the apex, doesn’t putting weight on the inner foot decrease the effective radius and thus the applied sideways force?
Hi Croser,
Hanging off on (road) motorcycles is done to reduce the needed lean angle (for a given speed and turn radius), in order to avoid the footpegs from stretching the road (and reducing the needed amount of lean angle in order to fight the centrifugal force at the given speed and turning radius).
It helps with that effectively – putting your body to the inside, as you’ve said. But it creates some problems as well. Control is easiest when your body is in line with the (motor)bike. Any weight not in line with the bike puts a certain side load, that can cause some unwanted steering “input” on bumps (road surface irregularities).
Some other problems with the bicycle hanging off cornering technique:
– If the bicycle has no suspension, any steering inputs caused by the rider’s weight being off centre will be more noticeable.
– Even with suspension, bicycles are very light. Hanging off means unloading the front wheel (unless one manages to keep the arms pushing down on the bars, without creating steering problems at the same time – I can’t do that). For motorcycles that have their own weight this is not a problem, it’s even preferable. For bicycles, this can result in the front wheel just sliding off because it has no load to keep it pressed against the pavement.
– On a bicycle, it’s difficult to unload the saddle while hanging off. Maybe, if using the inner pedal at 6 o’clock (haven’t tried that I must say).
Still, it beats the point: bicycles provide all the needed lean without the pedals hitting the ground. Unlike motorcycles. Just keep the outer pedal at 6 o’clock.
On very rough (very bumpy) roads, it helps keeping both pedals parallel, to use one’s knees, along with ankles as shock absorbers.
Either way, the reason why motorbike riders lean into turns is to “get” more clearance. And bicycles, unlike motorcycles, provide more than enough clearance. 🙂
Motorcycle riders not only lean for clearance, but also to keep the meat of the tires in a better position for both breaking and accelerating.
A cyclist does not really need to worry about the acceleration aspect as you won’t be pedaling while leaning off of a bicycle. However you may find better braking performance when standing up the bicycle a little to offer more of a contact patch when braking is required.
The outer pedal at 6o’clock and weighting the outer pedal also helps with keeping the bike balanced as the cyclist leans to the inside. You can use your inner thigh against the saddle as well to help control the bike with your lower body as you lean in with your upper body.
Thank you for the article as I came across this while trying to explain decreasing/constant/expanding radius corners as well as early and late apexing.
Thank you for taking the time to put it together as this is so often overlooked by many riders.