This post explains cantilever brake adjustment.
Table Of Contents (T.O.C.):
- Intro
- Cantilever brake geometry – basic terms
- Types of cantilever brakes
- Mechanical advantage of cantilever brakes
- Cantilever brake adjustment
4.1. Caliper angle adjustment
4.2. Adjustment of yoke angle
4.3. How does it all work in real life?
4.4. Correlation of adjustments
0. Intro
Cantilever brakes are unjustly considered to be poor brakes by many cyclists, compared to V-brakes for example. They do have their flaws, but low braking power is not one of those, it is mostly due to poor pad/rim material, and (more often) due to poor adjustment. Cantilever brakes allow the user to choose between stronger braking force, or shorter brake lever travel with weaker braking force. In short, these brakes have adjustable mechanical advantage, which is explained in this post:
Bicycle mechanical brakes – working principle.
1. Cantilever brake geometry – basic terms
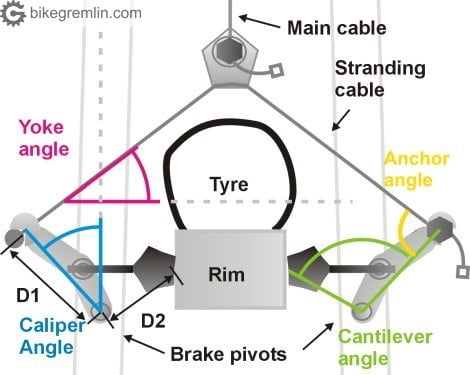
Picture 1
- Yoke angle: angle that stranding cable takes from horizontal.
- Caliper angle: angle that brake arm takes from vertical (line from pivot to cable anchor is taken for measurement), at the point when pad touches the rim.
- Cantilever angle: angle between the brake shoe – brake pivot line (D2) and the brake pivot – cable anchor point line (D1).
- Caliper length: ratio of D1 to D2 lengths (how much longer is the brake caliper arm compared to the distance of brake pad from the pivot).
- Anchor angle: angle that brake arm takes to the stranding cable, at the point when pad touches the rim.
2. Types of cantilever brakes
- Wide profile: cantilever angle is greater than 90 degrees. Obsolete standard. Has low mechanical advantage and requires brake levers with a high mechanical advantage.
- Medium profile: cantilever angle around 90 degrees. Most MTBs from late 80s and early 90s have such calipers.
- Low profile: cantilever angle below 90 degrees. The main advantage is these brake arms don’t stick out so much, so they don’t catch things (tree branches, or rider’s heels for the rear ones). If not set up properly, these brakes offer good firm feel on a work-stand, but low braking power – that’s why they require special attention when adjusting.
3. Mechanical advantage of cantilever brakes
Three factors affect mechanical advantage of a cantilever brake system:
- Brake levers. Lever mechanical advantage depends on the amount of cable pulled and the lever length (distance between the lever pivot and the place where rider pulls on the lever). It is usually around 3.5. For V-brake levers it is around 2.
- Ratio between caliper arm length and distance of the pad from anchor point (D1:D2). This mechanical advantage usually is between 1 and 2.
- Anchor angle – gives mechanical advantage when it is 90 degrees. The further away from that it gets, the less it contributes.
- The main effect on mechanical advantage, especially with low profile cantis, comes from adjusting stranding cable, which effectively alters the yoke angle. The smaller the yoke angle, the more mechanical advantage a brake has, but pads travel less for the same amount of brake lever movement.
The aggregate effect of all the noted factors determines the total mechanical advantage. First factor is determined by lever choice. Second is (mostly) determined by brake caliper choice. The rest can be altered by brake adjustment and this will be explained in the next chapter.
4. Cantilever brake adjustment
4.1. Caliper angle adjustment
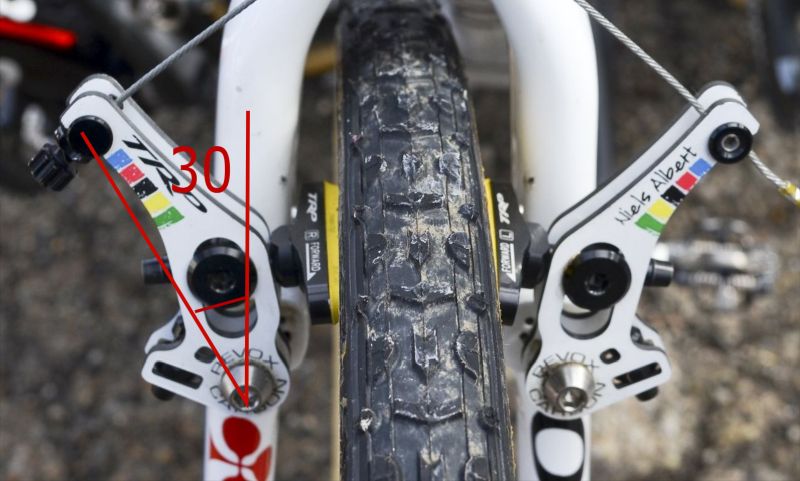
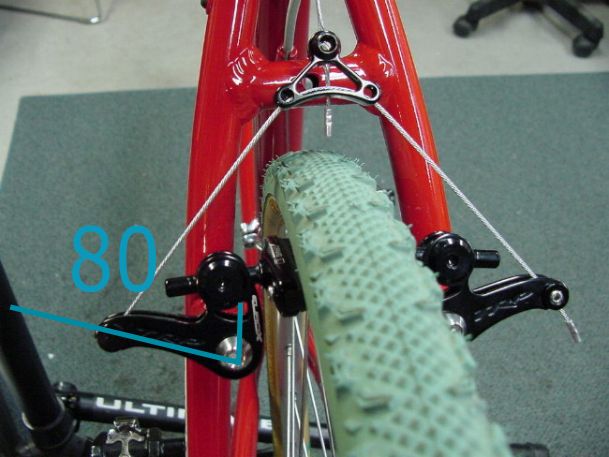
Caliper angle of 90 degrees gives the least mechanical advantage. As the angle narrows, mechanical advantage rises, but pads move less for the same brake lever travel. Up to a point when the advantage starts diminishing, along with decreased pad movement! To make this as close to 90 as possible, with narrow profile brakes the pads should stick towards the rim as much as possible, to make the cable anchors stick out as much as possible. Of course, pads mustn’t be too far from the rim, since the effective angle is the one at which pads touch the rim. It is the opposite for decreasing the angle – pads should stick out towards the rim as little as possible.
Available range of angles depends on caliper type, as shown in the pictures below.
4.2. Adjustment of yoke angle
The smaler the yoke angle, the greater mechanical advantage. However, yoke angle of zero would mean the cable passing through the wheel. So the minimal possible yoke angle is one that allows the straddling cable to clear the rim, tyre, mudguards etc.
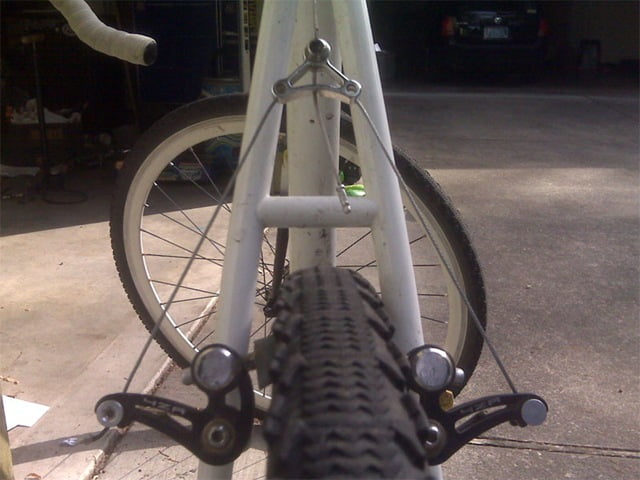
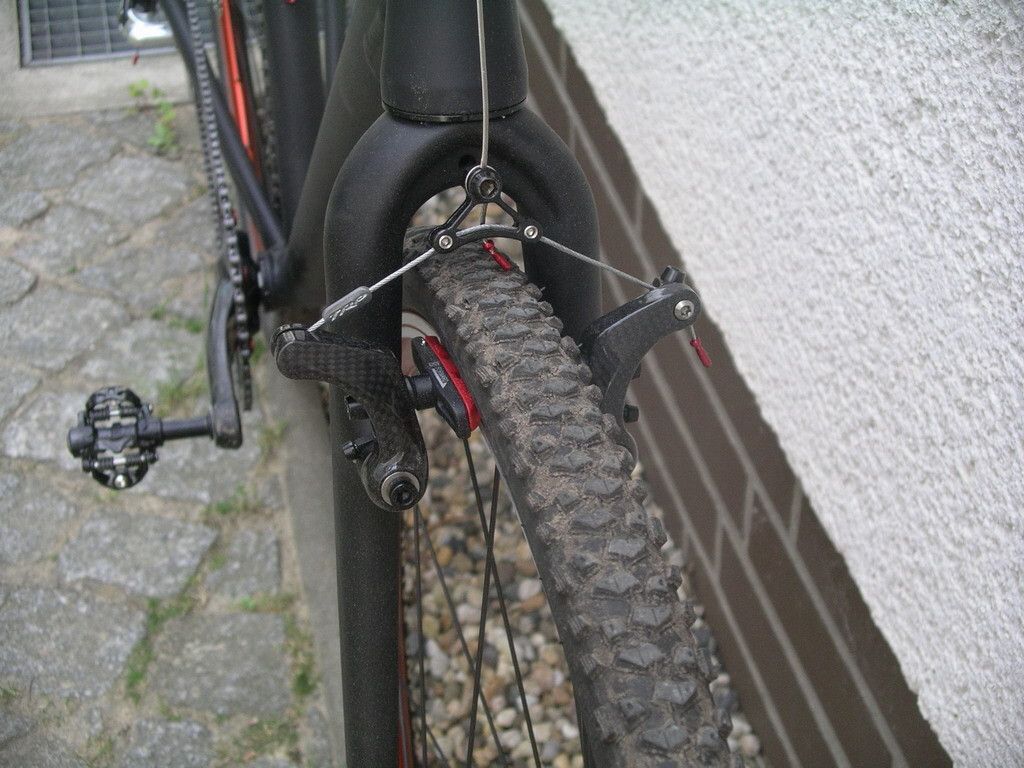
Yoke angle adjustment has the greatest impact on mechanical advantage of cantilever brakes. Overdoing this can cause problems. Too much mechanical advantage can lead to brake lever bottoming out against the handlebars, before any significant brake force is applied – levers have a limited range of motion. Likewise, too little mechanical advantage leads to weak brake force.
4.3. How does it all work in real life?
Brake pad distance can be adjusted on most cantilever models. Brake pad distance affects the cantilever angle, caliper angle and caliper length ratio. This is especially important for low profile brakes.
Cantilever angle is rather small with low profile brakes and as the pads wear down, the caliper angle diminishes more drastically, lowering mechanical advantage exponentially. That is why it is good to set low profile brake pads as close to the rim as possible, in order to make the caliper angle as large as possible and yoke angle as small as possible (without the cable rubbing the tyre). In addition, since these brakes have low mechanical advantage, lowering yoke angle will give optimal mechanical advantage – without making it too much (too much mechanical advantage would make the brake levers travel all the way to the bars, without pads reaching the rim).
For wide profile brakes, it is the other way round. Because of the caliper angle, low yoke angle can give too much mechanical advantage. That means too much brake lever travel before the pads even reach the rims. This should be considered when setting up these brakes.
Medium profile brakes are somewhere in between the two extremes.
4.4. Correlation of adjustments
Changing pad distance from the pivots (moving them closer, or further from the brake caliper arms) effectively changes both cantilever and caliper angle. This is the first thing that should be set up, according to the type (profile) of cantilever brakes used.
After the caliper angle has been set, yoke angle is adjusted by placing one stranding cable end in one side of the calipers, passing it over the hook that is attached on the main cable, then pinching it at the opposite side of the calipers, at the desired length (with models that allow for this adjustment, some have a fixed stranding cable length).
Shorter stranding cable will have a smaller yoke angle, and will require that the hook attached to the main cable be put lower (and longer main cable). Vice versa for longer stranding cable.
As a brake lever is pulled, harder for hard braking, several things happen:
- Pads start moving towards the rim.
- Calipers rotate towards the rim, making the caliper angle narrower.
- Yoke angle increases.
While the effect of greater yoke angle always decreases mechanical advantage, the effect of caliper angle change depends on particular achieved angle and angle change. This can be determined only when tested, feel on the stand can be deceiving. That is why cantilever setup takes some trial and error, and experience can help get it right in less time.
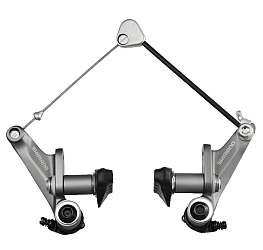
Shimano cantilever brakes of decent quality (clicking on the image below leads to the Amazon on-line shopping – as an Amazon Associate I earn from qualifying purchases):
Last updated:
Originally published:
The existing comments posted under this article (questions and answers) have been moved to this BikeGremlin forum thread:
https://www.bikegremlin.net/threads/cantilever-brake-adjustment-article-comments.144/

Hi Relja,
I,d love to know your opinión on my plan to update an old hard tail, steel frame mountain bike to reincarnate it as a “gravelish” tourer.
I would like to fir bigger wheels than 26″ but it has cantilever brakes and it seems that 27.5 conversion is as far as I can go. I have read that some cantilever brakes have enough up and down adjustability of the pads to allow for the bigger rim. The 27.5″ would be only 12 mm higher from tne brake pivots than tne 26″.
One cantilever model that is recommended for the 27.5 conversion is the Tektro 720 but after reading your thorough article I have some doubts.
First of all, it is a wide profile cantilever, that you describe as obsolete and poor on mechanical advantage.
Second, I fear that the fact that I have to move the pads as high up as possible, that is, further away from the pivot, will also diminish mechanical advantage and braking performance.
Do you think that this conversion is more trouble than what it’s worth? Do you know by any chance a more suitable cantilever model? Am I right in discarding the idea of Vbrakes? Partly because I prefer drop bars.
Thank you
As for mechanical advantage, it can be modified by altering yoke angle – so there’s no problem with that, at least not with “old-style” cantilever brakes (no “fixed size” stranding cable). So no need to worry about that – if the brakes are any decent ones (not no-name, flexible calipers).
About the wheels – what is the aim of 27.5″ wheels? What do you want to achieve? 26″ wheels with wide (and hence tall as well) good quality tyres will give strong wheels with comfortable and fast rolling.
28″ wheels (or 29″ as they’re marketed when such diameter wheels are placed on a MTB) do allow slightly lighter wheel (though less strong), but 27.5 is just extra expense for minimal gains in my opinion. So, perhaps a bit of a “Solomon solution”, but I’d recommend good quality tyres with the current 26″ wheels.
Well, I see your point, but current rims and hubs are worn. I have to replace the wheels any way. And I thought I might gain a a bit of diameter in the process, 25 mm exactly. Probably not worth it if you have decent 26″ wheels, but not my case. I like the way my 28″ bikes roll, 27.5 is as far as I can go because it is a 26″ frame with brake pivots.
I also think, bikes look nicer with bigger wheels, and ride better, I hope the difference is noticeable. 26″ may be doomed to,disappear. There are less and less options and many online shops don’t even sell them any more, many reputed brands stopped making 26″ models. This may be a poor argument, as 27.5 is not very widespread either.
In case you need new wheels anyway, things are different, didn’t understand that from the start. I’d still consider 26″ wheels, here’s my thinking:
They’ve been pronouncing the death of 26″ ever since 29ers first came out. But even today, factories make good quality tyres in that dimension as well. In fact, for touring, I’d opt for 26″ wheels since (at least in my part of the world) 26″ tyres are more widely available than 27.5″ and 26″ wheels are stronger (all else being equal).
My first choice would be 28″ wheels, but here that’s not an option. These do roll better. 27.5 is obviously like a “half step” up from 26, but not a very big difference. Even from aesthetic point of view, I’m not sure how nicer a bike designed for 26″ wheels would look with 27.5 – but the looks are 100% subjective, so no arguing there.
You probably could “get away” with 27.5 technically – provided the pads can be moved a bit higher (about 13 mm tops). If that’s the case, you need to weigh the pros and cons. 27.5 leaving less clearance for wider tyres on the frame, which can be a problem if you intend to use mudguards, or wider tyres, for example. Rim and tyre choice also play a role. If you need to change brakes, do currently available cantis (or V-brakes, if changing the levers as well) also have the “extra” 13 mm of pad movement.
Plus side being that 27.5 will roll better with a similarly wide tyre, compared to 26″ wheels.
Gearing is a non-issue with today’s available cassettes and triple chainring cranks in my opinion.
Whatever route you choose, it can be a fun project. Choosing/building new wheels, perhaps even going the dynamo hub route (for touring). 🙂 While I slightly “lean” towards the 26″ option (if it’s not obvious already), I really can’t say that either choice is outright, 100%, better – not in every aspect. It boils down to your preferences and priorities. So I can’t give you a straight answer “do this”. Most I can do is say what you probably know already: 26″ is more certain to work/fit.
About the death of 26″ wheels, they will always be around, there will always be a few niches left fir them, like smaller size bikes for children and small people.
But, if I go to good bike shops I don’t see any 26. You can have a look at tne catalogues of the big brands. Trek has three 26″ models whereas 27.5 go up to sixty something. And it is a matter of time untill 28″ is most common in every country. Most bikes are made in China an Taiwan, it is a highly globalised market and trends will spread everywhere.
It is true that a smaller wheel is always stronger, but I have read that today there are better quality materials, rims and spokes and 28″ can be made stronger than before. That’s why you can see wheels with 18, 12 a less spokes.
Geometry is not a problem, clearance, bottom bracket hight, etc. The bike I want to conver is a 1990 mountain bike. A 26″ rim with a 2.20″ tyre and a 27.5 rim with a 1.75″ tyre have an identical,external diameter. In reality I don’t gain much, I only compensate the loss of diameter when I fit smaller road/hybrid tyres.
I have to her new cantilevers with enough adjustability. Tektro cr720 are recommended for this conversion and there are more options, many made for the cyclocross market. My fear, and my original question, was that moving the pads to the far end, away from the pivots will di inish tne mechanical advantage. Cantilevers slteady have a bad name as the least powerful of all brake varieties, l don’t know it the bad name is really deserved. My fear was whether I can afford to loose mechanical advantage in a brake that is already suppose to be just about adecquate got a loaded touring bike,
Cheers
Mechanical losses from moving the pads upwards will be compensated by altering yoke angle. I wouldn’t worry about that too much.
You could also try v-brakes (would require changing the brake levers as well), provided they allow the pads to be moved high enough for the larger rim diameter.
Hi Relja, how do I consider extra wide yokes (50mm – http://www.sheldonbrown.com/images/yokewide.gif) when setting up the brakes? I want to use them on vintage Shimano 600 cantilevers which are a sort of medium to narrow profile. Thanks.
Just in case – to avoid any misunderstanding: as far as brake levers are concerned, any road, or cantilever brake levers are compatible. Regardless of the type of cantilever brakes used.
Concerning the brake calipers: the system is not digital (of course, as you have obviously noted in your comment – saying the calipers seem like “medium to narrow profile”), so there’s no cut in stone limit, like: “from this – to this width the brake calipers are medium profile”, or “from this to this angle the brake calipers are wide profile” etc.
The model shown in the picture, with the yoke cable setup shown in the picture, looks like a good starting point for setup. The brakes come closest to medium profile for all I can tell. I would start with a yoke angle at about 40 degrees and tune from there.
First testing for brake lever travel (making sure to take out any cable slack first of course by using adjustment barrel on the brake lever, or near the brake housing stops – if one is available/exist on the bike).
Then I’d make a controlled hard stop (in a safe environment) to test for the stopping power (i.e. the level of mechanical advantage). Of course, any increased mechanical advantage, gained by increasing the yoke angle, will result in longer lever travel – so it is a trade-off (I prefer shorter lever travel, with pads staying closer to the rim when brake levers are released, but my hands are rather strong AND I usually use only two fingers for the brake, so don’t like the lever pinching my two smaller fingers still left on the bars).
It is a bit of a trial and error. A bit more so than V-brake tuning, since with cantilevers, depending on the anchor cable length and angle, mechanical advantage changes, along with lever travel (while with V-brakes, it generally boils down to adjusting the desired lever travel and not much else). But once you get a desired setup for the given calipers, you can measure, take note and know how to easily and quickly do it the next time (yoke angle length and angle).
Not sure if this is of much help. Cantilever setup is nothing mysterious, nor completely guess work, but, at least in my experience, there is no getting around some trial and error for a “perfect setup” (according to one’s preferences). The info given in this post is, again, in my experience, a good starting point. Meant to keep trial and error hassle to a minimum.
In fact – this is more thinking out loud – it could be a good idea if people reading this and configuring their cantilevers, could send pictures of their setup (and lever and caliper model if available), yoke cable length and angle, along with their achieved brake lever travel (according to their preference) and feedback on the stopping power, rim clearance and brake lever travel.
Would take some figuring out, but surely in time I could assemble a searchable table depending on the caliper model – with the desired mechanical advantage/lever travel setup examples.
Great. Thanks a lot. The picture linked is just to show which yoke I mean. It is from Sheldon’s page.
My calipers are these: http://velobase.com/ViewComponent.aspx?ID=37540293-d654-4c28-aaf5-b303e3df43ed&Enum=117
But my question was regarding the special type of yoke and you gave me a very detailed reply which gives me a good direction to adjust the setup. so thanks again.
Cheers, Chris