In this article, I’ll explain which tools I use for building bicycle wheels, which ones have performed well, which wheelbuilding tools I consider to be more necessary – and which ones I could live without.
I’ll be posting links to on-line shops where the tools can be purchased, including Amazon affiliate links.
1. Introduction
On my websites, my YouTube channel and in person, I’ve provided a lot of help, tips and advice on various bicycle-mechanics related topics. People try things on their own, provide positive feedback and all is good. But – when it comes to building, or truing wheels, I often hear: “I do everything else, but wheelbuilding is complicated.”
Bicycle wheelbuilding is not mystical, or complicated. It requires patience and attention, but that’s all. Wheelbuilding instructions are so simple that I’m convinced a 14-year old child could follow them and build a good wheel (haven’t put this to the test yet).
For the instructions, you can see my article on bicycle wheelbuilding basics. There I explained all the important terms, and the whole process. The article has links to my other articles and videos showing particular procedures (measuring, calculating the optimal spoke lengths, lacing, truing etc.).
Or you could just buy this book for about 12 $. It’s the best one on this topic. I’m not selling it, and it’s not an affiliate link, I just think it really is exceptionally good and explains it all.
Now all you need are the right tools – which is the topic of this article. 🙂
2. Spoke keys / wrenches
Though they are in fact nipple keys, technically… 🙂
Spoke keys, or spoke wrenches, are the basic, and probably the only really necessary tool for building and truing wheels.
OK, in an emergency, this too can be improvised using a small adjustable wrench, but it holds the nipple on two sides only, and I’ll explain in this chapter why that is bad.
Best choice are keys that hold all the four sides of a nipple, which minimizes the risk of them being damaged (i.e. stripped, rounded off):
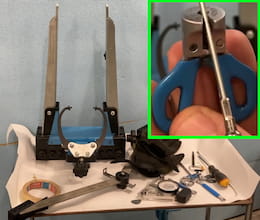
Picture 1
My favourite Unior 1630/2P (Amazon affiliate link) are shown in the picture. Such keys (made by whichever manufacturer) are fast and easy to work with, they hold stably onto a nipple (se the picture above), and pose minimal risk of nipple damage even when working with stuck nipples. I’ll explain the spoke-key sizes in the next chapter, but first let’s see what other basic models exist.
The other basic model are nipple wrenches that press on the nipple from two sides only. They are often advertised as “three-sided,” but effectively, only two sides are pressing on a nipple at any given time.
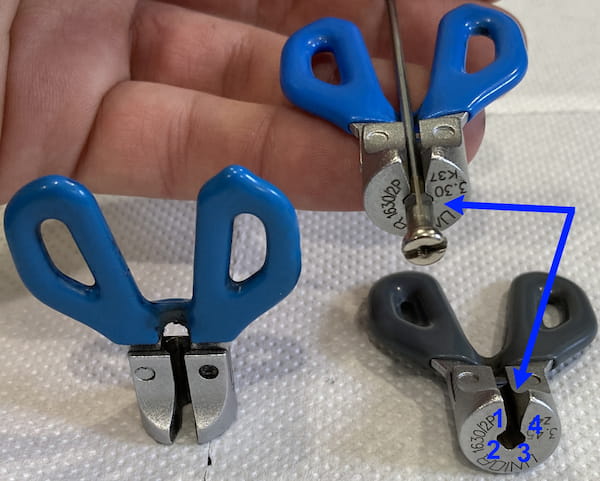
Picture 2
With tools like these, nipples are easily damaged – especially if you need to tighten spokes to a high tension, or if you are trying to unscrew stuck nipples. I don’t recommend these.
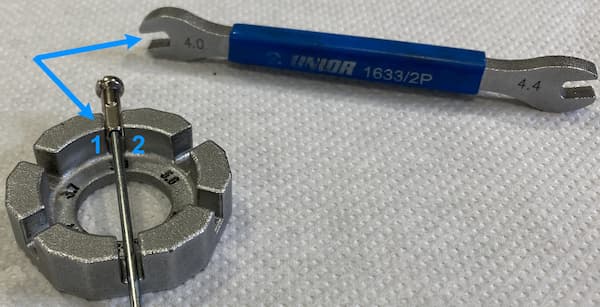
If you are working with some exotic nipples (and spokes), you’ll have to get the required keys for them. Picture 3 below shows some of those wrenches:
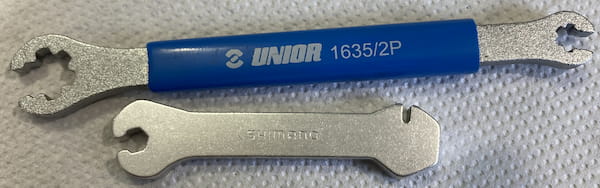
Picture 3
2.1. Spoke key / wrench sizes
There are many different sizes, even for the classic, four-sided nipples. Fortunately, in practice, you will fix 99.9% of the wheels with the following two spoke-key sizes:
- 3.3 mm – this is the most common size for DT Swiss, Sapim, and nipples of many other manufacturers.
DT Swiss classic nipples are 3.23 mm wide across flats. Many “nominally” 3.3 mm wrenches are actually designed to fit snugly over 3.23 mm flats without being too loose. - 3.45 mm – the second most common nipple diameter (at least in my experience).
Of course, if you already have a wheel, or nipples, it’s best to measure before buying, in order to get the right size wrench.
- Wrench that is too small just won’t fit a nipple.
- Using a wrench that is too large will easily damage a nipple, and then you’re in trouble (can’t tighten it, nor unscrew it).
Nipples can be measured using calipers, but I find it easier to just take the smallest wrench, and if it won’t fit, I try the one size larger – until I find the smallest wrench size that fits.
3. Truing stand
This tool makes wheelbuilding faster and easier, but it’s not absolutely necessary. Your bicycle frame is also a good truing stand.
You could just put a zip-tie on the frame, near the rim, perhaps even cut it to size so the end protrudes just as much as you need. Rotate the zip tie to get it closer-further (unless you cut it too short). I’ve used this method successfully.
Of course, it’s easier with a truing stand:
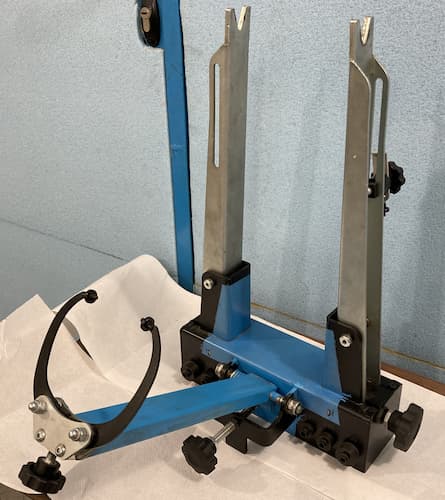
Picture 4
The picture shows my favourite truing stand, Unior, model 1689 (Amazon affiliate link). Can you use a cheaper one? Sure, just check if it’s too flimsy – at least I hate when a stand twists and moves while I’m tightening spokes. My experience with cheap, poor quality tools is that you later still have to buy better ones – that’s why I do that right away.
4. Nipple insertion tool
Modern double walled rims require a tool for inserting nipples when lacing a wheel. I’ll show three models of tools for this, and say a few words about each:
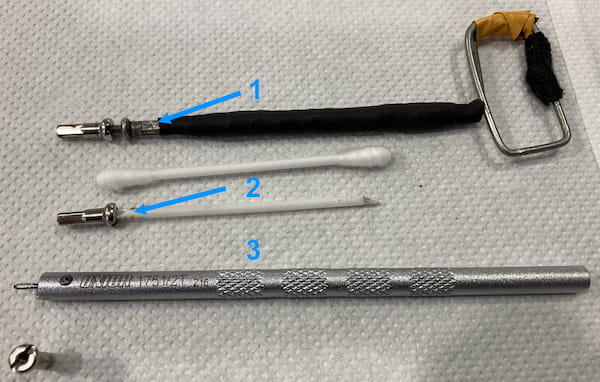
Picture 5
- Marked with number 1 in the picture is my hand-made tool. I took a spoke, screwed a nipple onto it so that the spoke protrudes by some 3 mm out of the nipple. Then I pinched the nipple in place with some wire-cutters. I also bent the spoke to form a handle, and put some tape over it for easier holding. This tool holds the nipple securely, but is a bit slow in use.
- Number 2 is an ear stick, cut at an angle near the end, so a nipple can be stuck onto it. It doesn’t hold the nipples too stably, but it does the job.
- Number 3 is the special tool for this job, Unior model 1751/2T (Amazon affiliate link). I find this one most convenient to use, but the others can do the job.
5. Nipple driver
Once you’ve laced the wheel, putting all the nipples at the ends of all the spokes, it helps a lot if every nipple is screwed to exactly the same amount. This is where my favourite hand-made tool comes in. Here’s the picture:
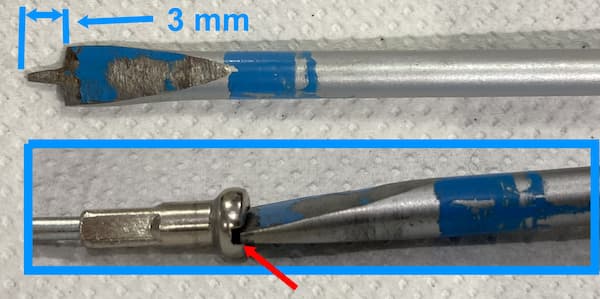
Picture 6
I took a cheap Chinese flat-bladed screwdriver, 6 mm size, and ground the sides to make a tip that is about 3 mm long, and about 1 mm wide.
How do I use this? I keep a nipple slightly pressed on the side, with a finger, so it doesn’t turn too freely – and I start screwing it in with this tool. At exactly the same point, the “modified screwdriver” cams out, as its tip gets pushed out by the spoke.
This way I start with a wheel that is reasonably true. I read about this “trick” in Roger Musson’s book “Professional Guide to Wheel Building.”
6. Masking paper tape
When you are working, a phone might ring, you might get interrupted, or you might just want to mark a spoke that is too tight, or too loose. Have some masking tape ready.
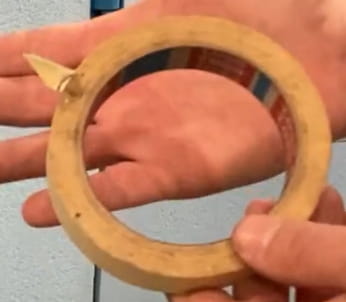
Picture 7
7. Wheel dishing gauge
Dishing gauge is the tool used to measure if the rim is centered between the hub ends (see rim dish trueness). Here’s what it looks like:
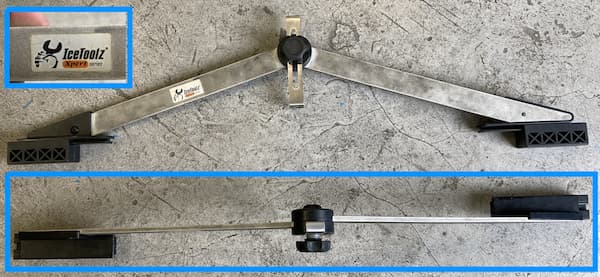
Picture 8
I use IceToolz dishing gauge (Amazon affiliate link). You can make this tool by yourself, easily. If you are using your bicycle’s frame as a truing stand, it will show any dish offset. Finally, you could just flip the wheel in your truing stand to check if the rim is more to one side – though this method is not very precise – I very much prefer using a proper tool for this.
8. Tensiometer
It is very important to achieve uniform, and optimal spoke tension. Tensiometer helps with this.
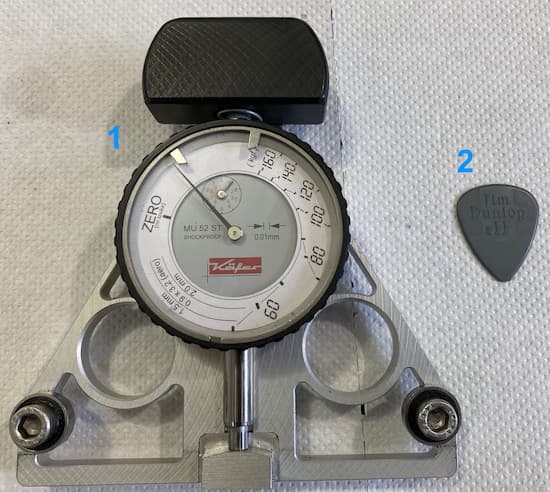
Picture 9
Marked with number 1 is Jobst Brandt’s open patent, built by Filip Kralyevski (link to his YouTube channel for contact).
Note: In January 2024 I paid Filip for a new tensiometer and got it in January 2025.
Wheel Fanatyk also makes them (their web-shop link). This is the most precise tensiometer model.
Other tensiometer models, made by DT Swiss, Park Tool, Unior and the likes – are all inherently imprecise, due to a poor design (they all have a friction pivot, with no bearings between the instrument, and the spoke).
Cheaper alternative is using a guitar pluck. Tighter spokes will make a higher-pitch sound, just like guitar strings. This way you can achieve a uniform spoke tension. However – you can’t measure the tension value using a guitar pluck, to see if it’s optimal. Uniform tension is of no use, if all the spokes are equally too loose, or too tight.
OK, you could use a phone-app to record the resonant frequency, then calculate the tension, knowing the spoke thickness, length, and the fact it’s made of stainless steeel. This method hasn’t worked very precisely for me, but you might have better luck.
There is a way around this problem. Not extremely precise, but good enough, at least in my experience. Simply squeeze the parallel spokes of some well built wheels – to get the sense of what the optimal tension feels like. Then aim for that – using the guitar pluck to confirm your spoke tension is uniform, and your fingers to feel if it’s the optimal tension.
9. Leather gloves
When stress relieving the spokes, one must strongly squeeze parallel spoke pairs (I’ve demonstrated and explained the procedure in the video below). Good, thick gloves help protect your palms, and tendons.
Video presentation of bicycle wheelbuilding tools:

Last updated:
Originally published: