This post explains what bicycle chainline is. Why is it important? How is it measured? How to set a “correct” chainline?
If you have any questions (or additions and corrections), please use the BikeGremlin forum:
www.bikegremlin.net
Table Of Contents (T.O.C.):
- What is a bicycle chainline?
- Why is bicycle chainline important?
- How to measure bicycle chainline
3.1. Measuring front chainline
3.2. Measuring rear chainline
…..3.2.1. Offset frame rear chainline - How to set a correct chainline?
4.1. Front chainline adjustment
…..4.1.1 Chainline for 1x drivetrains
4.2. Rear chainline adjustment - Deliberate imperfections
- Apendix – axle lengths for BBs with axles
6.1. Square taper axle length video - VIDEO about the chainline (shown and explained)
- Chainline table
8.1. Why is 1x chainline wider than 2x or 3x chainlines?
TL/DR
For your bike to run well (with good shifting, less chain noise, and longer lasting drivetrain), it is important for your front chainring(s) to be in line with your rear chainring(s).
This article explains how to measure if they are in line, and how to fix any imperfections (and improvise if needed).
1. What is a bicycle chainline?
Definition is: distance between the middle of chainring(s set/s) and the longitudal axis of the bicycle. It is explained in plain English in this post. 🙂
Middle of the front chainring and middle of the rear sprocket should be at the same distance from the axis that goes along the middle of the bicycle frame from the front to the back. That means the chain will run completely straight from the front to the rear. For bicycles with more speeds, definition is the same, only measurement is taken as middle of the sets of chainrings and sprockets. Picture explains it better:
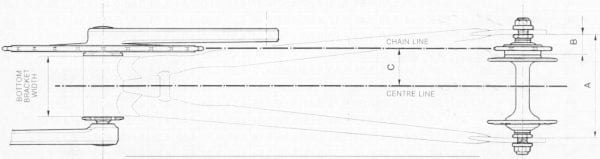
Front and rear sprocket are at the same distance from the longitudinal axis of the bicycle. The chain runs perfectly straight, parallel to the longitudinal axis of the bicycle.
Picture 1
When measuring, the middle of the rear sprocket set is taken as a reference, aligned with the middle of the front chainring set.
Picture 2
Help BikeGremlin
stay online & independent
This website is educational, free, objective, and not commercial
(sponsors don’t enjoy paying if you mention all the product downsides that you notice 🙂 ).
How much does a WordPress website cost?
If you find this site to be good and helpful,
and if $5 per month is what you can afford to set aside,
please consider supporting my work with a Patreon donation:
2. Why is bicycle chainline important?
For single speed bicycles (one chainring at the front and at the back) the answer is more obvious: the straighter the chain, the longer it will take for it to wear out, the less mechanical losses it creates when pedaling and the harder it will drop off the chainrings.
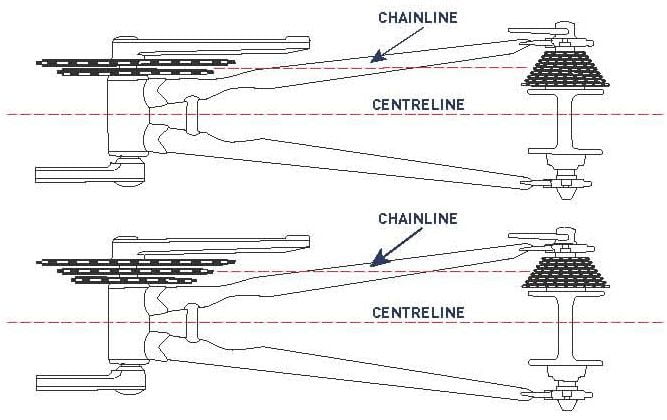
For multi speed bicycles (more sprockets), the answer is a bit more complicated. If the middle of front chainrings is not aligned with the middle of the rear sprocket set, then in some gear combinations, the chain will be too crossed. Picture below explains it better:
Picture 3
Upper half of the picture number 3: middle of the sprocket set is aligned with the middle of the front chainring. That way, in either gear combination, the chain is not at a great angle (green lines).
Lower half: front chainring is too far out compared to the middle of the sprocket set. That means that in top gear (blue line), the chain is almost straight. However, in lowest gear (red line), the chain runs at a sharp angle – bringing more wear and tear to both the chain and the sprockets, more noise and less mechanical efficiency of the whole system.
For double chainring set – the middle between the two front chainrings should be aligned with the middle of the sprocket set. For triples – middle chainring is aligned with the middle of the sprocket set. This is shown in the picture 2.
3. How to measure bicycle chainline
3.1. Measuring front chainline
It can be measured simply with a ruler:
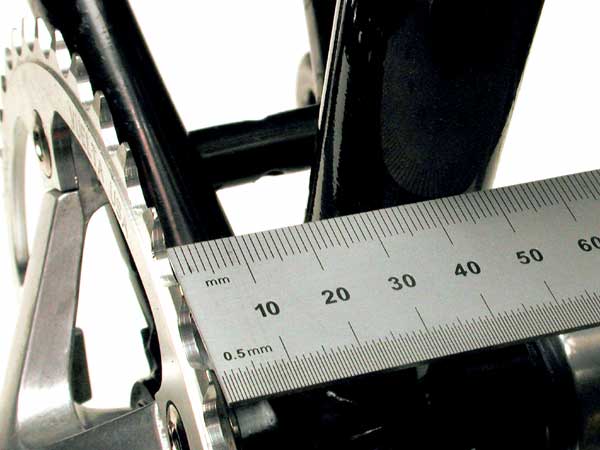
Picture 4
Technically more precise measurement is taken this way:
- measure the diameter of the seat post and the width of the front chainring (set) with vernier calipers. “Set” means the total width of the two, or three chainrings if the crankset is a double, or a triple one.
- measuring distance from the seatpost to the end of the largest chainring.
- add half of the seatpost width to the measured distance, and then deduct half of the chainring (set) width. That’s the front chainline.
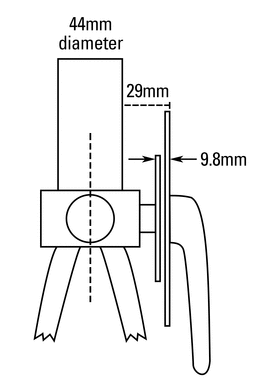
44 / 2
+ 29
– (9.8 / 2)
Picture 5
For the example in picture 5, the chainline would be:
44 / 2 + 29 – (9.8 /2) =
= 22 + 29 – 4.9 = 46.1 mm
3.2. Measuring rear chainline
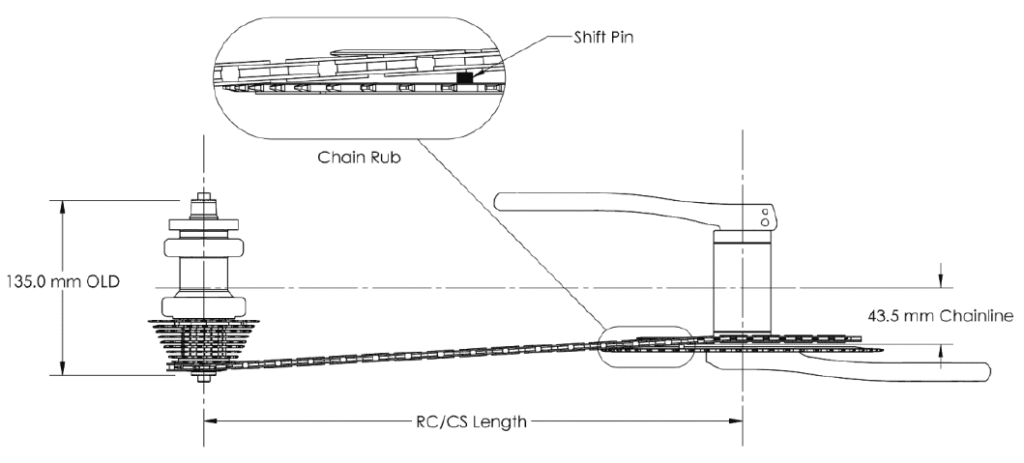
Measure the width of the rear hub. OLD (over locknut distance).
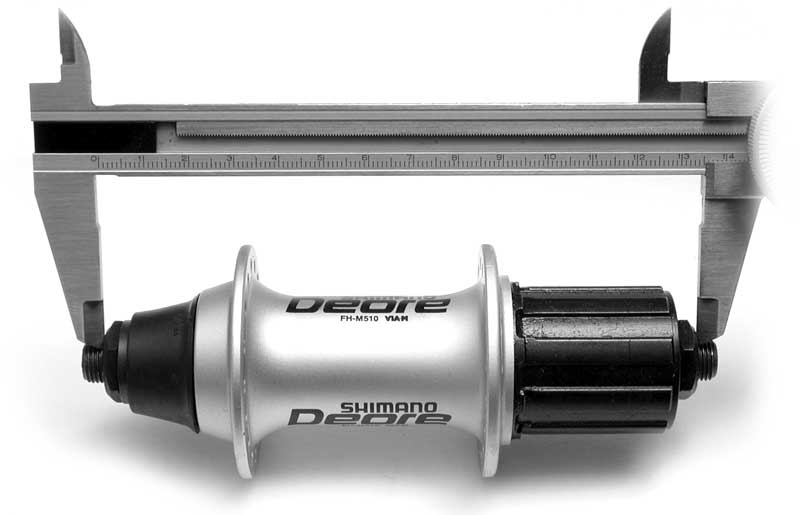
Picture 6
The whole axle is not measured, just the inner locknuts that hold the hub bearings in place. For solid axles – outer nuts that hold the wheel in place are disregarded. Only the part of the hub that sits against the inner part of the rear dropouts is measured.
Most modern rear MTB hubs are 135 mm wide (OLD), most road ones 130 mm, while older road hubs are 126 mm. Ancient road and newer single speed hubs are usually 110 to 120 mm wide.
With help of a picture, the procedure is more easily explained:
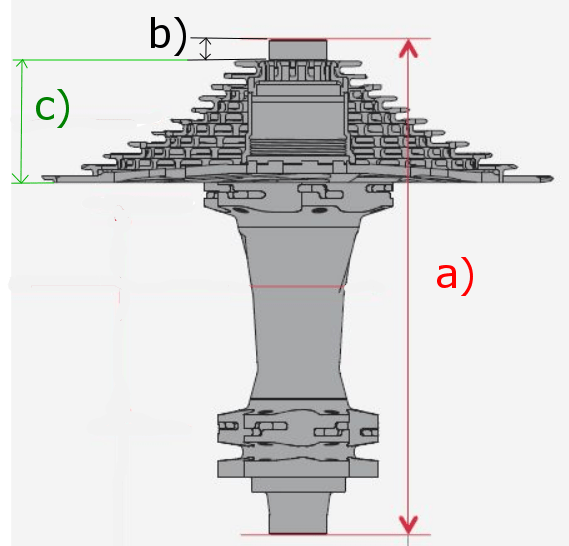
Picture 7
- First measure a), like explained in the text above
- Then measure b) – from the hub locknut, to the begining of the smallest sprocket. Measure to the face of the sprocket itself, not to the locknut holding the sprockets in place.
- Finally measure c) – from the beginning of the smallest, to the end of the largest sprocket
Rear chainline = (a / 2 ) – ( (c / 2) + b)
For example: if a = 135 mm. b=4 mm. c = 35.4
Chainline = (135 / 2) – ( (35.4 / 2) + 4)
= 67.5 – ( 17.7 + 4)
= 67.5 – 21.7
= 45.8 mm
3.2.1. Measuring offset frame rear chainline
For an offset frame, simply add the frame’s offset to the rear chainline you measured and calculated using the procedure explained in the previous section (section 3.2).
Offset frame manufacturers usually provide information about how much the frame is offset (usually expressed in millimetres). It is very difficult to manually measure a frame’s offset accurately.
4. How to set a correct chainline?
By setting a correct chainline it is meant to set front and rear sprockets so that their middles are in line, like shown in pictures 1 and 2. Literally: front chainline (measurement explained in paragraph 3.1.) and rear chainline (3.2.) should be the same.
When doing that, rear sprockets are usually taken as a fixed position, with front chainring position set to match them. That case is first explained under 4.1.
4.1. Front chainline adjustment
- For single chainring crankset, where chainring is bolted to the spider holding it, the chainring can be moved outwards with adding spacers between the chainring and the spider, then bolting it. To move the chainring inwards, it can be mounted on the inner side of the spider, with fine adjustment made using spacers, as shown in picture 8:

Picture 8
- With triple cranksets, smallest, or largest chainring can be removed, or front derailleur set so it never moves onto one of them, effectively altering the chainline according to needs.
- A spacer can be added between the right bottom bracket cup and the frame, in order to move chainrings outward.
- Longer, or shorter axle (spindle) can be used with square taper and Octalink bottom brackets to move the chainrings outward, or inward. When using shorter axle, make sure that crank arms aren’t too close to the frame so they don’t hit the rear chainstay when turning.
- Replacing crankset for one with more outward, or inward placed chainrings.
It is important to bear in mind the type of chainrings (crankset) used. This goes especially for square taper cranks. On an axle of the same width, some will stick further outwards, while others may be positioned more inwards, towards the frame. This plays an important role when choosing a correct BB axle length. Some crankset manufacturers publish required axle lengths for desired chainlines, while with others it’s more trial and error.
4.1.1. Chainline for 1x drivetrains
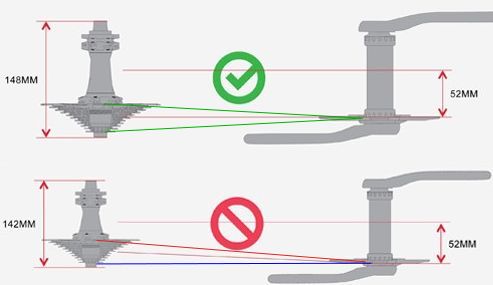
With 1x drivetrains, it is optimal to have the front chainline be about 2 mm larger (more outwards) compared to the rear chainline.
This helps avoid chain scratching against the adjacent larger sprocket when it’s past the middle of the cassette – on the smaller sprockets (1x cranks are often paired with cassettes that have huge sprockets and large differences in adjacent sprocket size).
4.2. Rear chainline adjustment
Adjusting the rear chainline is done by rearranging the rear axle spacers.
- Spacers from the left side are placed on the right, to make the sprockets move inward.
- Spacers from the right are moved to the left side to make the sprockets move outward.
It is important to note that this affects:
- Room left for rear sprockets – they might start rubbing the frame if too many spacers are removed from the right side.
- Disc brake alignment – make sure disc brake calipers can be moved laterally enough to match the sprocket rearrangement. If a spacer is added to the left side, disc brake calipers must be moved inwards. If a spacer is removed from the left side, calipers must be moved outwards.
- Rim alignment – rim will no longer sit in the middle of the frame, and must be re-dished. If a spacer is added to the left side, left hand side spokes must be tensioned to move the rim back into the middle. If a spacer is added to the right side, right hand side spokes must be tensioned to center the rim.
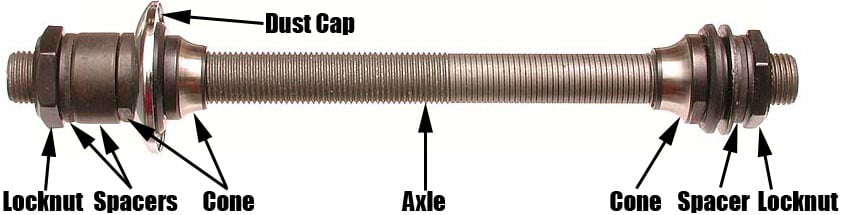
There must be one cone and one locknut at each side, while spacers can be moved.
Picture 9
It can be also combined by discarding a wide spacer and replacing it with a narrower one from some old axle, then placing a third, narrower spacer on the opposite side to keep the total used spacer width the same.
Setting correct chainline using the rear hub is a complicated task that is not recommended, unless it’s not possible to get a satisfactory chainline by adjusting the front chainrings. It’s often better to leave a less than perfect chainline, than to mess with the rear hub spacers.
5. Deliberate imperfections
I do most of my riding from the largest front chainring. That’s why I like to have my chainrings more to the inward, than it is perfect. That way, the chain is a bit more crossed when using smallest chainring, but where I do most of my riding, on the big chainring, the chain is straighter than it would be if I had set the correct chainline.
The rule of thumb and a safe bet is to set the chainline correct, but if one is certain what they are doing, they can play with imperfect chainlines. Of course, diverting from perfect chainline has its drawbacks and consequences, like shown in picture 10:
Picture 10
Important note: when experimenting with imperfect front chainlines, for bicycles with front derailleurs (FDs), it is important to make sure the FD can reach all the chainrings. If they are moved too much outwards, FD might not reach far out enough to shift to the largest chainring, and vice-versa – if moving chainrings too much inward, FD might not be able to move in enough to shift to the smallest chainring.
Also, make sure that right and left-hand side crank distance from the frame is not greatly different, since that could affect ride comfort (having one foot moved substantially more towards the outside, compared to the other foot).
6. Apendix – axle lengths for BBs with axles
Axle measurements for BBs with axle (square taper and Octalink are the most widely used ones) are noted in picture 11:
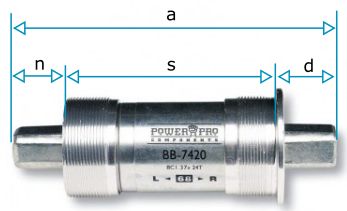
d) Drive side (chainrings side) length
s) Width inside the frame’s BB shell
n) Non-drive (left) side length
Picture 11
Measurement d) is always taken from the inside of the flange that aligns with the outer side of the frame’s BB shell. The drive side is always screwed all the way in, until the flange stops at the BB shell wall.
Table 1 shows measurements of some existing cartridge BB models:
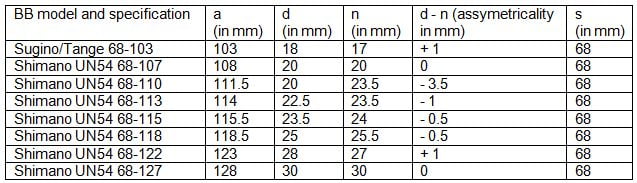
Some typical measurements.
As a guide to what to measure and look for.
a) Axle length
d) Drive side (chainrings side) length
s) Width inside the frame’s BB shell
n) Non-drive (left) side length
Table 1
For Shimano square taper cartridge bottom brackets combined with Shimano cranks, optimal axle lengths are usually (not always, it’s best to mount and measure):
- 110 mm for single chainring cranks (single-speed and 1x).
For example, a 110 axle will result in a 46 mm front chainline; 113 will give you 48 mm; and 117 will give a 50 mm front chainline. - 110 to 113 mm for double chainring cranks.
- 122.5 (122 ~ 123) mm for MTB triple cranks.
Sometimes, depending on the rear chainline, a 117 mm axle length can fit better.
Shimano often notes on a paper inside the package of their (square taper and Octalink) cranks which BB model (and axle length) gives which chainline with that particular crank. Without this, it’s often a trial and error, with various axle lengths.
6.1. Square taper axle length video
My video explaining how to find an optimal square taper BB axle length:

7. VIDEO about the chainline (shown and explained)
A video where I’ve explained the chainline and shown how to measure the front and the rear chainline:
8. Chainline table
A BikeGremlin forum chainline question inspired me to finally make this chainline table. The table (well, list, technically) should help you get the ballpark values when buying new components or planning bike builds.
- Single speed & fixie: 40.5 (old bikes with 110 mm dropouts) to 42 mm (newer SS bikes with 120 mm rear dropout widht)
- Road double: 43.5 mm
- Road triple: 45 mm
- MTB triple: 47.5 to 50 mm
- 1x for 135 mm QR or 142 mm thru-axle rear dropouts, and BOOST 148 mm frames: 52 mm
- 1x for BOOST 148 mm rear dropout width, for more wide tyre clearance: 55 mm
- 1x Super-BOOST 157 mm frames: 56.5 mm
- Tandem bicycles: 60 mm
- Fatbikes with 170 mm rear dropout spacing: 66 mm
- Fatbikes with 190 mm rear dropout spacing (and 4.8″ wide tyres): 76 mm
- Rohloff geared hubs chainline (link to the official website).
8.1. Why is 1x chainline wider than 2x or 3x chainlines?
The front chainline is how far out the mid-section of all the chainrings is from the bicycle’s centre-line. I’ll re-post the picture 2:
When measuring, the middle of the rear sprocket set is taken as a reference, aligned with the middle of the front chainring set.
Picture 2 – again 🙂
With double and triple cranks, chainrings are spaced at about 5 mm from each other (perhaps about 6 mm on 7 and 8 speed cranks). So:
- With triple cranks, when the middle chainring is at 50 mm, the outer (largest) as at 55 mm, and the inner (smallest) at 45 mm.
- With double cranks, when the chainline is 52 mm (that is the mid section between the two chainrings on a double), the inner chainring is about 2.5 mm inward at 49.5 mm, and the outer chainring is 2.5 mm outward, at 54.5 mm.
Now, for the 1x cranks, there is no chainline adjustment via shifting (shifting to the smaller front chainring when using the inner, larger cassette sprockets, and shifting to the larger chainring when using the outer, smaller cassette sprockets). So, 1x is a compromise, and you get a pretty awkward (bad) chain angle when using either largest two or smallest two cassette sprockets.
Another peculiarity is that 1x systems are usually paired with pretty large cassettes (40+ teeth on the largest sprocket) to provide both low and high enough gearing with only one front chainring. This results in chain rubbing against the largest rear sprocket when on the second largest rear sprocket if the front chainring doesn’t sit far enough out.
That is why 1x drivetrains usually use a bit larger (wider) chainline for their only chainring (~ 52 mm), instead of aiming for the 50 mm.
Is it bad for the chain and chainrings when climbing on the largest rear sprocket and putting out a lot of torque? Yes it is. Increased component wear (and cost of the huge cassettes) is a downside of 1x drivetrains (1x drivetrain pros and cons). That is why people invented front derailleurs and multiple front chainrings over half a century ago.
Having said that, modern chains are quite flexible sideways, so they can take that without breaking. Just increased cost and wear. That’s good for sales. Cyclists, on the other hand, are happy for not having to figure out how to shift gears with multiple front chainrings, while the extra cost is not that problematic for many.
The cynic in me says the whole modern 1x (as 1x did exist decades ago before it got replaced with doubles and triples) was started by the marketing team of the company that just couldn’t make a decent front derailleur, and was desperate to gain an edge over Shimano, but nonetheless, 1x took off, people like it, it is modern, trendy, and is here to stay (until companies “re-invent” the good old triple when they go looking for something new, and not compatible with the existing stuff 🙂 ).
Related post – Approach to bicycle servicing:

If you have any questions (or additions and corrections), please use the BikeGremlin forum:
www.bikegremlin.net
The existing comments posted under this article (questions and answers) have been moved to this BikeGremlin forum thread:
https://www.bikegremlin.net/threads/bicycle-chainline-article-comments.125/
With a 130 OLN rear and a 9 speed cassette I found my chainline to be 41mm. That’s where I set up my triple chainring -middle on 41. But I can’t find a front mech that will allow this. Does anyone make one? Is my 9 speed in 130 SO unusual? What do I do??
Hi Rik,
130 mm OLD rear hubs are often seen on road bikes.
As far as the front chainline goes, the only problem to worry about is whether the FD can move close enough to the frame (inwards) to shift to the smallest front chainring.
If buying new, I’d get a matching triple front derailleur depending on the type of shifters, and give it a go.
Especially if the shifters are road-bike shifters.
Relja
Exactly. Can anyone tell me of one that comes to 41mm? “Giving it a go” is ridiculously expensive if the majority are for wider chain lines.
What kind of shifters are you using?
I don’t think that you’ll find a manufacturer’s prospect that says a FD is designed for a 41 mm chainline.
But you can measure how close your smallest front chainring is to the frame, then find a FD that can move close enough inward to shift to it.
It’s usually enough to have the middle of the FD cage move by up to 3 mm closer inwards, compared to the position of the smallest front chainring.
Road FDs are often designed for smaller front chainlines. So if you have road shifters, it’s more likely that the FD will work.
But, again, I don’t know of any model that has it printed in the manual that it can work with a 41 mm chainline.
So, the way I’d do it, is go to a bike shop, nicely ask for a Shimano Sora triple FD, place it on my frame, loosen the low limit screw, and eyeball if it moves closer than the middle of the smallest front chainring.
Or do the same thing with a Shimano Acera FD if my shifters are MTB.
Or find a friend with a triple road, or MTB FD and ask if I can loosen the shifter cable, unwind the low limit screw, and measure how close to the frame’s centerline does the inner (or the outer, whichever is easier to measure) FD plate move, measure the cage width (to know where the FD cage centre-line is), then see if that would work on my bike, for my front chainrings, depending on how far the smallest front chainring is from the frame.
Many of these FDs are rather tightly packaged and no shop is likely to let me take it out, fiddle with it and then say it doesn’t fit and give it them back. Finding friends with triples is inhibited currently by coved restrictions. So I thought I’d just ask you. As you say 130 back end with a shimano 9 in it is not outlandish. Check with yours if you will that the middle sprocket comes 24mm in and when taken away from half of 130 you get 41. If you just throw any FD on and work with that you’re decreasing efficiency and increasing noise and wear. Surely I can’t be the only person who ever tried to get this right. Someone out there may know the answer? The truth is out there!
A derailleur is tuned and has some extra left-right movement that is limited using the low and high limit screws.
It’s not 100% set for one particular distance of the chainrings.
The range is not unlimited, but it’s not too limited either.
I don’t have any road bikes with triples at the moment (only doubles), but I will measure how close my MTB FD comes to the bike’s horizontal centreline (regardless of the tube thickness, measuring from the tube’s end, then subtracting half the seat tube thickness).
For what it’s worth: my Shimano LX triple FD can move as close as 39.5 mm.
That is: the distance between the middle of the FD cage, and the frame’s horizontal centre-line (middle of the seat tube).
So I don’t suppose it would shift nicely to the smallest chainring of a triple that has its middle chainring spaced at 41 mm.
I’ll measure this with a road bike triple FD, as soon as one comes along. Expecting those to be able to move closer to the frame (and less far out).
“The derailleur is tuned and has some – – – -” Relja. Which make and model of FD are you referring to?
Thanks for the correction. 🙂
I’ve edited the reply.
Hi everybody, I have a road bike 2×7 speed that uses Shimano A070 cranks model. The original square taper bottom brackets length is 125mm, and this result in a chain line of 56.5 mm. Much longer than suggested in Shimano A070 crank manual (43.5 mm). The original bracket is a 3 part type and I want to change for a sealed one. The question is: which length BB model use?