This post will explain bicycle bottom bracket standards. It is the first in the series of posts on the subject, explaining basic terms, then each standard. Most threaded standards are explained, while a separate post explains press-fit (threadless) bottom brackets. The last post will address BB and crankset compatibility and interchangeability.
Table Of Contents (T.O.C.):
- What is a bottom bracket bearing?
- History
- Standards of frame BB shell threading
- Attaching crank arms to the axle – emergence of cartridge bearings
(square taper)
Digression – JIS vs ISO square taper profile - Outbound bearings – return to the right crank arm and axle made in one piece
(Hollowtech II) - Abstract
1. What is a bottom bracket bearing?
Bottom bracket bearing will in the remainder of the text be called “BB”.
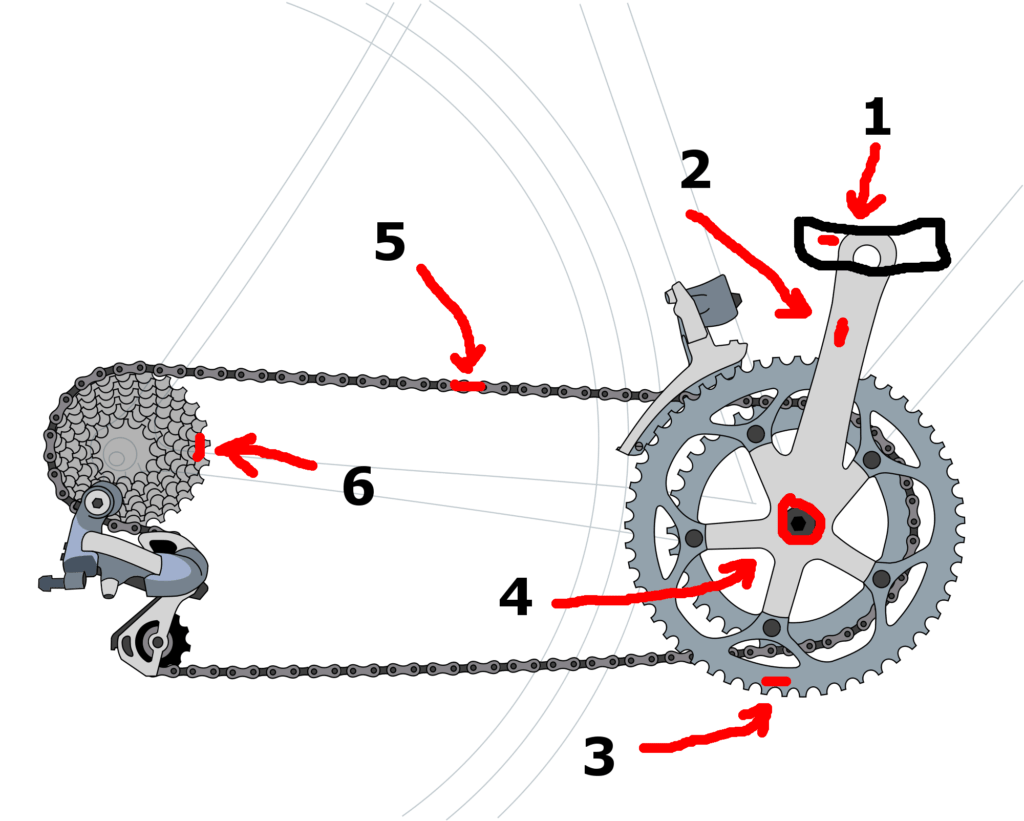
Look at the picture below. Bicycle is usually propelled by turning pedals (1), that are attached to cranks (2), attached to a front chainring (3). The front chainring then pulls the chain (5), which is connected to the rear sprocket(s) (6), who then turn the rear wheel. In order for the cranks to spin, they need a rotating bearing and an axle (4). That part, bearing and the axle, are the subject of this post.
2. History
First cranksets were simple mechanisms – one crank arm was holding chainrings and was cast in one piece with the axle – then the other crank arm was fixed to it with a rivet. Commonly used old Thompson bottom bracket standard (link to a Wikipedia page):
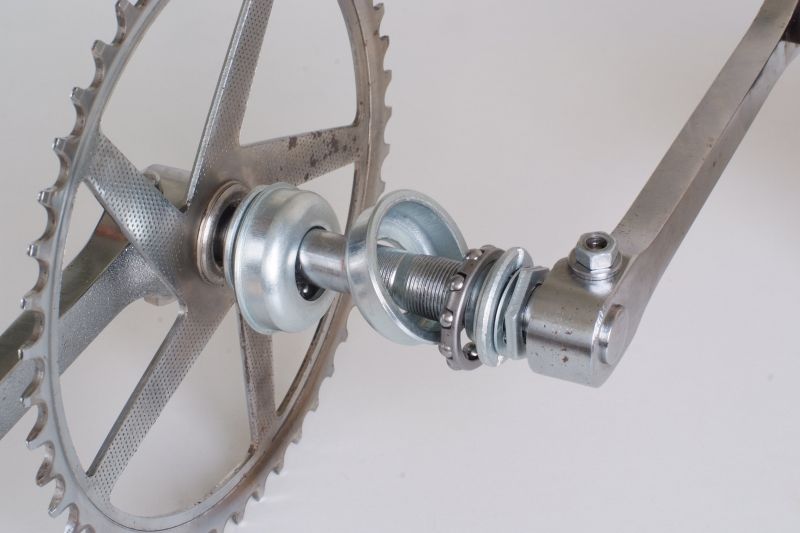
Along with it’s bearings slid onto the axle that is one piece with the right crank arm (holding the chainring as well).
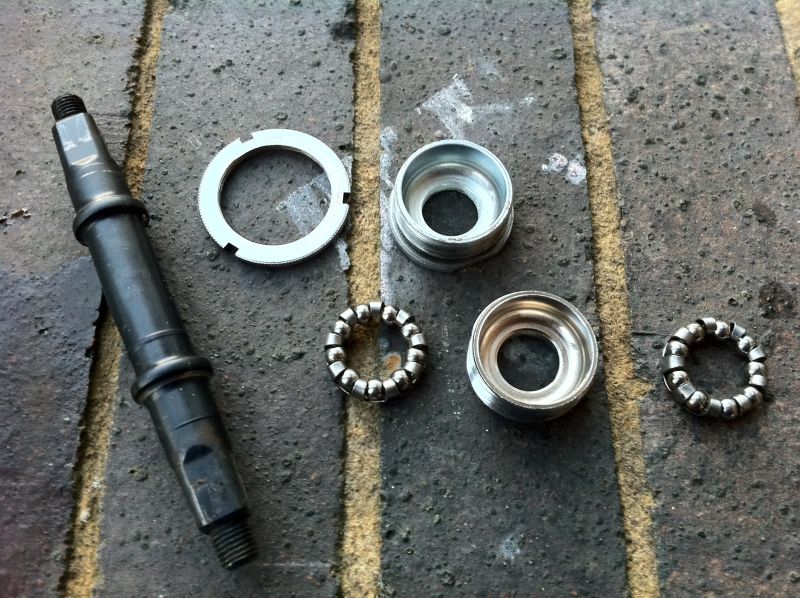
All that was needed was to fix the bearings to the frame. This was done with a system of cones and cups, holding ball bearings. Preload of the bearings was adjusted with a lockring. For cups to be held in place, BB shell of the frame was threaded, to screw the cups in. There were several standards of BB shell threading.
3. Standards of frame BB shell threading
| Standard | Thread dimensions | cup outer diameter | frame shell width | frame shell inner diameter |
|---|---|---|---|---|
| British, or BSA | 1.37 in x 24 TPI | 34.6-34.9 mm Right cup has left hand side threading | 68 mm, 73 mm Oversize, 83 mm for DH i FR bikes, 100 mm for Fat Bikes | 33.6-33.9 mm |
| Italian | 36 mm x 24 TPI | 35.6-35.9 mm Both shells have right hand side threading | 70 mm | 34.6-34.9 mm |
| French | 35 mm x 1 mm | 34.6-34.9 mm Both shells have right hand side threading | 68 mm | 33.6-33.9 mm |
| Swiss(exotic) | 35 mm x 1 mm | 34.6-34.9 mm Right cup has left hand side threading | 68 mm | 33.6-33.9 mm |
| Whitworth (Raleigh 3-speed + most Raleigh road frames except Super Course) | 1-3/8 in x 26 TPI | 34.6-34.9 mm Right cup has left hand side threading | 71 mm, 76 mm | 33.6-33.9 mm |
Some exotic standards that are extremely rare, only on some vintage bicycles were left out.
British standard (also called ISO, BSA, or English) is the overwhelming current standard, most bikes with threaded BBs are made to that one.
The other, still being used is Italian. It’s biggest flaw is right hand side threading on the right hand side cone. The result of this is that right cup needs to be tightened really hard and even some thread locker used to prevent it from unscrewing during riding. Tribute to fine Italian (and French) engineering. 🙂
My article explaining left and right hand(ed) threads.
4. Attaching crank arms to the axle – emergence of cartridge bearings
(square taper)
Ideal crankset should have as little weight as possible, with as stiff axle as possible. Manufacturers first started making separate axles, fixing crank arms to them via a square taper interface. Soon they realized that lower weight along with less need for maintenance can be achieved with making a cartridge BB bracket – as one unit that holds both the axle and the bearings – that is just screwed into frame’s BB shell.
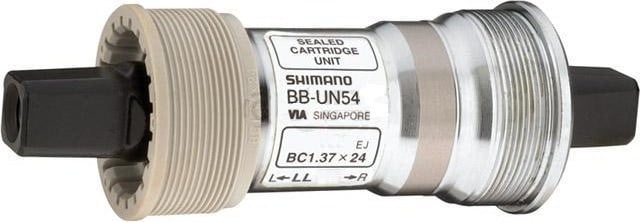
Cartridge bottom bracket with square taper interface (right)
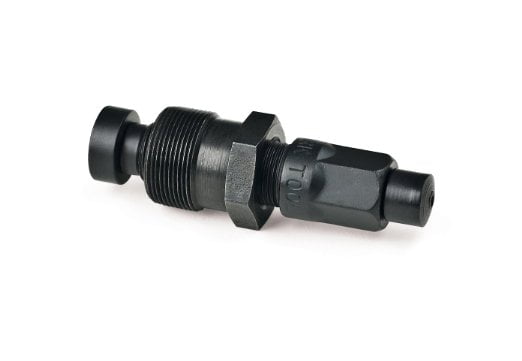
Square taper attachment system is based on preload and elastic deformation of the cranks – axle slightly widens towards the middle, while crank arms have openings that match the axle diameter. Bolts are used to pull the crank arms onto the axle, then they are locked in place by the tight fit with lots of preload. It takes a special crank arm puller tool to pull the cranks off:
Square taper spindle (axle) diameter is about 16 mm. Separate axles remained in square taper mounting standard, while newer standards came exclusively in cartridge system.
Digression – JIS vs ISO square taper profile
There are two standards for the square taper axles (spindles): JIS, and ISO. Taper’ angle is practically identical (about 2 degrees). They differ by the taper (wedge) starting diameter. JIS starts a bit wider, so cranks designed for a JIS axle will slide too high (too deep) on an ISO axle. ISO cranks, on the other hand, will not slide far enough if mounted on a JIS axle (they will stop about 3 mm further out compared to mounting them on an ISO axle).
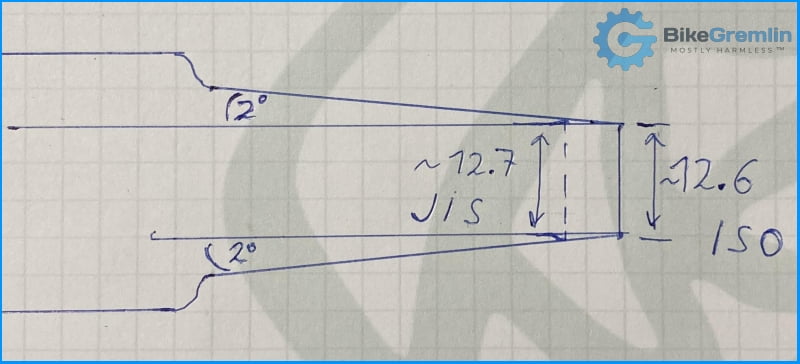
– JIS is basically like ISO with the first couple of millimetres cut off from the spindle (the narrowest end cut off)
- Japanese manufacturers, like Shimano, make JIS standard cranks and square taper axles.
- European manufacturers, like Campagnolo, Mavic, and Miche make ISO standard.
- Many others, like Sugino, FSA and Phil Wood, make cranks and axles according to both standards.
Further changes of crank-axle interface by Shimano resulted in Octalik 1, then Octalik 2 standard. It made mounting crank arms easy, just sliding them onto splines. Removal is also easier, just unscrew a bolt holding the crank arms and pull them off by hand (well, OK, in practice they often do get stuck… when they don’t fall off – explaining the reasons would require a separate article). That is also the main flaw of this system – bolts tend to loosen because of slight play in the cranks and they can fall off (with damage to the attachment interface). Octalink 2 has deeper splines than Octalink 1, but share the bolt loosening problem.
Also, axle was made thicker, 22 mm spindle diameter, with thinner walls – which made it both stiffer and lighter. Bearing balls diameter had to be smaller, to provide for thicker axle inside the same shell size, but because the cartridge is packed inside the shell, protected from dirt and water, it didn’t make bearings last much shorter than square taper ones. At least the Octalink ones.
Manufacturers who didn’t want to pay for Shimano’s patent joined and made “International Splined Interface Standard”, shortened ISIS (didn’t sound so bad back then 🙂 ).
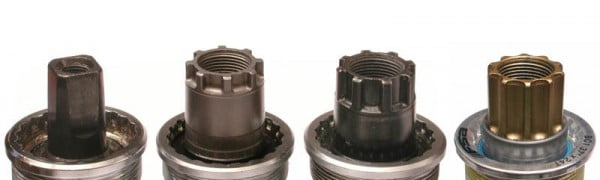
Square taper, Octalink 1, Octalink 2, ISIS
All these cartridge bearings are usually made for both British and Italian frame shell threading standards.
5. Outbound bearings – return to the right crank arm and axle made in one piece
(Hollowtech II)
The wider a tube diameter, the higher strength and stiffness can be achieved with lower weight. However, when it comes to BB axles, frame BB shell was the limit. Diminishing of bearing ball size was exhausted with Octalink and ISIS standards – further size decrease would mean bad rolling and very short bearing lifetime. Shimano rose to the challenge by placing bearings outside, so that cartridges with bearing cups are screwed in from both sides, while bearings are sitting outside the BB shell.
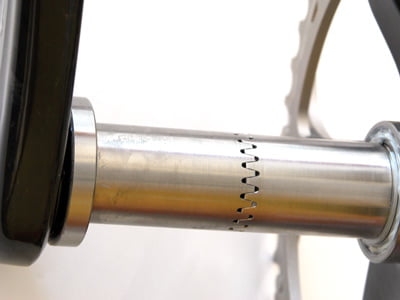
Spindle diameter was raised to 24 mm. Right crank arm held the wider, hollow axle, that went through the BB, onto which the left crank arm was attached. Just like some 30 years ago, only lighter, stiffer… better? That was the birth of the Hollowtech II standard.
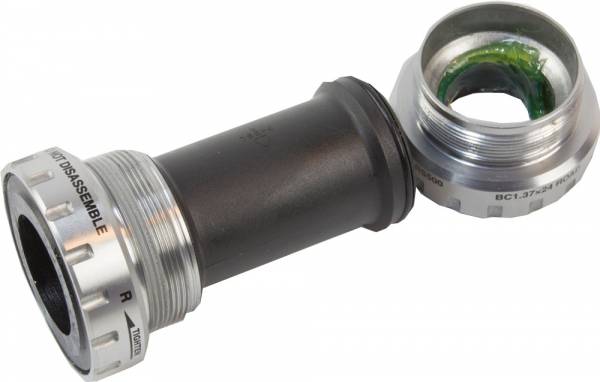

Hollowtech 2 cranks – rigth crank arm carries the (hollow) axle as well (right)
Other manufacturers joined in, so there became: Race Face X-type, FSA MegaEXO, and Truvativ/SRAM’s Giga X Pipe (GXP). Campagnolo was the only one to make a two piece axle, with their Campagnolo Ultra Torque standard (requires special tools to mount and remove, and is rather tricky to work on).
Standards with external threaded bearings and hollow axles are still compatible with British and Italian BB shell threading standards (available for both standards). Their biggest advantage turned out to be a flaw as well: bearings mounted on the outside are exposed to water and dirt, so quite soon they develop a characteristic irritating creaking. Bearings can last some time with the creaking, but their lifetime is less than half of what square taper and Octalink ones last.
6. Abstract
- Threaded frame BB shell: current standards are British (ISO) and Italian. Shell diameter is about 34 mm. Shell width is usually 68 mm for road and 73 mm for MTB frames.
- Cartridge bearings: introduction brings long lifetime without maintenance – just replacement. Easier installation and removal (no lockrings).
- Square taper: spindle (axle) diameter about 16 mm. Cheap, long lasting. Heavier, less stiff, harder mounting and removal of crank arms. Determining appropriate axle length takes some (simple) calculations – chainline measurement.
- Octalink 1, Octalink 2, ISIS: quite long lasting, lighter and stiffer than square taper, still rather cheap, easier mounting and removal of crank arms. Tendency of cranks to fall off.
- Hollowtech II, X-type, MegaEXO, Giga X Pipe (GXP): spindle (axle) diameter 24 mm. Lighter and stiffer than Octalink. Shorter lifetime and a bit more expensive.
Later standards were made without threading and with different frame BB shell diameter. These standards are explained in this article:
Threadless, press fit bottom brackets
New standard of a threaded BB is explained in this post:
T47 – a new threaded BB standard
The existing comments posted under this article (questions and answers) have been moved to this BikeGremlin forum thread:
https://www.bikegremlin.net/threads/threaded-bbs-bottom-brackets-01-article-comments.148/
if your not sure how many loose bearings were in a wheel or crank i just fill up the whole space then remove one bearing sometimes two bearings but usually removing just one does the trick also dont over tighten on loose bearings as they will also run rough and grind away
Hey Relja
You’re explanations are super clear as always !
I was wondering if you explain somewhere the differente lenght of the square taper axles. I would like to buy one but there is a wide variety of size around… 107 to 127mm… Which one for what ? Is it important ?
Also in the end are JIS, and ISO completely compatible ? Should I take care of that when I mount old cranckset on various bikes or it doesn’t really matter ?
I was amazed to realized that your website is now big enough so I need to use the research function. Nice job !
Thx for your answers !
Christophe
Hi Christophe,
My latest YouTube video is titled “What length square taper axle do I need?” and I think it answers most of your questions (to the best of my ability).
Yes, the website is growing. Over the last year, I’ve concentrated more on the IT-related articles, but I’m slowly working on some more cycling-related ones. 🙂